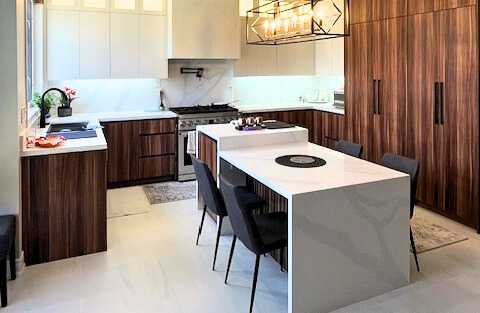

Welcome to the project diary for one of our favourite transformations from early last year. Nestled in a beautiful Mississauga neighbourhood, this home had great bones but a kitchen that felt disconnected from the family’s modern lifestyle. They envisioned a space that was both a culinary powerhouse and a warm, inviting hub. Our mission was to create a sophisticated dark wood linear grain U-shape kitchen with a multilevel sintered stone center island, a design that would anchor their open-concept living area with style and unparalleled function.
Project Quick Facts
- Project: Full Kitchen Demolition & Renovation
- Location: Mississauga, ON
- Category: Modern Kitchen Design
- Key Features: Custom dark wood linear grain cabinetry, U-shape layout, multilevel sintered stone island with waterfall edge, integrated panel-ready appliances, heated porcelain tile flooring.
- Duration: 4 weeks
- Project Start: March 2023
Design Vision
During our initial consultations, the homeowners expressed a desire for a kitchen that felt both dramatic and welcoming. They loved the richness of dark wood but were concerned it might make the space feel heavy or dated. This is where the concept of a “linear grain” became the cornerstone of our design. Unlike a traditional wood grain, a linear or “rift-cut” pattern provides a clean, vertical texture that draws the eye upward, creating a sense of height and contemporary elegance. It delivers the warmth of wood without the visual weight.
The U-shape layout was a natural choice for this space. It’s a classic for a reason: it creates an incredibly efficient work triangle, keeping the refrigerator, cooktop, and sink within easy reach. This ergonomic design minimizes steps and maximizes productivity, whether you’re preparing a multi-course meal or just a quick breakfast.
The true showpiece, however, was the island. The clients wanted more than just a prep surface; they needed a multi-functional centerpiece for their busy family life. Our solution was a stunning multilevel island crafted from sintered stone. The higher tier, at standard counter height, is dedicated to food preparation and houses a sleek induction cooktop. The lower tier drops to table height, creating a comfortable, built-in dining area perfect for casual meals, morning coffee, or a place for the kids to do their homework while still being part of the kitchen’s buzz. This split-level design not only adds immense functionality but also creates a dynamic architectural feature in the heart of the home.
Materials & Specifications
Achieving this level of refined simplicity requires a meticulous selection of materials. Every finish was chosen for its beauty, durability, and ability to contribute to a cohesive whole.
-
Cabinetry: We specified custom-built, full-overlay cabinets to create a seamless, monolithic look. The doors and panels are finished in a dark wood veneer with a pronounced vertical linear grain. To ensure longevity, the finish is a commercial-grade matte polyurethane, which resists fingerprints and is easy to clean. All drawers are equipped with soft-close hardware for a touch of quiet luxury.
-
Countertops & Island: The star material is a premium sintered stone in a soft white with subtle grey veining, reminiscent of Calacatta marble. Sintered stone is an engineering marvel—a composite of natural minerals compressed under immense heat and pressure. The result is a surface that is virtually non-porous, making it resistant to stains, bacteria, scratches, and even extreme heat. We used it for the main countertops, a full-height backsplash behind the cooktop, and the dramatic multilevel island, which features a waterfall edge on one end for a flawless finish.
-
Backsplash: To complement the feature wall behind the cooktop, the remaining backsplash areas feature large-format, matte porcelain tiles in a light concrete grey. The larger tiles mean fewer grout lines, contributing to the clean, uncluttered aesthetic.
-
Appliances: To maintain the sleek design, the homeowners opted for a suite of high-end, panel-ready appliances. The refrigerator and dishwasher are completely concealed behind custom cabinetry panels, allowing the beauty of the dark wood to flow uninterrupted. A state-of-the-art induction cooktop is flush-mounted into the island, and a built-in wall oven and microwave tower provides ergonomic cooking convenience.
-
Flooring: The floor is grounded with large-format (24”x48”) porcelain tiles in a light grey that mimics the look of polished concrete. Beneath them, we installed a programmable in-floor heating system—a touch of comfort that makes a world of difference on chilly Ontario mornings.
-
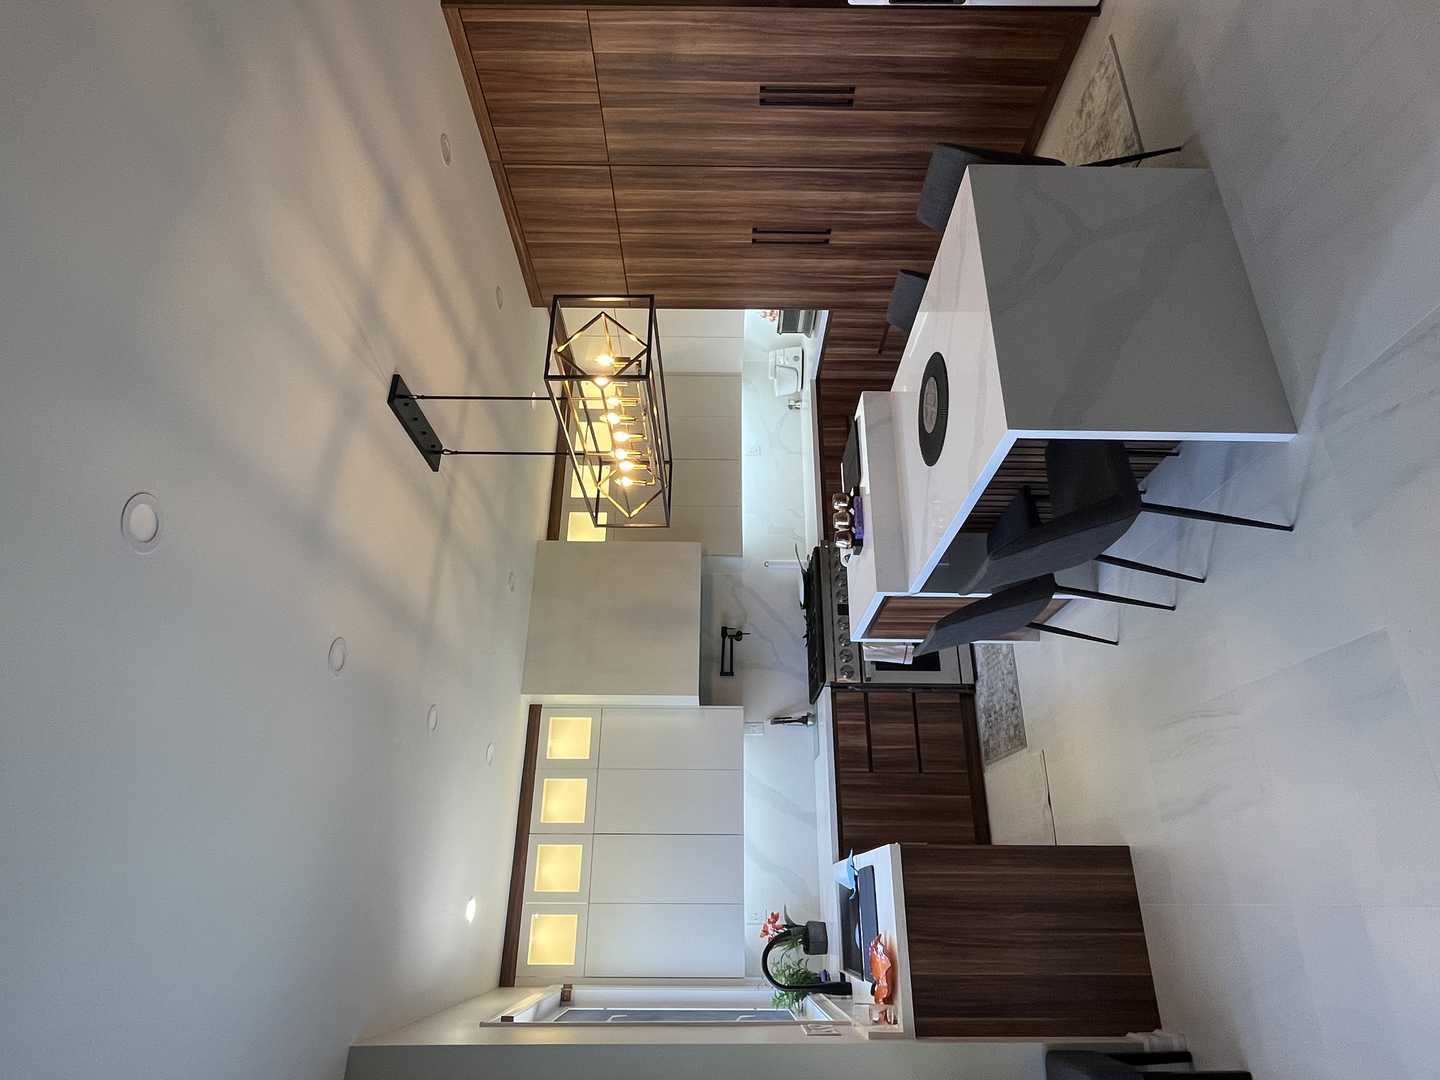
Lighting: A layered lighting strategy was essential. General illumination is provided by slim, energy-efficient LED pot lights. Task lighting is handled by continuous LED strips tucked discreetly under the upper cabinets, casting an even, shadow-free light across the countertops. Finally, two minimalist black pendant lights hang above the island’s dining area, defining the space and adding a touch of ambient warmth. All electrical work, from new dedicated circuits for the appliances to dimmer switches, was completed by our licensed electrician in full compliance with the Ontario Electrical Safety Code.
Process & Timeline
A renovation of this scale is a carefully choreographed dance of trades and timelines. While every project has its unique rhythm, the phases of transformation follow a proven path.
Phase 1: The Blank Canvas The first step is always demolition. We carefully dismantled and removed the old kitchen, taking the room back to the studs. This allows us to inspect the underlying structure and prepare for the new electrical and plumbing layouts. Protective coverings were laid down to ensure the rest of the home remained clean and undisturbed.
Phase 2: The Foundation With the space open, our licensed trades got to work on the rough-ins. The electrician mapped out and ran new wiring for the repositioned appliances, island power, pot lights, and under-cabinet lighting, ensuring everything met or exceeded current code requirements. Simultaneously, our plumber adjusted the water supply and drain lines for the new sink and dishwasher location.
Phase 3: Taking Shape Once inspections were passed, the room began to come back to life. New drywall was installed, taped, and mudded to a perfect Level 5 finish. After priming and the first coat of paint, the heated flooring system was laid, followed by the large-format porcelain tiles. The arrival and installation of the custom cabinetry was a major milestone—seeing the dark wood U-shape take its final form was a truly exciting day on site.
Phase 4: The Crowning Glory With the cabinets in place, a specialized team came in to create a precise digital template for the sintered stone countertops. This ensures a perfect, seamless fit. A few days later, the massive, beautiful slabs arrived and were expertly installed. The multilevel island, with its intricate cuts and waterfall edge, was carefully pieced together. This is the moment the kitchen truly starts to feel like the finished vision.
Phase 5: The Finishing Touches The final phase is all about details. The backsplash tiles were meticulously set, the appliances were installed and calibrated, and the panel fronts were perfectly aligned. The plumber returned to install the sleek undermount sink and faucet, while the electrician completed the final hookups for all the light fixtures, switches, and outlets. After a final coat of paint and a thorough professional cleaning, the kitchen was ready for its grand reveal.
The Final Look
The result is a breathtaking transformation. The kitchen is a study in contrasts: the deep, warm tones of the linear grain wood are perfectly balanced by the bright, airy feel of the white sintered stone and light grey floors. The U-shape layout feels spacious yet intimate, a highly functional workspace that wraps around you.
The integrated appliances create a clean, uncluttered look that elevates the entire space, making it feel more like custom furniture than a utility room. Light from the large window reflects off the subtle sheen of the countertops, while the layered lighting system allows the homeowners to change the mood from bright and functional to soft and intimate at the touch of a button. The multilevel island is the undeniable heart of the room—a place for cooking, dining, connecting, and creating memories. It’s a kitchen built not just for a house, but for a home.
Design Takeaways
This Mississauga kitchen renovation offers several key insights for anyone planning their own project:
- Don’t Be Afraid of Dark Tones: When balanced with light surfaces and good lighting, dark cabinetry can create a sophisticated and cozy atmosphere. A linear grain is the perfect modern twist.
- Make Your Island Work Harder: Consider a multilevel or multi-zone island to cater to different activities. It can dramatically increase the functionality of your kitchen.
- Invest in Integrated Appliances: For a high-end, seamless look, panel-ready appliances are worth the investment. They allow your cabinetry design to be the star.
- Prioritize Professional Installation: Materials like large-format tile and sintered stone require specialized tools and expertise to install correctly. Professional installation ensures a flawless, lasting finish.
Maintenance Tips
To keep this stunning kitchen looking its best for years to come, we provided the homeowners with a few simple care guidelines:
- Sintered Stone: Clean spills promptly with a soft cloth and a pH-neutral cleaner. While incredibly durable, always use a cutting board to protect your knives and the surface. It is heat-proof, but using trivets for hot pots is still a good habit.
- Linear Grain Cabinetry: Wipe down with a slightly damp microfiber cloth, moving in the direction of the grain. For tougher spots, use a mild, non-abrasive cleaner. Avoid harsh chemicals or excessive moisture.
- Induction Cooktop: Clean the glass surface after it has cooled using a cleaner specifically designed for glass/ceramic cooktops and a soft cloth or non-scratch pad.
Frequently Asked Questions
1. What are the main benefits of a U-shape kitchen layout for a home in Mississauga? A U-shape layout is fantastic for both open-concept and enclosed kitchens in the GTA. It maximizes counter and storage space along three walls and creates a very safe and efficient work zone by keeping traffic out of the main prep area. It’s an ergonomic dream for anyone who loves to cook.
2. Is sintered stone a good choice for a busy family kitchen? Absolutely. Sintered stone is one of the most durable and low-maintenance countertop materials on the market. It’s non-porous, so it won’t harbour bacteria or absorb stains from things like wine or juice. Its high resistance to scratches and heat makes it ideal for a high-use environment with kids.
3. Did a kitchen renovation of this scope require permits in Mississauga? Yes. Any renovation that involves altering plumbing or electrical systems requires permits from the city. This is non-negotiable for ensuring the safety and compliance of the work. As part of our service, we manage the entire permit application and inspection process to ensure everything is built to the latest Ontario Building Code standards.
4. Why choose custom cabinetry instead of pre-fabricated options? Custom cabinetry, like the dark wood linear grain units in this project, allows for total design freedom and perfect utilization of space. We can build cabinets to any width or height, incorporate custom storage solutions, and ensure a flawless fit and finish that you simply can’t achieve with stock sizes.
This project was a joy to bring to life, resulting in a space that is as beautiful as it is functional. If this Mississauga kitchen transformation has inspired you, we’d love to help you envision the possibilities for your own home. Contact us for a free quote and let’s start the conversation about your dream renovation.