A Timeless Transformation: The Mississauga L-Shaped Kitchen
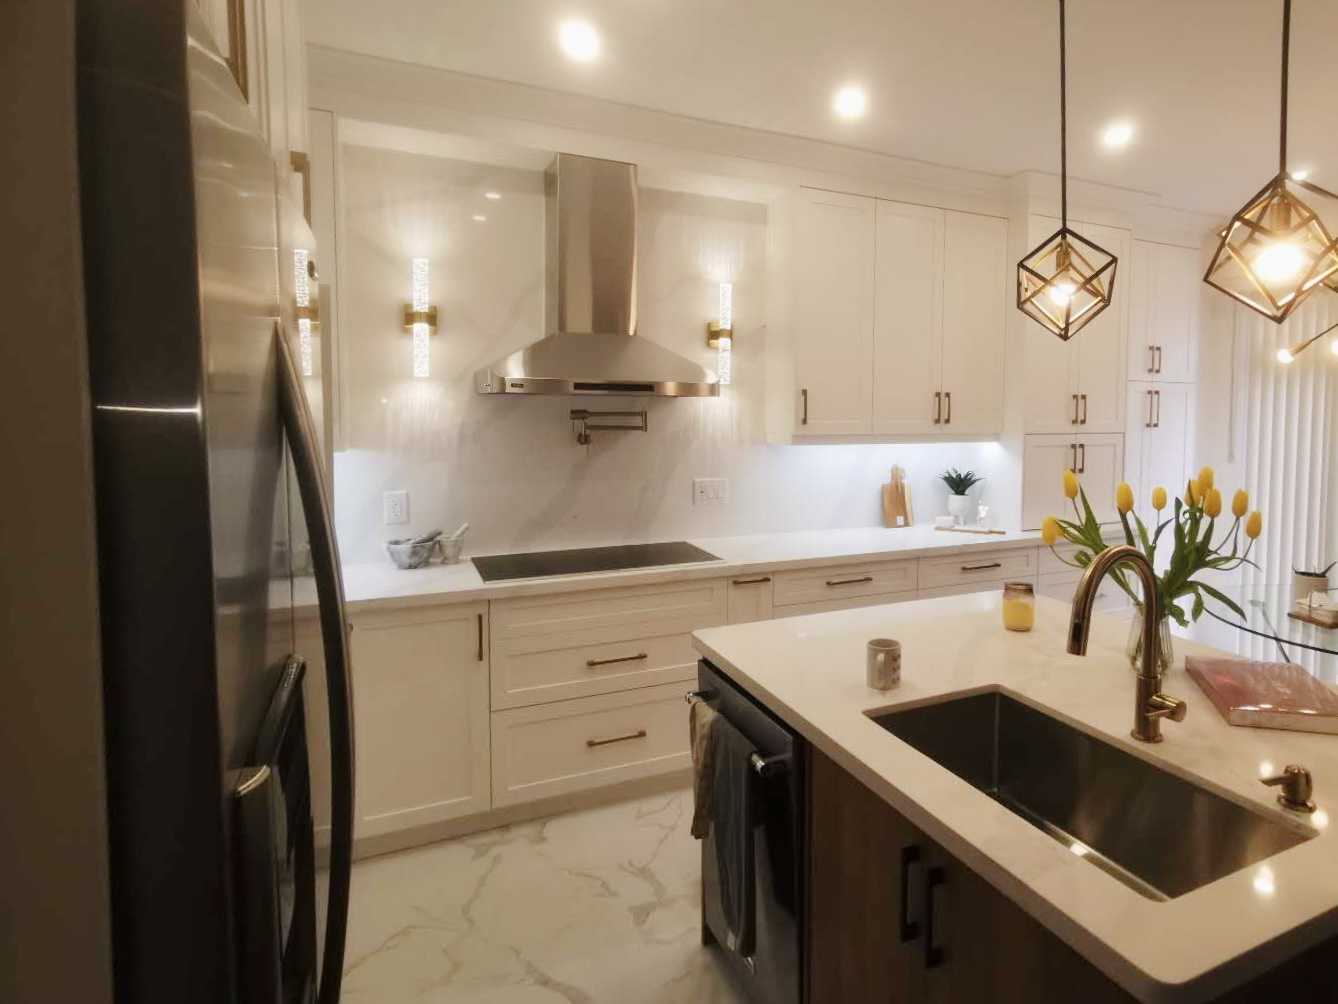
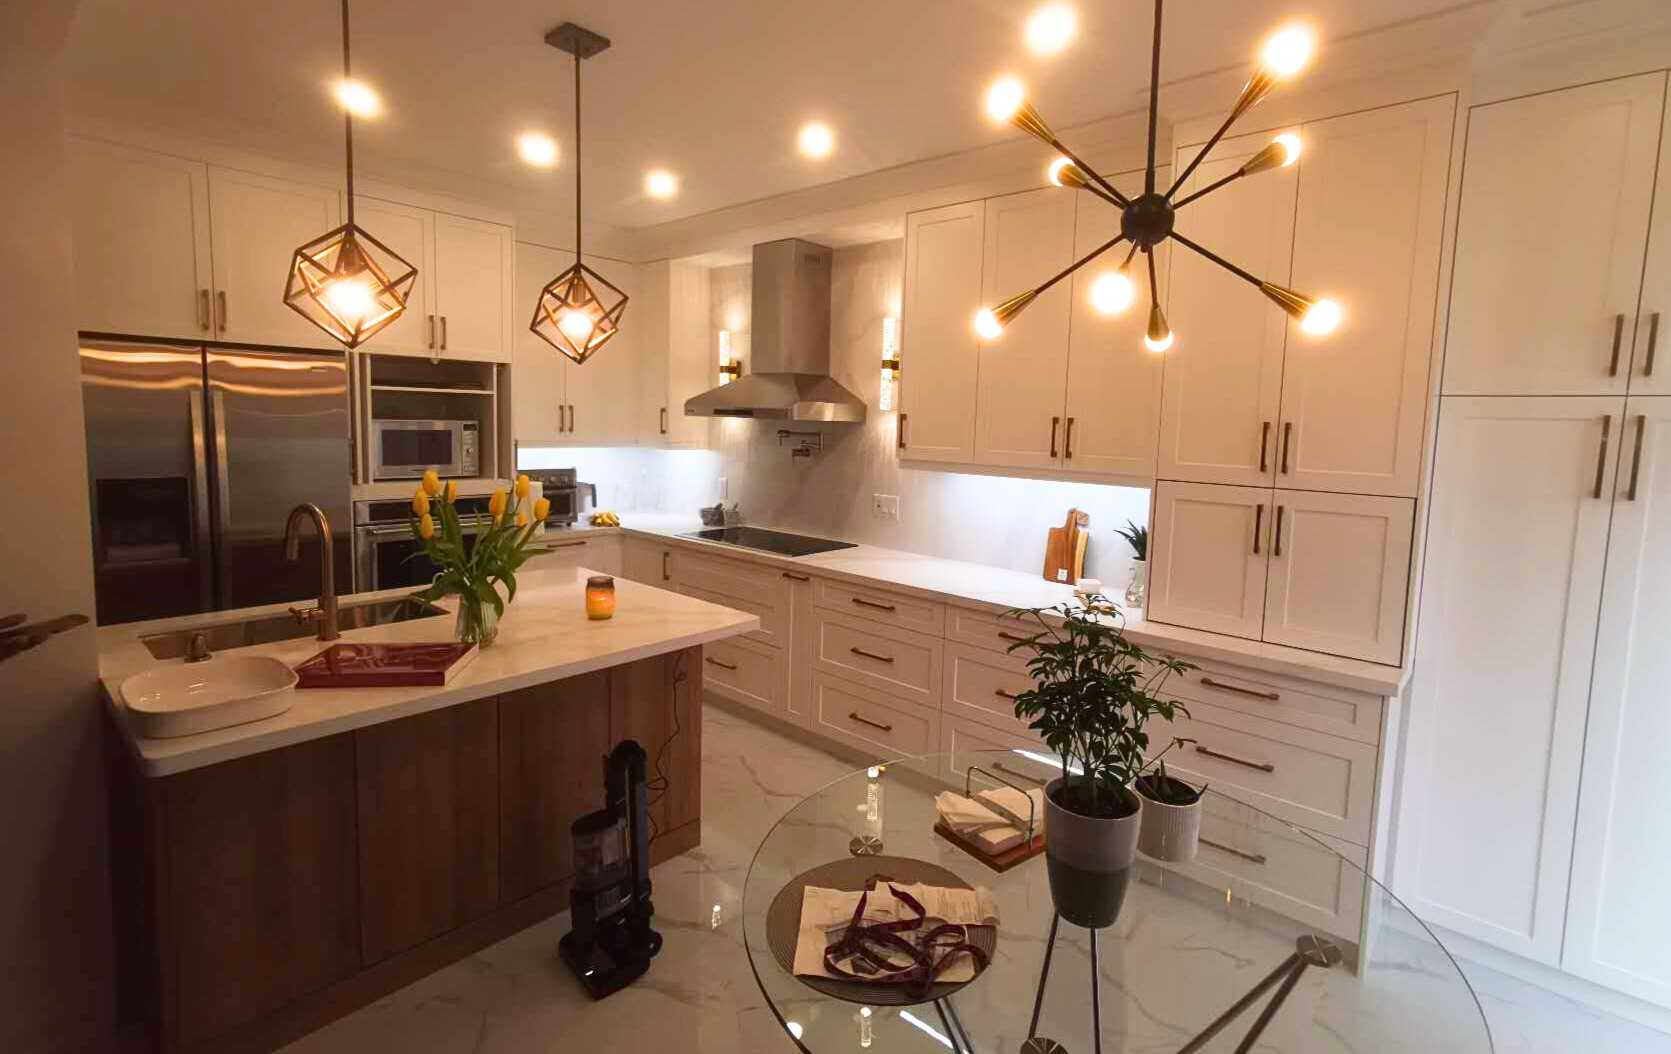
In the heart of Mississauga, a family dreamed of a kitchen that was more than just a place to cook. They envisioned a bright, inviting hub for daily life that blended classic style with modern functionality. This led to the creation of Project 3227, a stunning renovation centered around a beautiful L-shaped kitchen design. The final result features elegant white wood panel cabinets along the perimeter, contrasted by a striking dark wood colour island that houses the main sink and dishwasher, creating a perfect balance of light and warmth.
Quick Facts
- Project: Kitchen 3227
- Location: Mississauga, ON
- Scope: Full kitchen demolition and remodel, including layout reconfiguration, custom cabinetry, new electrical, and plumbing.
- Key Features: Two-tone L-shaped layout, custom Shaker and flat-panel cabinets, quartz countertops, integrated appliances, and a central island workstation.
- Duration: 4 weeks
- Completed: March 2024
The Design Vision: A Conversation with Our Lead Designer
We sat down with our lead designer to discuss the creative process behind this beautiful Mississauga kitchen renovation.
Q: What was the primary goal for the homeowners with this kitchen project?
A: The original kitchen was a product of a different era—cramped, with a closed-off layout that felt disconnected from the rest of their beautiful home. The primary goal was to create a sense of openness and flow. They wanted a timeless aesthetic that wouldn’t feel dated in five years, but that also had character and warmth. Functionally, they needed better storage, more counter space for meal prep, and a layout that would allow multiple people to work and socialize in the space without feeling crowded. It was about transforming the room from a simple utility space into the true heart of their home.
Q: How did you land on the final two-tone, L-shaped design?
A: The L-shaped layout was a natural fit for the room’s architecture. By placing the main cabinetry and appliances along two adjacent walls, we instantly opened up the floor plan, improving traffic flow to the nearby dining and family rooms. This layout also provides an incredibly efficient “work triangle” between the fridge, range, and sink.
The two-tone concept was central to achieving that balance of airy and grounded. The perimeter white wood panel cabinets in a classic Shaker style reflect light beautifully, making the entire space feel larger and brighter. To avoid a sterile, all-white look, we introduced the dark wood colour island. It acts as a stunning centerpiece, adding richness, depth, and a touch of organic texture. Placing the primary sink and dishwasher in the island was a deliberate choice. It turns the often-isolated task of cleanup into a more social activity, allowing the person at the sink to face into the living area and engage with family and guests.
Materials & Specifications: The Building Blocks of Quality
Every detail in this kitchen was chosen for its beauty, durability, and contribution to the overall design harmony.
Cabinetry
The project features fully custom cabinetry to maximize every inch of space.
- Perimeter Cabinets: A timeless Shaker profile with detailed wood paneling, professionally finished in Benjamin Moore’s “Chantilly Lace” (OC-65). This crisp, clean white provides a perfect, light-reflecting backdrop.
- Island Cabinets: Sleek, flat-panel cabinetry crafted from a dark walnut veneer with a durable, low-sheen matte finish. This modern profile contrasts beautifully with the classic perimeter cabinets.
- Hardware: All doors and drawers are fitted with high-quality soft-close hinges and slides for smooth, quiet operation. The hardware is a minimalist matte black pull, adding a subtle, contemporary edge.
Countertops & Backsplash
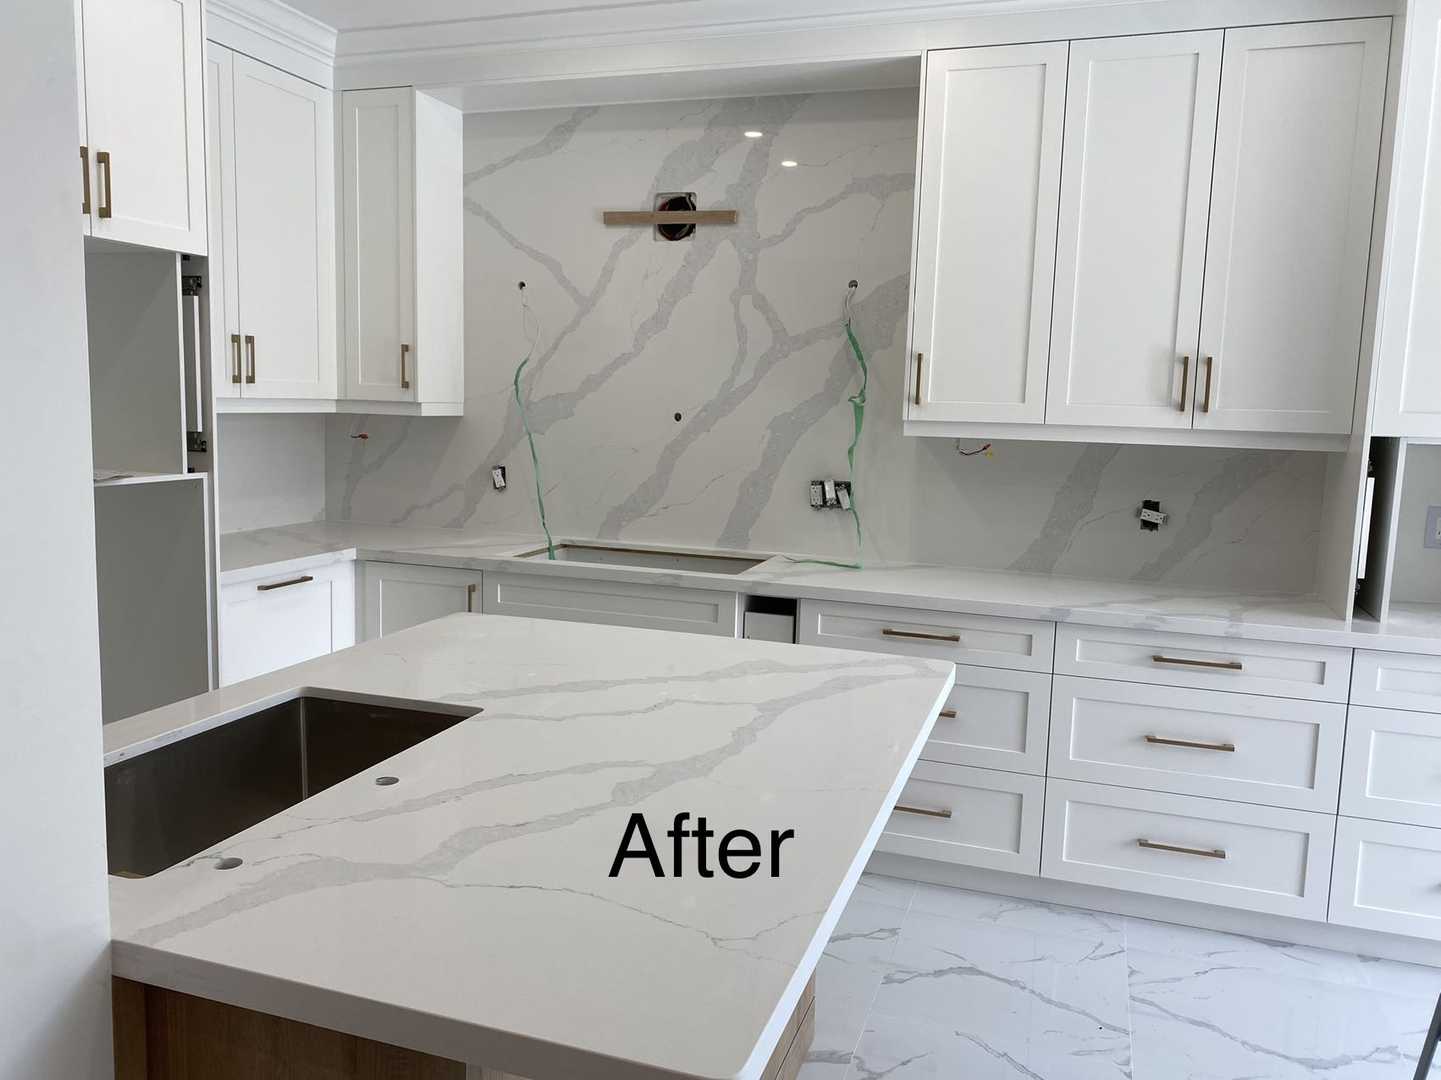
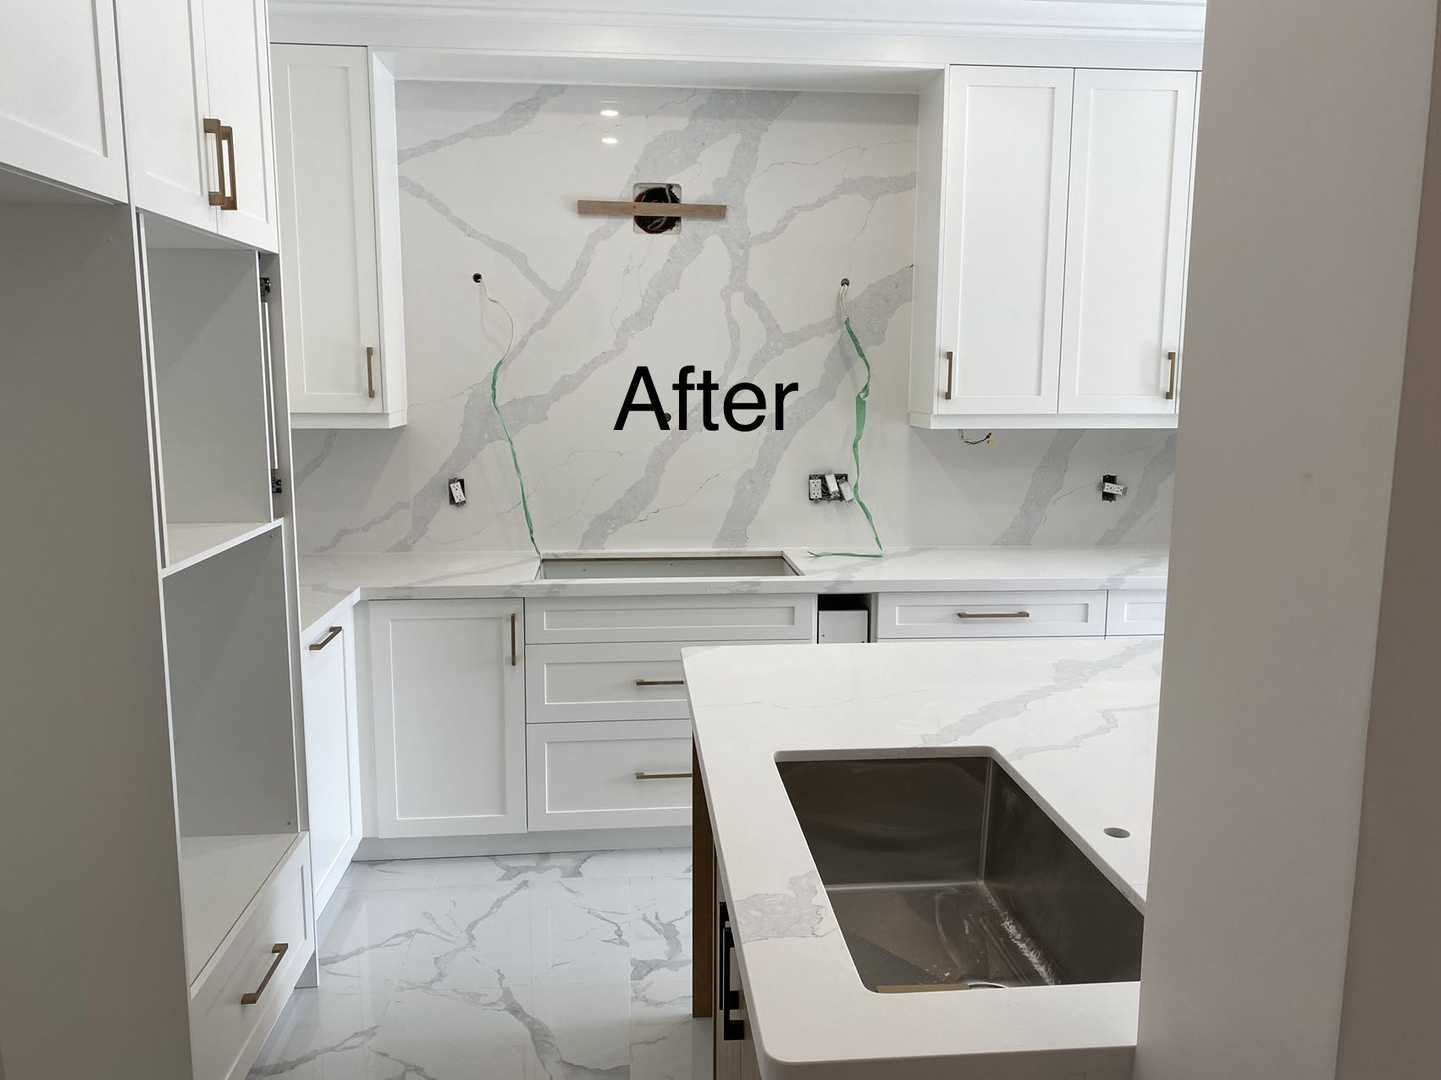
- Countertops: We selected Caesarstone Quartz in “Statuario Maximus” for its luxurious look and robust performance. Its soft white base and broad, subtle grey veining mimic the elegance of natural marble without the high maintenance. Quartz is non-porous, making it resistant to stains, scratches, and bacteria—ideal for a busy family kitchen.
- Backsplash: To add texture without competing with the countertops, we installed a classic 3x6 inch white ceramic tile in a sophisticated herringbone pattern. The matching white grout keeps the look clean and cohesive.
Flooring & Lighting
- Flooring: New wide-plank engineered hardwood was laced into the existing flooring from the adjacent rooms, creating a seamless and continuous look throughout the main floor.
- Lighting: A layered lighting strategy was essential. This included:
- General: Energy-efficient LED pot lights on dimmers for overall illumination.
- Task: Two elegant, oversized glass pendants above the island and under-cabinet LED strip lighting for bright, focused light on the countertops.
- Compliance: All electrical work was completed by a licensed electrician and inspected to meet the stringent requirements of Ontario’s Electrical Safety Authority (ESA).
The Process & Timeline: A Step-by-Step Look
While every custom project’s timeline is unique and tailored to the client’s specific needs and material selections, the process follows a series of carefully managed phases to ensure a smooth and successful renovation.
Phase 1: Demolition and Preparation The project began with the careful and contained demolition of the old kitchen. This included removing all cabinets, countertops, flooring, and appliances. Once the space was stripped to the studs, we assessed the existing plumbing and electrical systems to plan for the necessary upgrades required by the Ontario Building Code.
Phase 2: Rough-ins and Infrastructure This is the critical, behind-the-walls stage. Our licensed tradespeople rerouted the plumbing lines to service the new island sink and dishwasher. New dedicated electrical circuits were run for the refrigerator, dishwasher, and stove to prevent overloads and ensure safety. All new wiring was meticulously planned to accommodate the new pot lights, pendants, and under-cabinet lighting. Finally, new drywall was installed, taped, and mudded to perfection.
Phase 3: Installation With the foundational work complete, the visual transformation began. The engineered hardwood flooring was installed first to run underneath the cabinets for a clean finish. Next, our master carpenters meticulously installed the perimeter and island cabinetry, ensuring every piece was perfectly level and aligned. Following the cabinet installation, precise digital templates were made for the quartz countertops.
Phase 4: Finishing Touches This is where the design truly comes to life. The stunning quartz countertops were installed, followed by the intricate herringbone tile backsplash. The appliances were delivered and expertly fitted, with the panel-ready dishwasher and fridge getting their custom fronts. The plumber returned to connect the sink, faucet, and dishwasher, and the electrician installed all the beautiful light fixtures and outlets. A fresh coat of paint and the installation of the cabinet hardware were the final steps.
The Final Look: Bright, Balanced, and Beautiful
Stepping into the completed kitchen is a breath of fresh air. The space is now bright, open, and incredibly welcoming. The L-shaped design creates an effortless flow, while the contrast between the crisp white perimeter and the rich, dark island provides a powerful visual anchor. The island has become the undisputed heart of the home, serving as a versatile surface for everything from morning coffee and homework sessions to elaborate meal prep and casual entertaining. The seamless integration of the appliances and the thoughtfully layered lighting create a clean, sophisticated, and highly functional environment that this Mississauga family will enjoy for decades to come.
Design Takeaways for Your Own Renovation
This project offers several valuable lessons for any homeowner planning a kitchen remodel in Ontario.
- Don’t Fear Contrast: A two-tone kitchen is a fantastic way to add personality and visual interest. Pairing a light perimeter with a darker island (or vice-versa) creates depth and prevents the design from feeling one-dimensional.
- Design an Island That Works: Think beyond just extra counter space. By strategically placing a primary sink or cooktop in your island, you can create a highly efficient and social workstation that enhances the way you use your kitchen.
- Invest in a Professional Lighting Plan: Good lighting is transformative. A combination of ambient, task, and accent lighting is crucial for both the functionality and atmosphere of your kitchen. Always use a licensed electrician to ensure your plan is safe and up to code.
- Prioritize a Cohesive Flow: If you’re undertaking a major kitchen renovation, consider how the new flooring will connect with adjacent rooms. Creating a seamless transition, as we did with the engineered hardwood, makes the entire main floor feel more integrated and spacious.
Simple Maintenance for Lasting Beauty
- Quartz Countertops: Clean daily with a soft cloth, water, and a mild detergent. Wipe up spills from coffee, wine, or juice immediately. While highly scratch-resistant, always use a cutting board. Use trivets or hot pads for pots and pans directly from the stove or oven.
- Custom Cabinetry: Dust regularly with a soft, dry cloth. For cleaning, use a damp cloth with a gentle, non-abrasive soap. Dry immediately. For the walnut veneer island, a specialized wood cleaner can be used sparingly to polish and protect the finish.
- Grout: The backsplash grout was sealed upon installation. We recommend cleaning with a pH-neutral cleaner and re-sealing it once a year to protect against stains and moisture.
Frequently Asked Questions
Q: For a kitchen renovation in Mississauga, is a building permit always required?
A: It depends on the scope. For a project like this one, which involved moving plumbing and electrical, a permit from the City of Mississauga is absolutely necessary. This ensures all work is inspected and compliant with the Ontario Building Code, guaranteeing the safety and structural integrity of your home. Our team manages the entire permitting process for our clients, from application to final inspection.
Q: What are the main benefits of an L-shaped kitchen layout for a home in the Toronto area?
A: The L-shaped layout is one of the most popular and versatile designs, especially for the open-concept floor plans common in many Toronto and GTA homes. Its main advantages are its efficiency, as it creates a natural work triangle, and its openness. Unlike a U-shaped or galley kitchen, it doesn’t close off the space, making it perfect for integrating with a dining or living area and encouraging social interaction.
Q: How much should I budget for a custom kitchen renovation featuring elements like a dark wood island and white cabinets?
A: The budget for a custom kitchen can vary significantly based on the size of the space, the appliances you choose, and the specific materials selected. Custom cabinetry, like the pieces in this project, is a significant investment but offers unparalleled quality and a perfect fit. Generally, a full custom kitchen renovation in the GTA can range from moderate to extensive in cost. The best first step is to get a detailed, transparent estimate. We provide comprehensive quotes that break down every aspect of the project.
Inspired by the stunning transformation of this Mississauga kitchen? If you’re ready to turn your vision into a beautiful, functional reality, we’re here to help. Contact us today for a free, no-obligation quote and let’s begin designing the kitchen of your dreams.