Welcome to the project diary for a truly transformative renovation in Mississauga. This project was more than just a kitchen update; it was a core part of a full house reno, breathing new life into a classic 1981 home. Our goal was to create two distinct yet harmonious kitchen spaces: a sophisticated main-floor MDF kitchen with Egger wood panel accents and a bright, welcoming basement kitchen featuring snow white shaker cabinets and a custom wood niche. This journey is a testament to how thoughtful design and material selection can completely redefine a home’s character.
Project Intro & Quick Facts
Nestled in a mature Mississauga neighbourhood, this family home from the early ’80s had great bones but was showing its age. The original kitchens were cramped, dark, and disconnected from the modern way families live, cook, and entertain. The clients envisioned a complete overhaul, creating a main kitchen that would serve as the home’s warm, beating heart, and a secondary basement kitchen that offered flexibility for guests, multi-generational living, or future rental potential. The challenge was to ensure both spaces felt like they belonged to the same home while serving very different functions.
- Project Type: Full House Renovation (Kitchen Focus)
- Location: Mississauga, Toronto, ON
- Key Features: Main Floor Custom MDF Kitchen with Egger Wood Panels, Basement Snow White Shaker Kitchen with Wood Niche
- Original Home Built: 1981
- Project Start: Autumn 2024
- Duration: 4 weeks
Design Vision
The design process began with a deep dive into the family’s lifestyle. They needed the main kitchen to be an entertainer’s dream—open, inviting, and highly functional, with a subtle European flair. For the basement, the priority was creating a bright, efficient, and self-sufficient space that felt anything but subterranean.
Main Floor: Contemporary Warmth
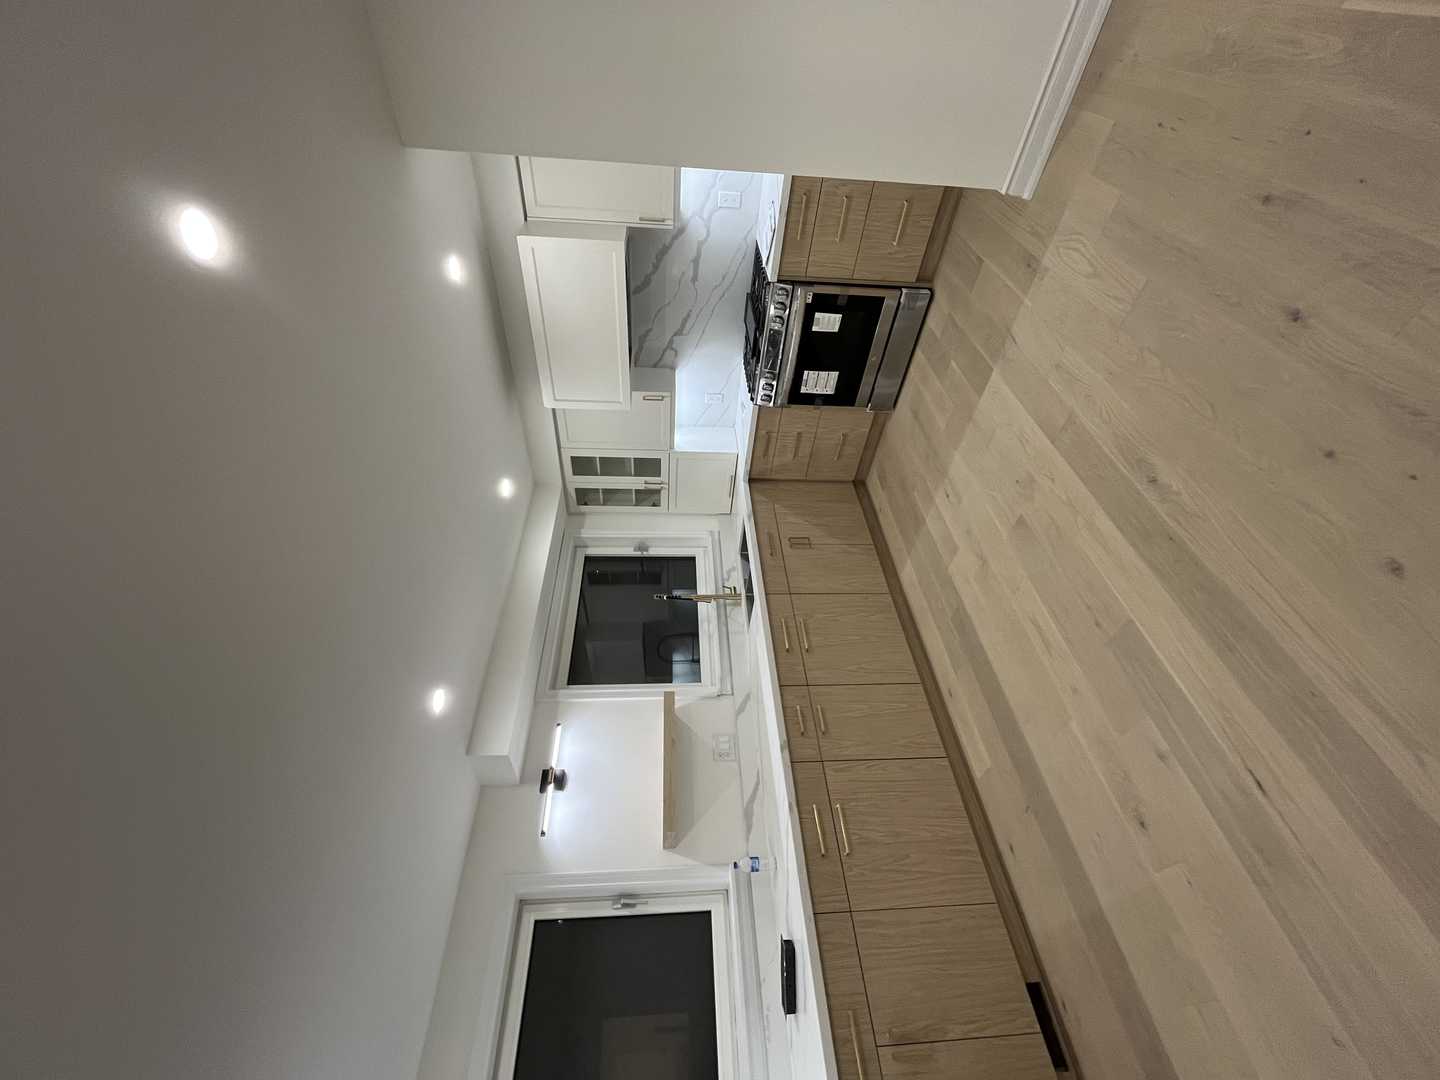
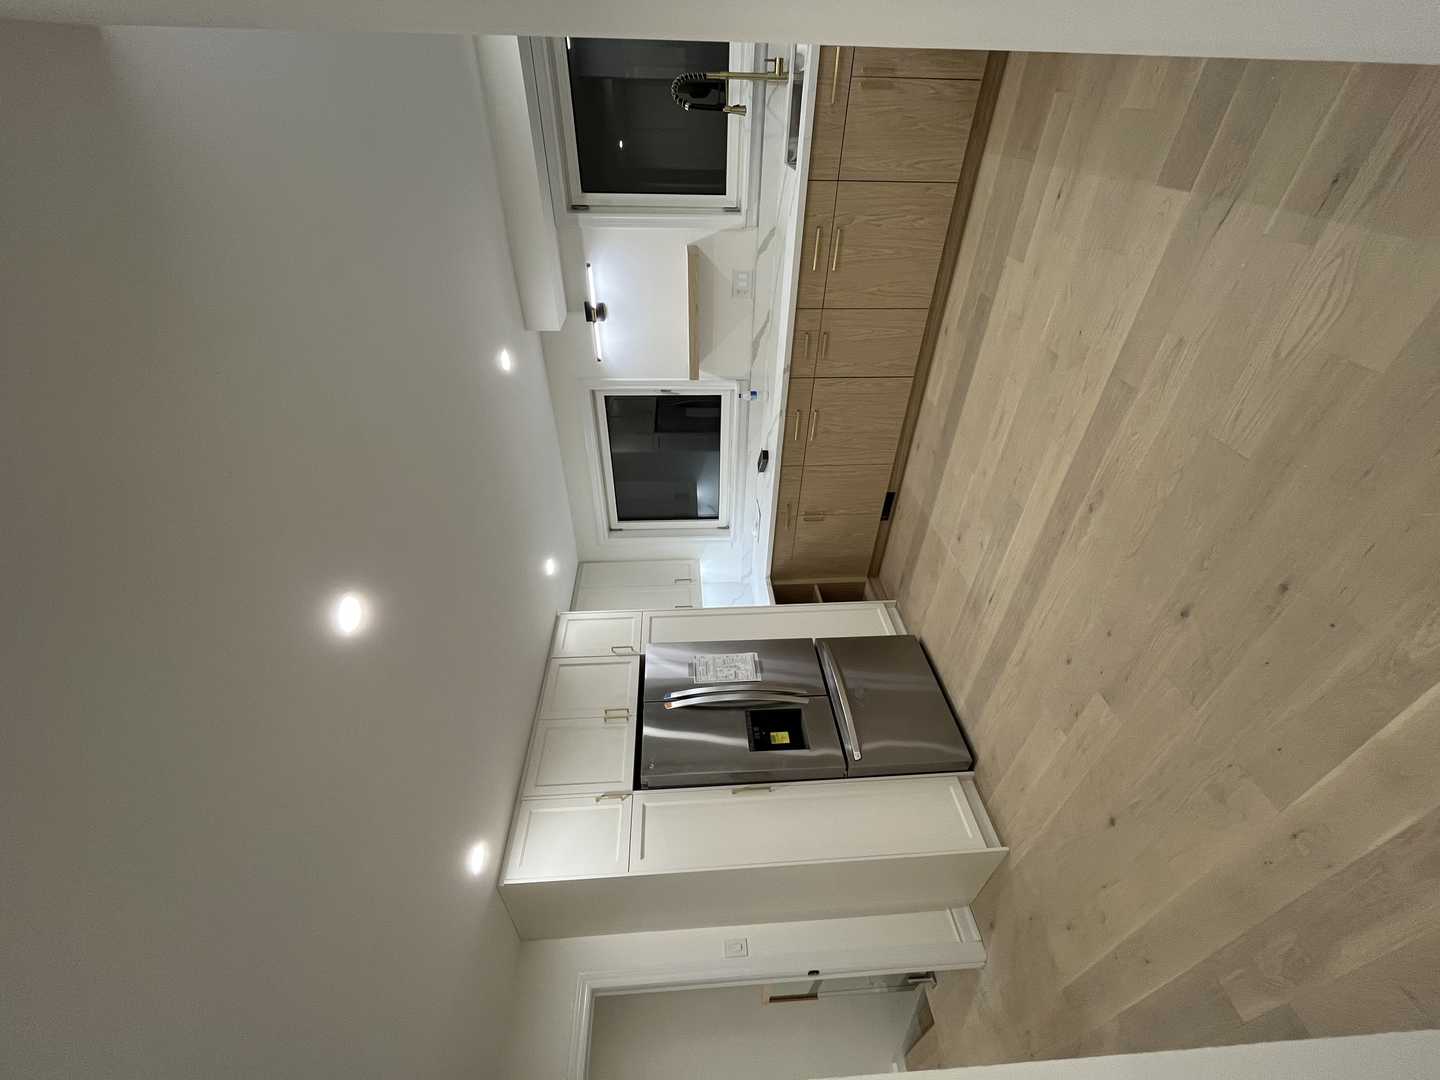
The vision for the main kitchen was centered on a sophisticated interplay of texture and tone. We moved away from traditional cabinet styles and opted for a sleek, minimalist aesthetic. The core of the design involved using custom flat-panel MDF cabinetry in a soft, neutral matte finish. To prevent the space from feeling cold or clinical, we introduced the rich, authentic texture of Egger H1180 ST37 Natural Halifax Oak panels. These panels were strategically used as a feature wall, on the back of the large central island, and for floating shelves, injecting organic warmth and visual depth. The layout was reconfigured to create an open-concept flow, with a large island serving as the primary hub for meal prep, casual dining, and socializing.
Basement: Bright & Functional
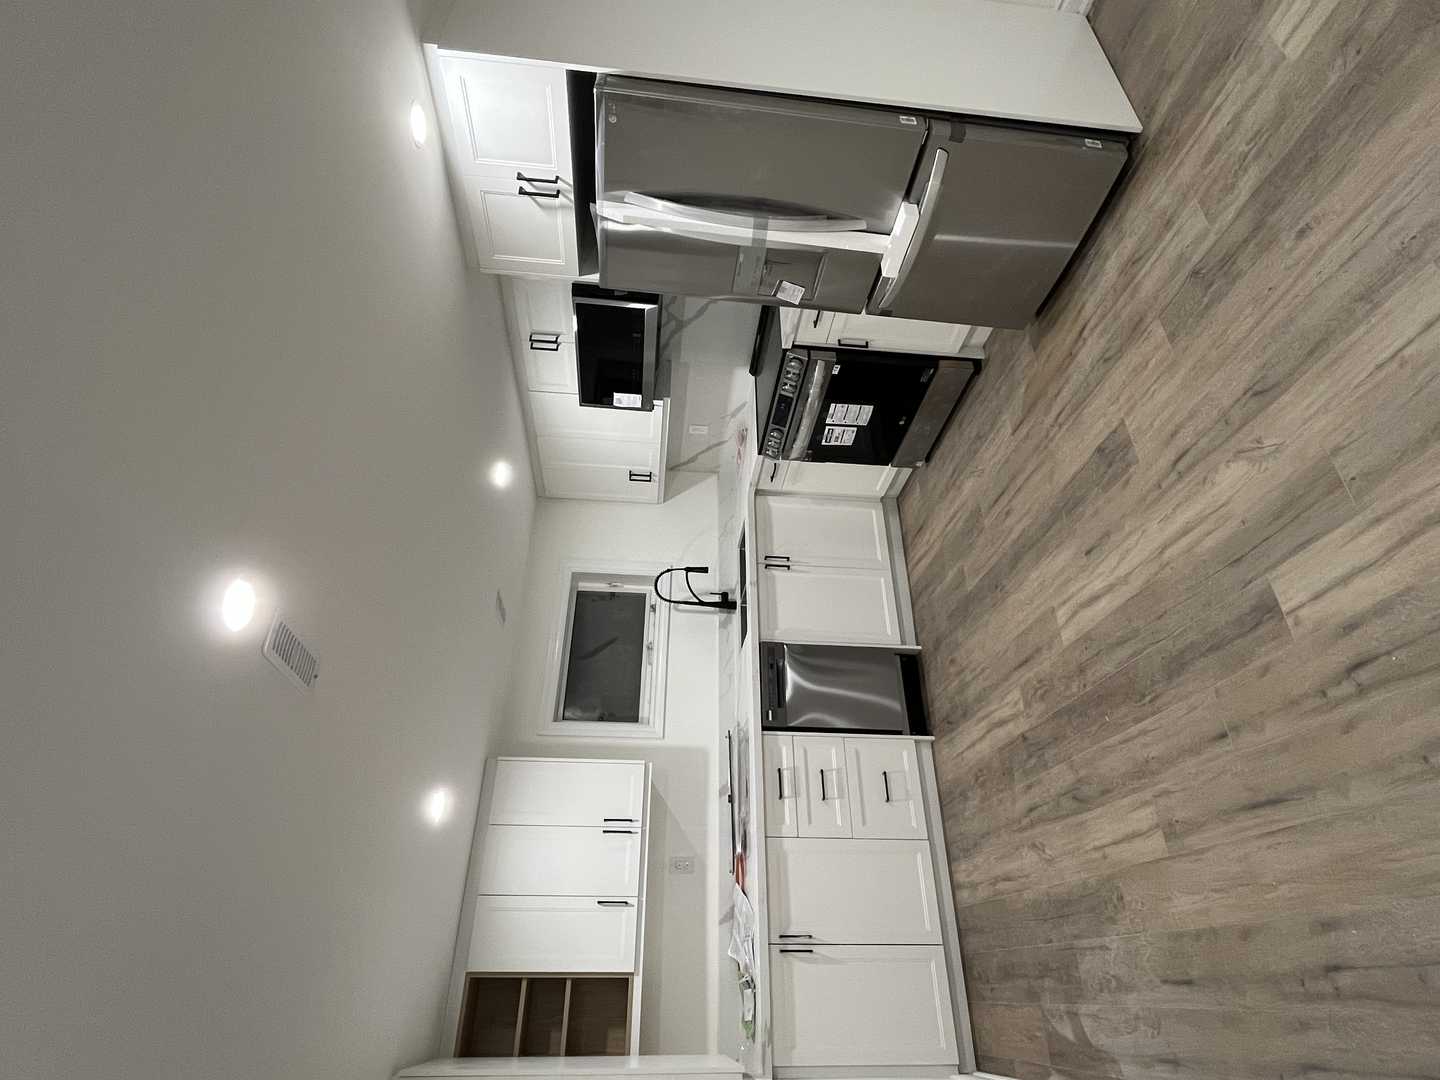
For the basement kitchen, the design mantra was “light and bright.” To maximize the sense of space and combat the inherent challenges of a lower level, we chose a timeless Snow White Shaker cabinet profile. The classic lines of the shaker style add a touch of architectural detail without overwhelming the smaller footprint. The masterstroke of this design is the custom-built wood niche. Crafted from the same Egger Halifax Oak as the main kitchen, this feature provides a beautiful spot for display and creates a powerful design link between the two floors, ensuring the entire home feels cohesive.
Materials & Specifications
Choosing the right materials was crucial to achieving the desired look, feel, and long-term durability for both kitchens.
Main Floor Kitchen
- Cabinetry: Custom-fabricated, moisture-resistant MDF doors with a factory-sprayed matte lacquer finish. This provides a seamless, durable surface that’s easy to clean.
- Accent Panels & Shelving: Egger H1180 ST37 Natural Halifax Oak decorative panels. This high-quality laminate offers the hyper-realistic look and feel of solid oak, complete with knots and grain, but with superior resistance to scratches and fading.
- Countertops: 3cm Caesarstone Quartz in “Statuario Maximus.” Its soft white base and broad, warm grey veining beautifully complement both the neutral MDF and the oak tones. The island features a waterfall edge for a dramatic, continuous look.
- Backsplash: Large-format porcelain slabs matching the countertop for a seamless, grout-free wall that extends from the counter to the upper cabinets.
- Appliances: A suite of high-end, panel-ready appliances were chosen to integrate flawlessly into the cabinetry, maintaining the kitchen’s clean lines.
- Hardware: Minimalist matte black finger pulls and handles for a touch of modern contrast.
Basement Kitchen
- Cabinetry: Solid wood frame Snow White Shaker doors with HDF centre panels to ensure stability and prevent cracking in a basement environment.
- Feature Niche: Custom-fabricated from the same Egger Halifax Oak panels used upstairs, complete with integrated LED lighting.
- Countertops: A durable and cost-effective 2cm quartz in a simple, light grey finish to keep the space bright and easy to maintain.
- Backsplash: Classic 3x6 ceramic subway tile in a glossy white, laid in a traditional offset pattern. It’s a timeless choice that reflects light and is incredibly easy to clean.
- Sink & Faucet: A deep, single-bowl stainless steel undermount sink paired with a high-arc, pull-down faucet for maximum functionality.
Process & Timeline
As a major part of a full home renovation, the kitchen transformations followed a meticulous, phased approach. While the overall project timeline was fluid, the kitchen-specific milestones were carefully sequenced to ensure efficiency and quality.
Phase 1: The Great Unveiling (Demolition & Abatement) The first step was to strip both kitchen spaces back to the studs. In a 1981 home, this often reveals surprises. We uncovered outdated knob-and-tube remnants in one wall, which were safely removed by a licensed electrician. We also rerouted old plumbing and bulkheads to open up the ceiling height and create the clean canvas our design required.
Phase 2: Rough-ins & Code Compliance This is the critical, behind-the-walls work that ensures safety and functionality for decades to come. Our licensed tradespeople got to work.
- Electrical: New wiring was pulled for all appliances on dedicated circuits. As per Ontario’s Electrical Safety Authority (ESA) code, we installed GFCI-protected outlets within 1.5 metres of the sinks. We mapped out and installed wiring for pot lights, island pendants, and under-cabinet lighting in both kitchens.
- Plumbing: All old copper and cast-iron pipes were replaced with new PEX and ABS. Drains and vents were reconfigured to accommodate the new sink and dishwasher locations, ensuring everything was up to the current Ontario Building Code.
- HVAC: Ductwork was moved to allow for the removal of a soffit in the main kitchen, dramatically improving the sense of space.
Phase 3: Building it Back (Insulation, Drywall & Flooring) With the “guts” of the kitchens in place, we began to rebuild. New insulation was installed, followed by fresh drywall, which was expertly taped, mudded, and sanded to a Level 5 finish for a flawless paint job. The new wide-plank engineered hardwood flooring was laid throughout the main floor, flowing seamlessly into the kitchen area.
Phase 4: The Vision Takes Shape (Cabinetry Installation) This was the most exciting phase. The custom MDF cabinets for the main floor arrived and were installed with precision. Our millwork specialists then fitted the large Egger wood panels, ensuring perfect alignment and grain matching. Downstairs, the snow white shaker cabinets went in, instantly brightening the space. The custom wood niche was carefully installed, becoming the immediate focal point.
Phase 5: The Finishing Touches Once cabinets were in, a technician created a digital template for the quartz countertops, which were fabricated and installed about a week later. This was followed by the backsplash tile and slab installation. Finally, our finishing carpenters installed trim, our painters applied the final coats, and the electricians returned to install all the light fixtures, switches, and outlets. The final hardware was mounted, and the appliances were slid into place.
The Final Look
The transformation is stunning. The main kitchen is now a masterpiece of modern design and warmth. The interplay between the smooth, matte MDF and the deeply textured Egger oak is sophisticated and inviting. The huge island is the undeniable heart of the home, a place where homework gets done, meals are shared, and friends gather. The seamless backsplash and integrated appliances create an uncluttered, serene environment that is a joy to cook in.
Downstairs, the basement kitchen defies all expectations. It’s bright, airy, and incredibly chic. The snow white shaker cabinets provide a clean, classic backdrop, while the illuminated oak niche adds a layer of custom luxury that makes the space feel special. It’s a fully functional second kitchen that adds immense value and versatility to this Mississauga home.
Design Takeaways
This project offers several key insights for anyone planning a kitchen renovation in the Toronto area:
- Embrace Mixed Materials: Don’t be afraid to combine different textures and finishes. The success of the main kitchen lies in the balance between the sleek MDF and the rustic Egger panels.
- Create Design Threads: Using the same Egger wood panel in both the main and basement kitchens creates a subtle but powerful sense of cohesion throughout the entire home.
- Invest in Lighting: A multi-layered lighting plan (ambient, task, and accent) is non-negotiable, especially in a basement. The combination of pot lights, pendants, and under-cabinet LEDs is what makes these spaces truly shine.
- Prioritize Function: A beautiful kitchen that doesn’t function well is a failure. The “work triangle” is still relevant, and ensuring ample storage and counter space was key to the success of both designs.
Maintenance Tips
To keep these new kitchens looking their best for years to come:
- MDF & Egger Panels: Clean with a soft, damp cloth and a mild, non-abrasive cleaner. Avoid harsh chemicals or excessive water. Wipe up spills promptly.
- Quartz Countertops: While highly stain-resistant, it’s best to wipe up spills like wine or coffee quickly. Use hot pads or trivets for hot pots and pans. Clean with a simple solution of soap and water.
- Shaker Cabinets: The corners and grooves of shaker doors can collect dust. Wipe them down regularly with a microfiber cloth to keep them looking crisp and clean.
Frequently Asked Questions
Do I need a permit for a kitchen renovation like this in Mississauga?
Yes, absolutely. Any renovation that involves altering plumbing, electrical systems, or moving walls requires permits from the City of Mississauga. This is a critical step to ensure all work is performed safely and complies with the Ontario Building Code, which protects both your family and your home’s value.
What’s the advantage of using Egger panels over real wood veneer for accents?
Egger panels, which are a type of high-end textured laminate, offer several advantages in a high-traffic area like a kitchen. They provide exceptional durability against scratches, dents, and fading from UV light. The colour and pattern are perfectly consistent, unlike real wood which can vary. They give you the beautiful, realistic look of wood without the maintenance or potential for warping associated with natural veneer.
We are considering a basement kitchen to create a legal secondary unit. What should we know?
Creating a legal secondary unit in Mississauga involves more than just adding a kitchen. You need to meet specific requirements from the city regarding ceiling height, egress (fire escape routes), fire separation between units, and more. It’s crucial to consult with a knowledgeable contractor and the city’s zoning department before you begin. We can help guide you through this process. If you’re exploring this option, we recommend starting with a free quote to discuss the feasibility.
This Mississauga project was a rewarding journey, transforming a dated house into a modern, functional, and beautiful home. If this story has sparked ideas for your own space, we’d love to help you bring them to life.
Ready to start your own renovation story? Reach out to us today for a complimentary consultation and let’s build something beautiful together.