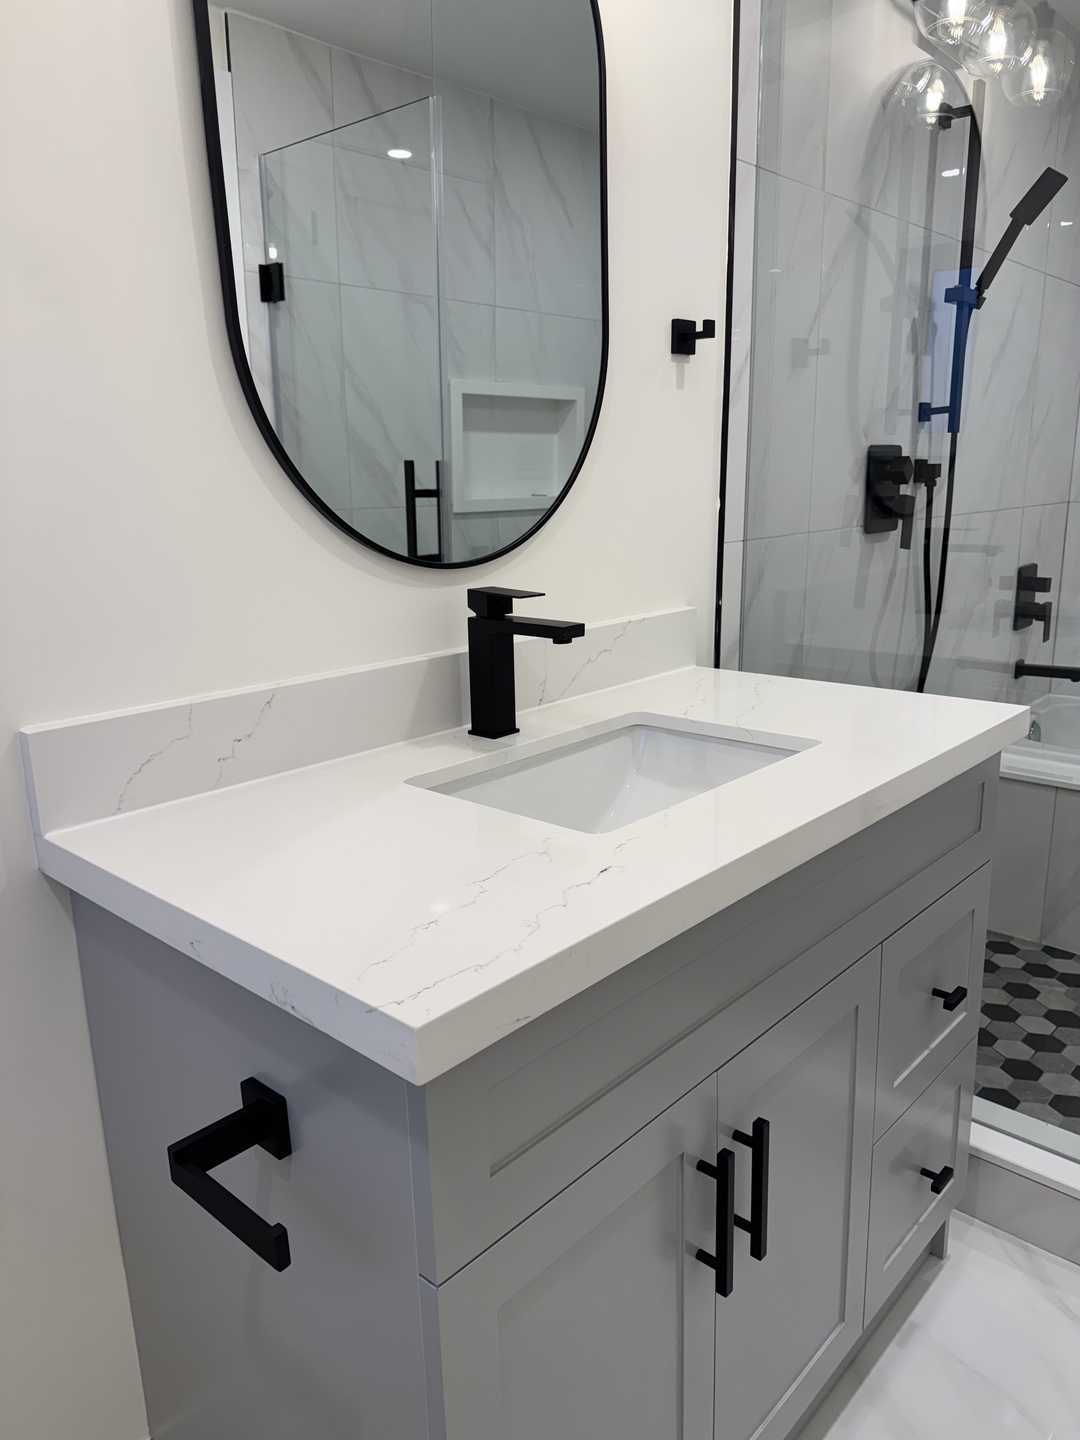
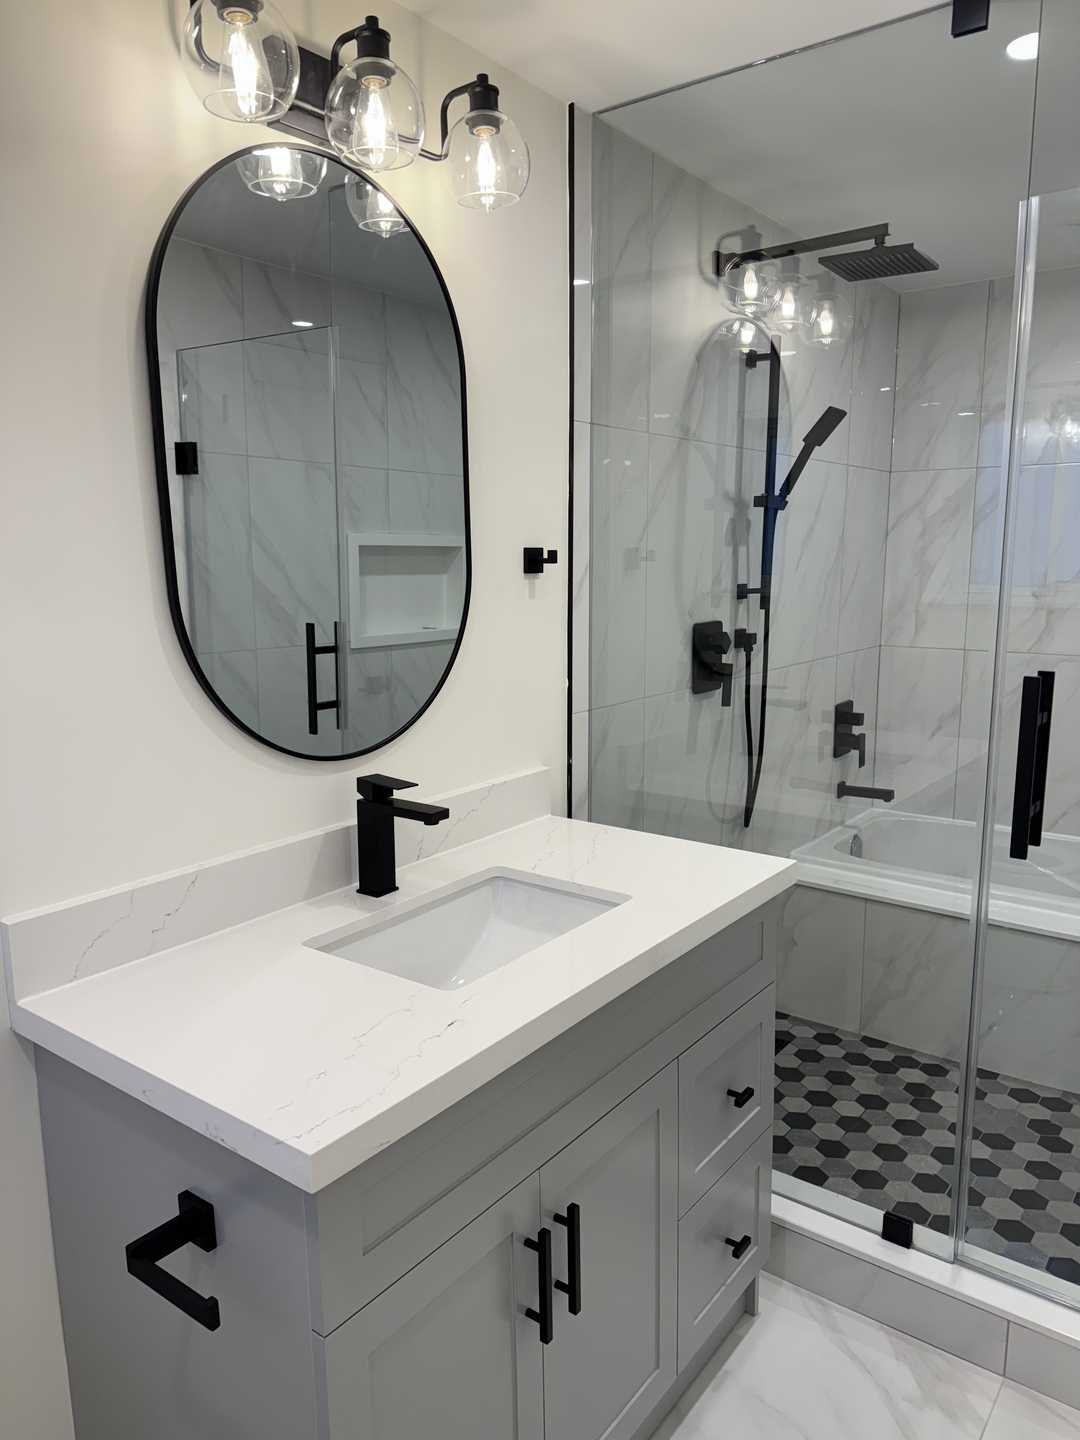
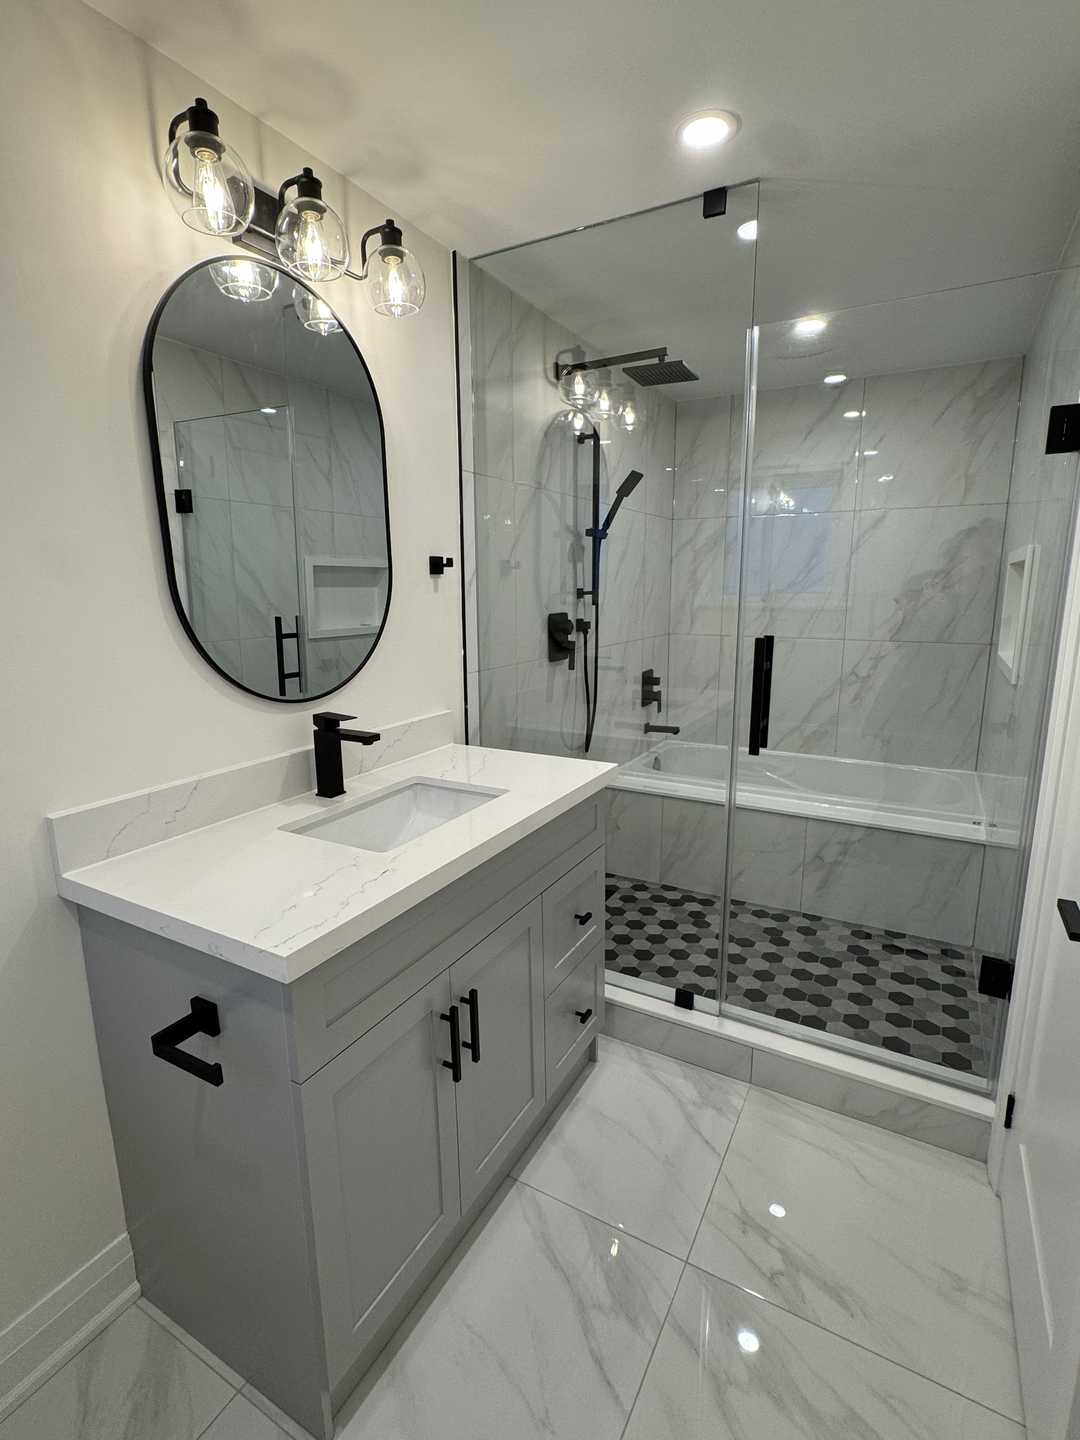
In the heart of a bustling Scarborough neighbourhood, a dated and cramped bathroom was calling out for a modern revival. The challenge was to transform this utilitarian space into a serene, spa-like sanctuary that felt both luxurious and incredibly functional. This stunning 4-piece bathroom renovation showcases how thoughtful design choices, like a sophisticated grey vanity, an elegant arch sense mirror, and expansive 24”x24” tile, can completely redefine a room. The result is a bright, airy, and calming retreat right here in Toronto.
Project Quick Facts
- Location: Scarborough, Toronto, ON
- Category: 4-Piece Bathroom Renovation
- Key Features: Floating grey vanity with quartz countertop, backlit arched mirror, large-format porcelain tile, walk-in shower with custom niche, matte black fixtures.
- Duration: 4 weeks
The Design Vision: A Conversation with Our Lead Designer
We sat down with our lead designer to discuss the creative journey behind this beautiful Scarborough bathroom project.
Q: What was the primary goal for this renovation?
A: The homeowners wanted to escape the “builder-basic” feel of their old bathroom. Their home has a lovely, contemporary aesthetic, but the bathroom felt like an afterthought. The goal was to create a personal oasis—a place to unwind after a long day. Functionality was key, but so was creating a specific mood: calm, sophisticated, and clean. They wanted a space that felt larger than it was, without changing the footprint.
Q: The material palette is very cohesive. How did you choose the core elements like the grey vanity and the large tiles?
A: We started with a mood board centered on “soft modernism.” The grey vanity was our anchor piece. We chose a deep charcoal grey in a floating style. This immediately modernizes the space and, by lifting it off the floor, creates an illusion of spaciousness. To complement it, we selected a beautiful 24”x24” porcelain tile with a subtle concrete texture. Using such a large format tile is a fantastic trick for smaller bathrooms; with fewer grout lines, the floor and walls feel more seamless and expansive.
Q: The arched mirror is a real statement piece. What was the thinking behind that choice?
A: I’m so glad you asked! In a room with many straight lines—the vanity, the tile grid, the shower glass—an arch introduces a necessary softness. The arch sense mirror we used isn’t just a beautiful shape; it’s also backlit, providing a gorgeous, diffuse glow that’s perfect for task lighting without being harsh. It’s that perfect blend of form and function that elevates a design from good to great. It became the focal point that ties the whole room together.
Materials & Specifications
Achieving this level of refined simplicity requires a meticulous selection of high-quality materials.
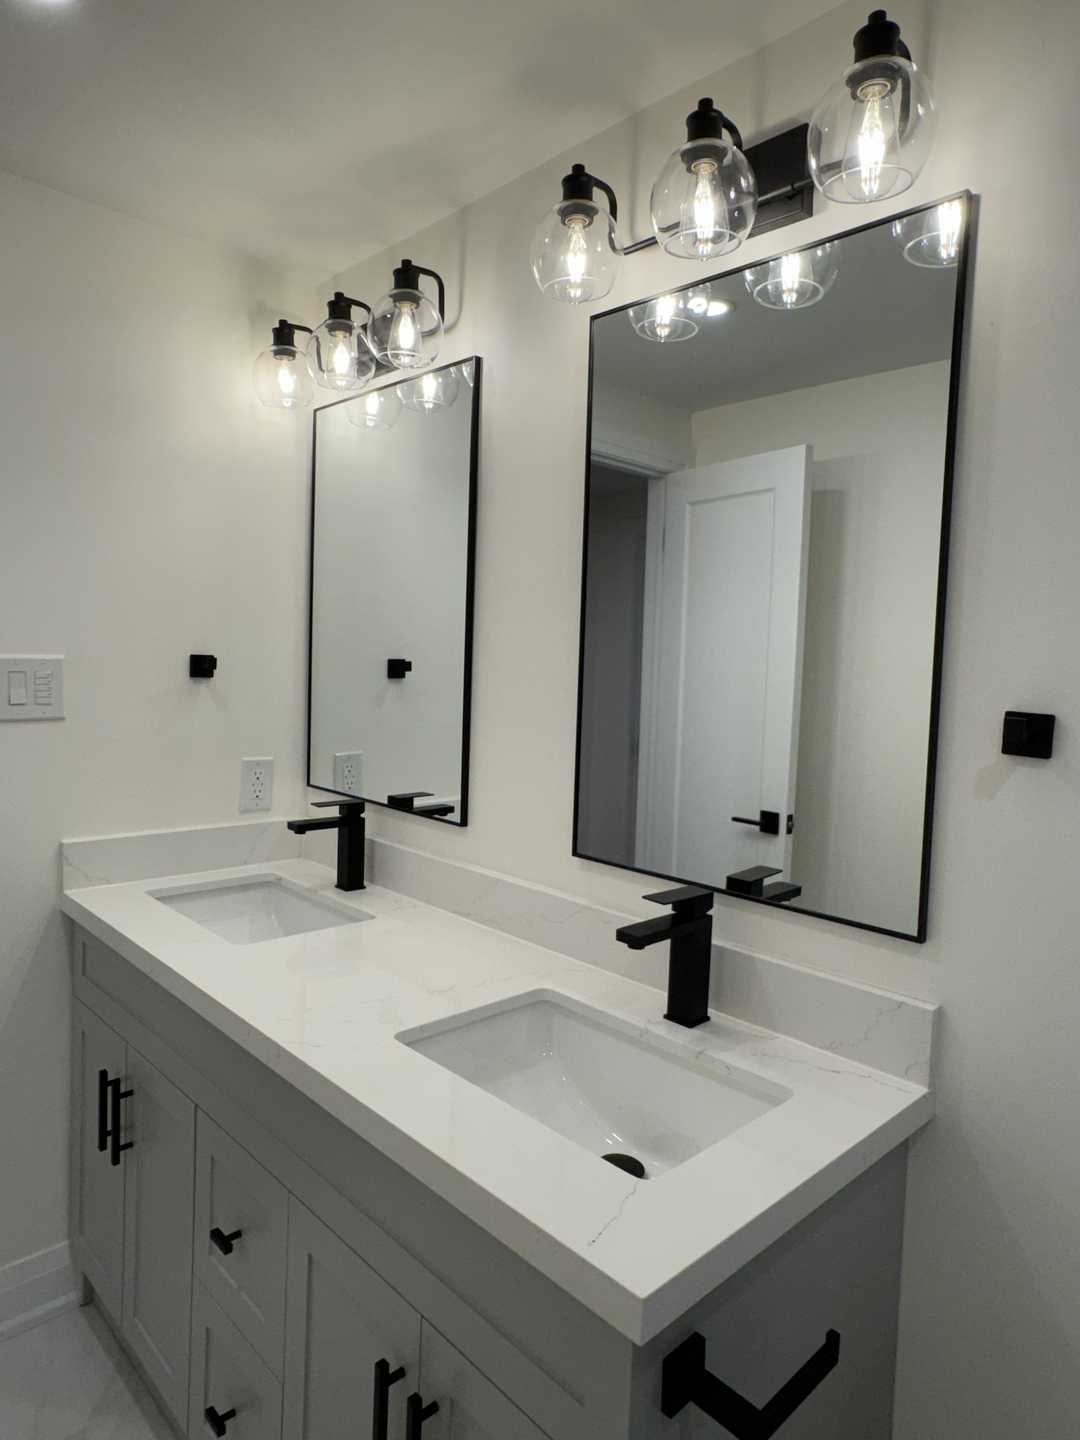
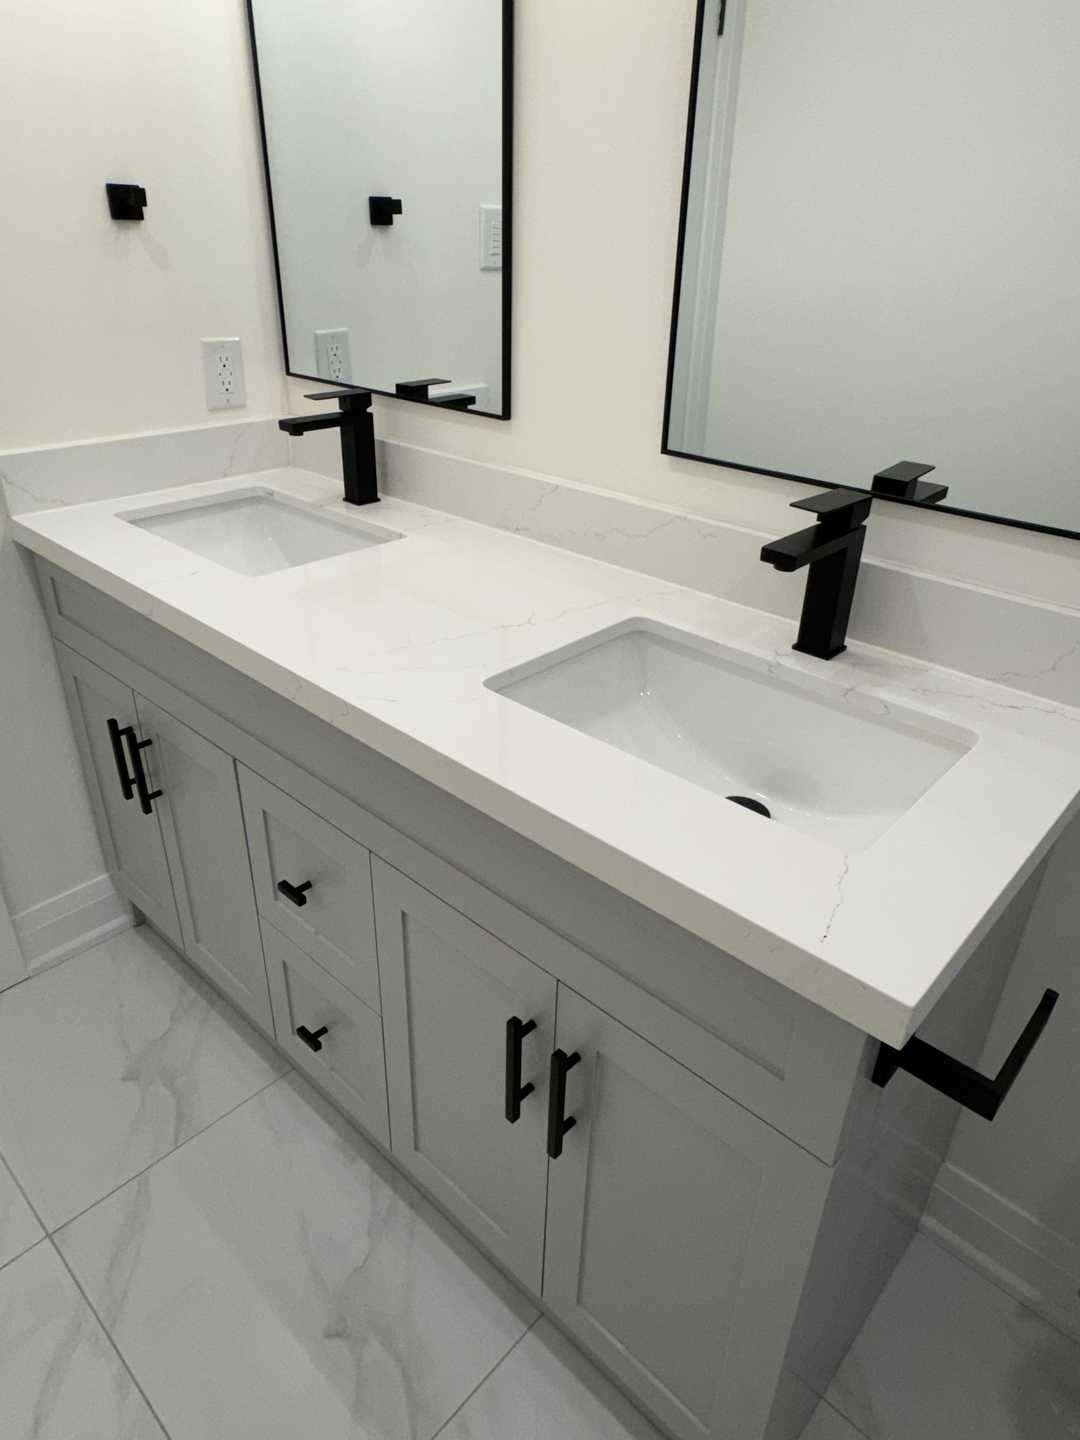
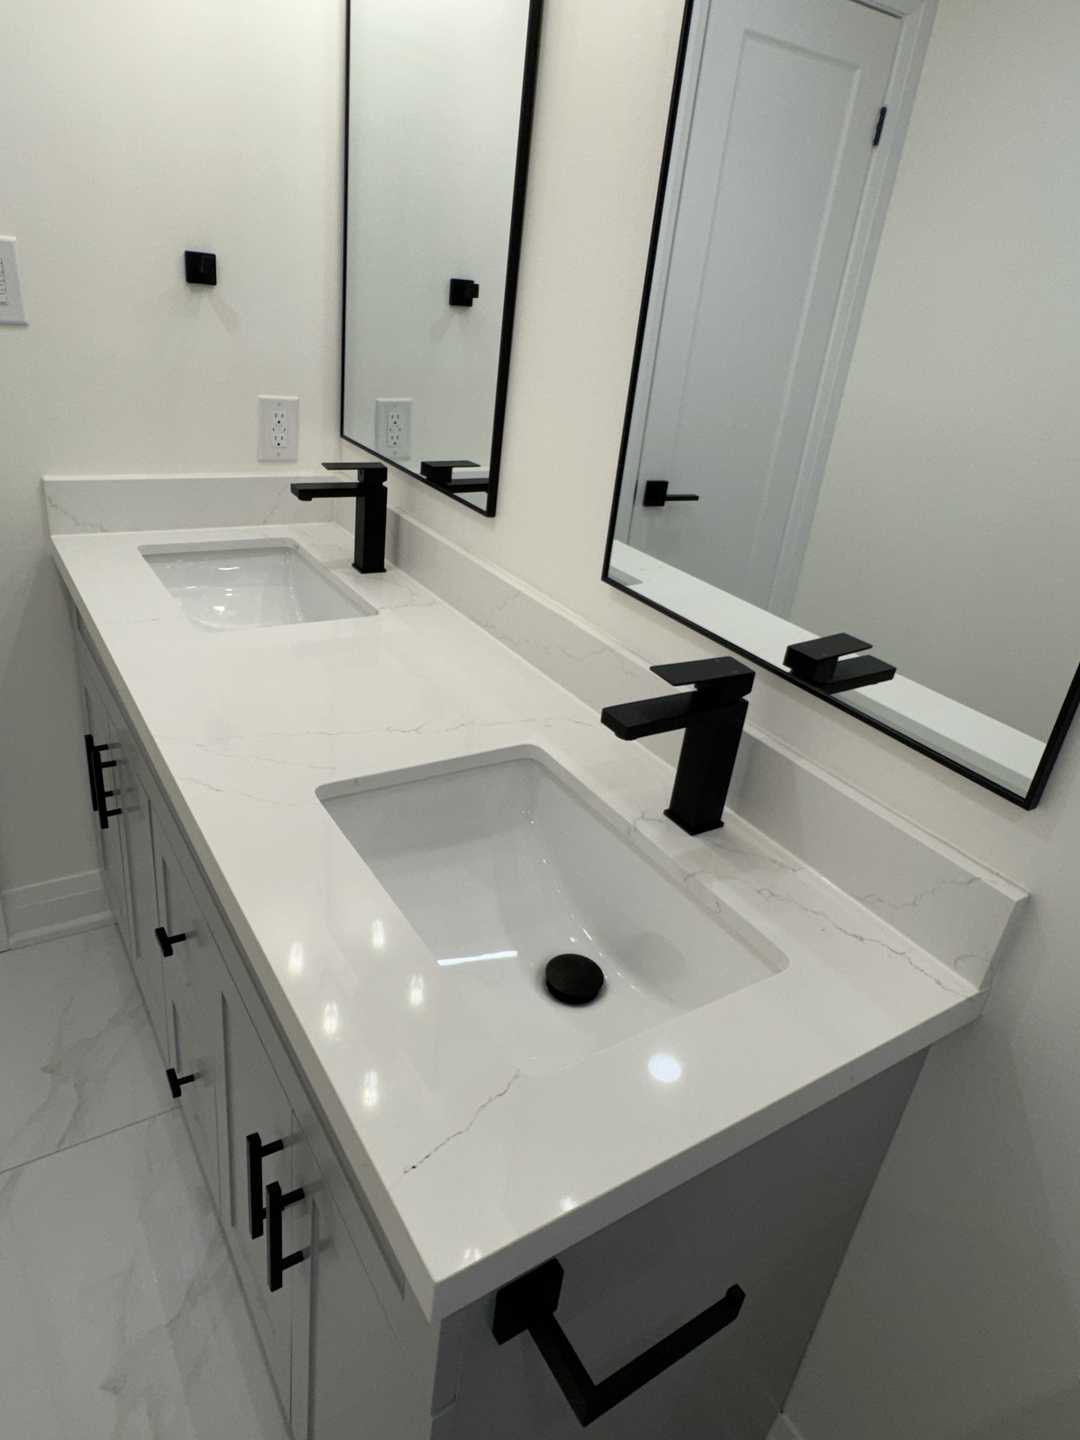
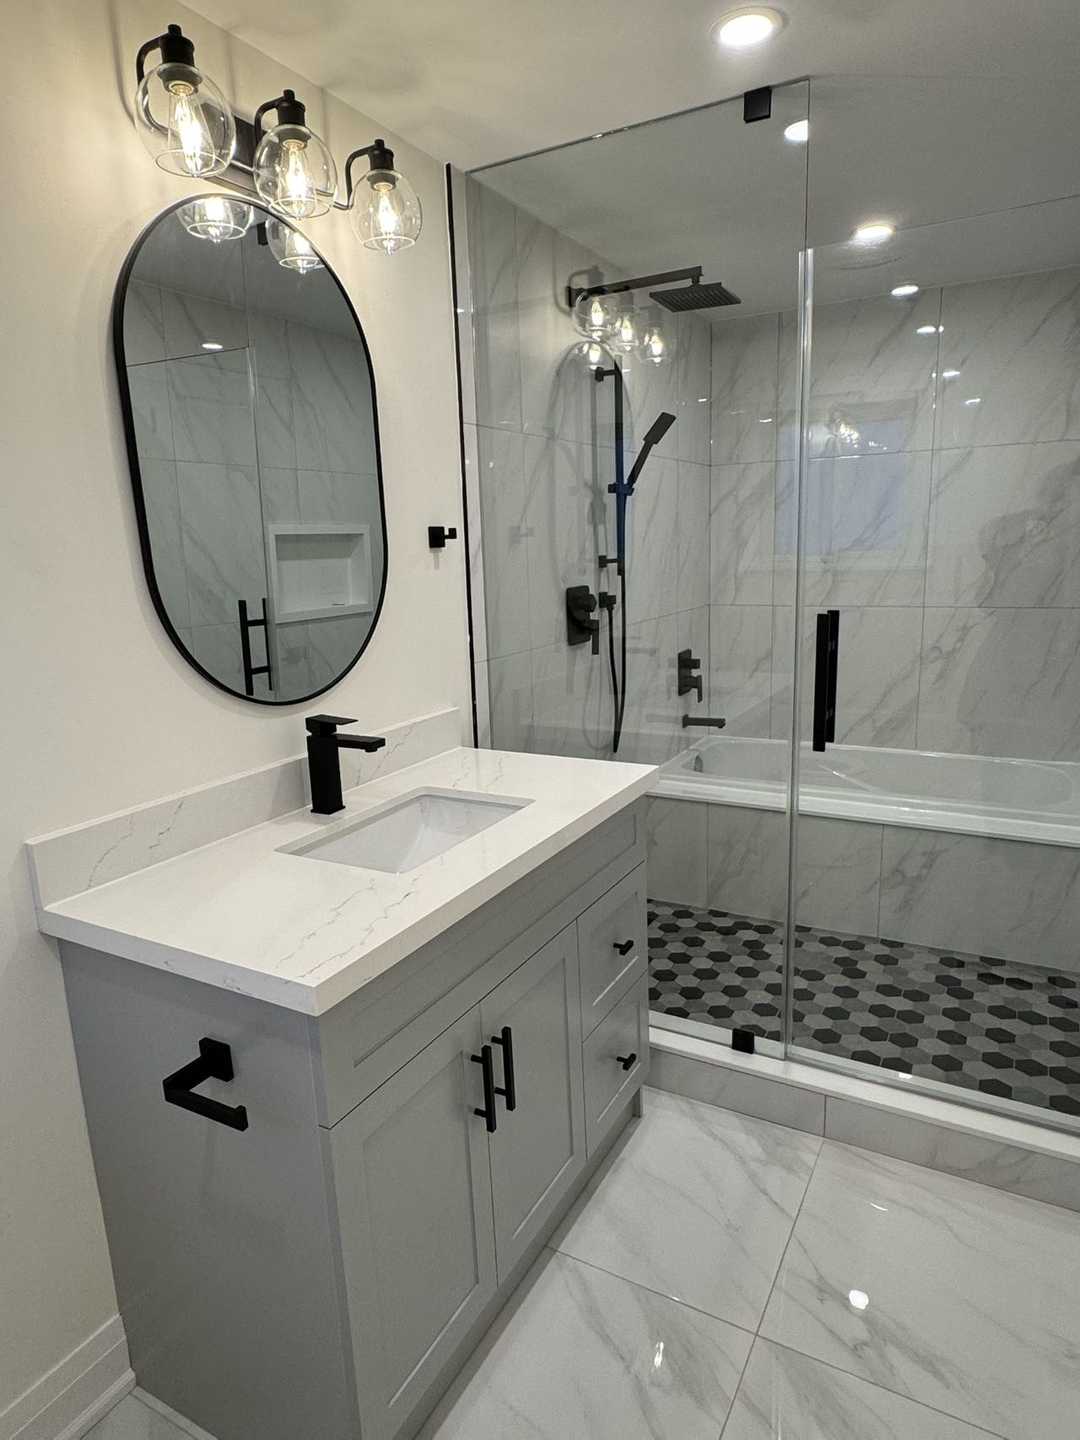
- Vanity: Custom floating vanity (60”) in a matte charcoal grey finish. Features shaker-style doors, soft-close hardware, and a durable white quartz countertop with subtle grey veining.
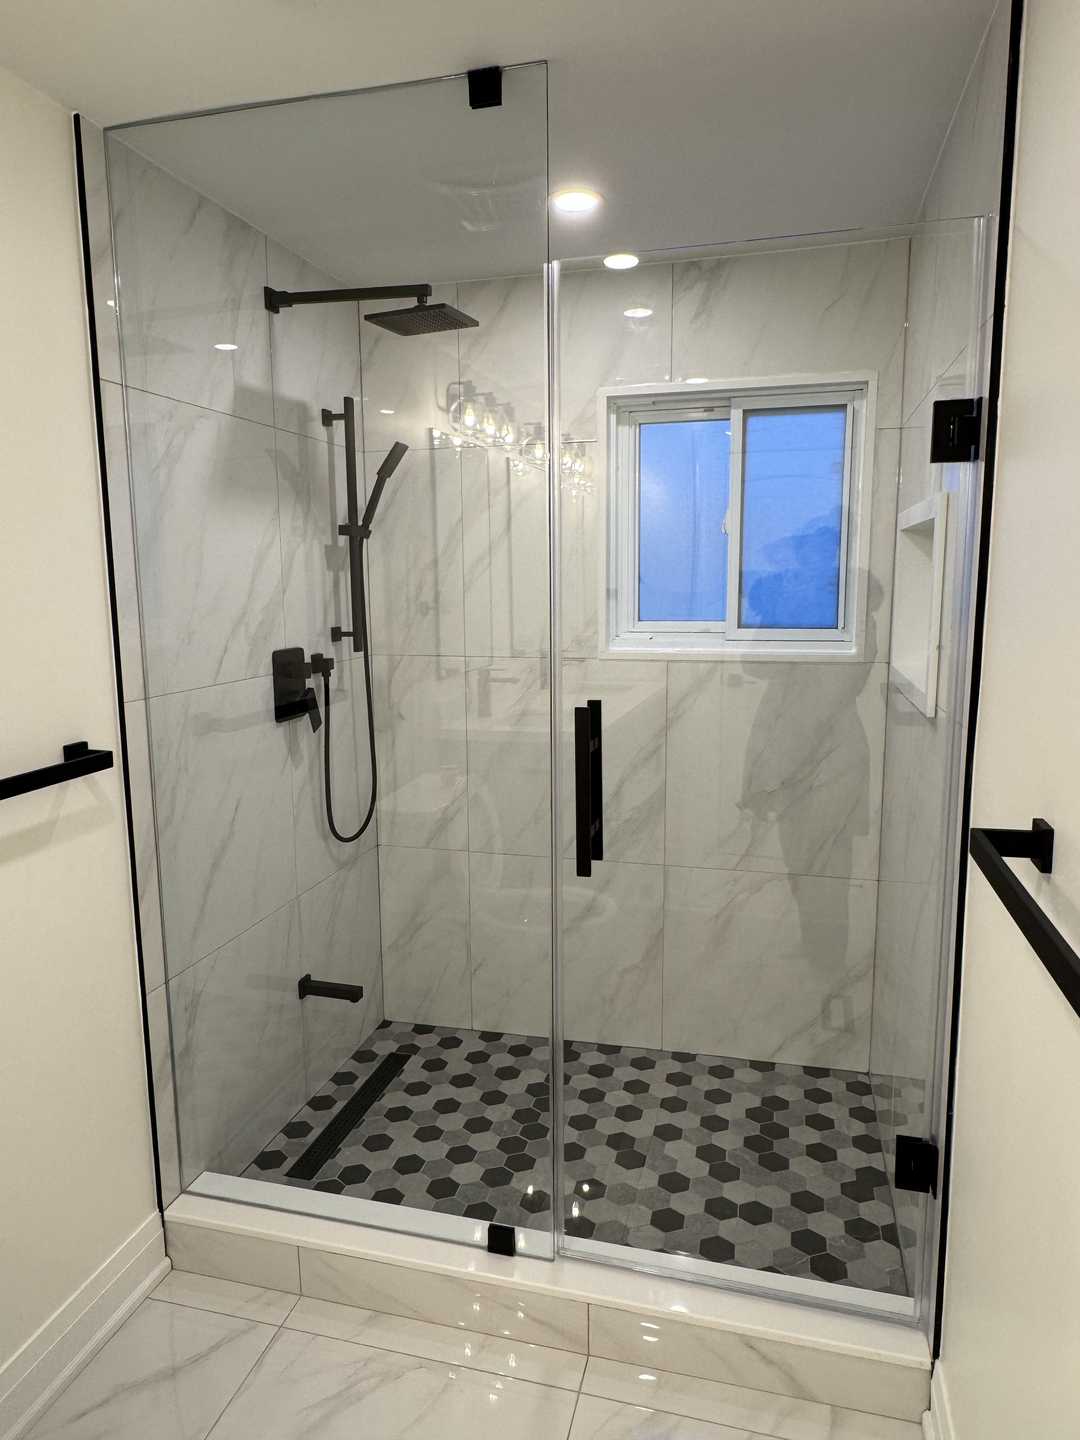
- Floor & Wall Tile: 24”x24” large-format porcelain tile in a light grey, matte concrete finish. Used on the main floor and extended up the shower walls for a seamless, monolithic look.
- Shower Niche Tile: Contrasting hexagonal mosaic tile in a darker charcoal to create depth and visual interest within the walk-in shower.
- Fixtures: All fixtures, including the widespread faucet, rain shower head, and handheld wand, are in a modern matte black finish. This provides a bold, graphic contrast against the lighter grey tiles.
- Mirror: 30”x40” arched smart mirror with integrated LED backlighting, adjustable colour temperature (from warm to cool white), and an anti-fog function.
- Lighting: In addition to the backlit mirror, four 4” LED pot lights were installed on a dimmer switch for layered, controllable ambient lighting.
- Toilet: A sleek, one-piece dual-flush toilet was chosen for its modern look and water-saving efficiency.
The Process & Timeline: A 4-Week Transformation
A successful renovation is built on a foundation of clear planning and expert execution. This project was completed efficiently and to the highest standard over four weeks.
Week 1: Demolition and Rough-ins
The first week is all about clearing the slate. We began with a full demolition, taking the old bathroom down to the studs. This allowed us to inspect the plumbing and electrical systems and plan for upgrades. Our licensed electrician re-routed wiring for the new pot lights and the smart mirror, ensuring all new outlets near the vanity were GFCI-protected as required by the Ontario Electrical Safety Code. Our plumber reconfigured the supply lines and drain for the new floating vanity and the walk-in shower.
Week 2: Preparation and Waterproofing
With the rough-ins complete, we installed new moisture-resistant drywall. This is a critical step in a high-humidity environment like a bathroom. The most important job this week, however, was waterproofing. We applied a premium liquid membrane waterproofing system to the entire shower area, including the floor, walls, and curb. This creates a seamless, impenetrable barrier, providing total peace of mind against leaks and mould growth—a non-negotiable step for any bathroom renovation we undertake.
Week 3: Tiling and Grouting
This is when the new design truly starts to take shape. Our tiling specialists began by carefully laying the large-format 24”x24” tiles. Working with tiles of this size requires immense precision and a perfectly level substrate to avoid lippage. We used a minimal 1/16” grout line to enhance the seamless effect. The contrasting mosaic tile was meticulously installed in the custom-built shower niche. Once the tiles were set, we applied a high-performance, stain-resistant grout in a complementary light grey colour.
Week 4: Final Installations and Finishes
The final week is about bringing all the beautiful elements together. The floating grey vanity and quartz countertop were securely installed, followed by the toilet. The plumber returned to connect the matte black faucet and all the shower fixtures. Our electrician installed the pot lights, switches, and the stunning arch sense mirror. Finally, the room received a fresh coat of paint in a soft, light grey, and the baseboards and door trim were installed. After a thorough professional cleaning, the bathroom was ready for its grand reveal.
The Final Look
Stepping into the completed bathroom is like entering a different world. The space feels significantly larger, brighter, and infused with a sense of tranquility. The large-format tiles create a clean, uninterrupted canvas, while the floating grey vanity adds a touch of modern drama without weighing the room down. The soft, ambient light from the arched mirror casts a welcoming glow, reflecting beautifully off the matte black fixtures. It’s a masterful balance of cool tones and warm light, hard lines and soft curves—a perfect urban sanctuary in the heart of Scarborough.
Design Takeaways for Your Own Renovation
- Embrace Large-Format Tile: Don’t be afraid to use large tiles in a small space. Fewer grout lines create a less “busy” surface, making the room feel more open and luxurious.
- Introduce Curves: Soften a modern, linear design with at least one curved element. An arched mirror, a round sink, or curved tapware can add elegance and prevent the space from feeling too sterile.
- Float Your Vanity: In any bathroom where storage isn’t the absolute top priority, a floating vanity is a game-changer for creating a sense of spaciousness. The visible floor space underneath makes the room feel much larger.
- Invest in Layered Lighting: Good lighting is everything. Combine general overhead lighting (like pot lights on a dimmer) with specific task lighting (like a backlit mirror) to create a space that is both functional and atmospheric.
Maintenance Tips
To keep this Scarborough bathroom looking pristine for years to come, we provided the homeowners with a few simple tips:
- Porcelain Tile: Clean with a pH-neutral cleaner and water. Avoid harsh, acidic, or abrasive cleaners that can damage the grout over time.
- Quartz Countertop: While highly durable and non-porous, it’s best to wipe up spills promptly. Clean with mild soap and water.
- Matte Black Fixtures: Use a soft, microfibre cloth with a gentle cleaner. Avoid abrasive sponges or powders that can scratch the finish. Squeegee the glass shower door after each use to prevent water spots.
Frequently Asked Questions
Q: I live in Toronto. How long does a full 4-piece bathroom renovation like this typically take?
A: For a project of this scope, our standard timeline is between 4 to 6 weeks. This project was completed smoothly in 4 weeks because the layout remained the same and there were no major structural surprises. The timeline can extend if we need to move major plumbing stacks, if custom-ordered materials have long lead times, or if unforeseen issues arise after demolition.
Q: What are the main benefits of using 24”x24” tiles in a standard Toronto bathroom?
A: The primary benefit is the illusion of space. The larger format means far fewer grout lines, which are what often make a floor or wall look busy and sectioned-off. This creates a cleaner, more monolithic surface that visually expands the room. As a bonus, fewer grout lines also mean less to clean and maintain over the years!
Q: Is professional waterproofing really that important for a bathroom renovation in Ontario?
A: Absolutely. It is one of the most critical steps in the entire process and is mandated by the Ontario Building Code for good reason. Water damage is costly and can lead to serious structural issues and mould growth. A professionally installed, continuous waterproofing system, like the one we used here, ensures a completely sealed wet area, protecting your investment and your home’s health for the long term.
Ready to stop dreaming and start designing the bathroom you deserve? Whether you’re in Scarborough or anywhere else in the GTA, our team is here to bring your vision to life. Contact us today for a free quote and let’s create something beautiful together.