From Dated to Dreamy: Our Bolton Bathroom Transformation
For years, our primary bathroom felt like a relic from another era. It was functional, sure, but it lacked any sense of style or sanctuary. The cramped fibreglass shower, the bulky vanity that wasted space, and the dated lighting made getting ready feel more like a chore than a ritual. We knew a change was needed, and we had a clear vision. We imagined a modern, serene space built around the clean lines of a large-format 32”x32” grey tile, the bold statement of black Riobel fixtures, and the soft glow of an arch sense LED mirror with back-lit illumination. A custom vanity was the final, non-negotiable piece of the puzzle to solve our chronic storage woes. This was going to be more than a simple update; it was a complete overhaul of our primary bathroom in our Bolton, ON home, and we couldn’t wait to begin.
Project Quick Facts
- Location: Bolton, ON
- Project Type: Primary Bathroom Renovation
- Key Features: Walk-in shower with frameless glass, custom floating vanity, heated flooring, large-format porcelain tile, Riobel matte black fixtures, arch-style LED mirror with back-lighting.
- Duration: 3-4 weeks
- Completed: Late 2024
Our Design Vision: A Modern Minimalist Retreat
Our goal was to create a space that felt like a private spa—calm, uncluttered, and luxurious. We weren’t chasing fleeting trends; we wanted a timeless design that blended modern minimalism with softer, organic shapes.
The inspiration started with contrast. We loved the dramatic, sophisticated look of matte black fixtures, but we worried they might make the room feel dark. To balance this, we chose a large-format, light grey porcelain tile. The sheer size of the 32”x32” tiles was a strategic choice to make the bathroom feel more expansive and open, with minimal grout lines to interrupt the visual flow.
The real showstopper in our vision was the arched mirror. In a room dominated by straight lines and sharp angles—the square tiles, the rectangular vanity, the glass shower enclosure—the soft curve of the arch would introduce a touch of elegance and visual interest. We specifically wanted an LED mirror that was both front-lit for perfect task lighting (no more shadows when getting ready!) and back-lit to cast a gentle, ambient glow against the wall. This dual-lighting feature was key to creating that versatile, spa-like atmosphere.
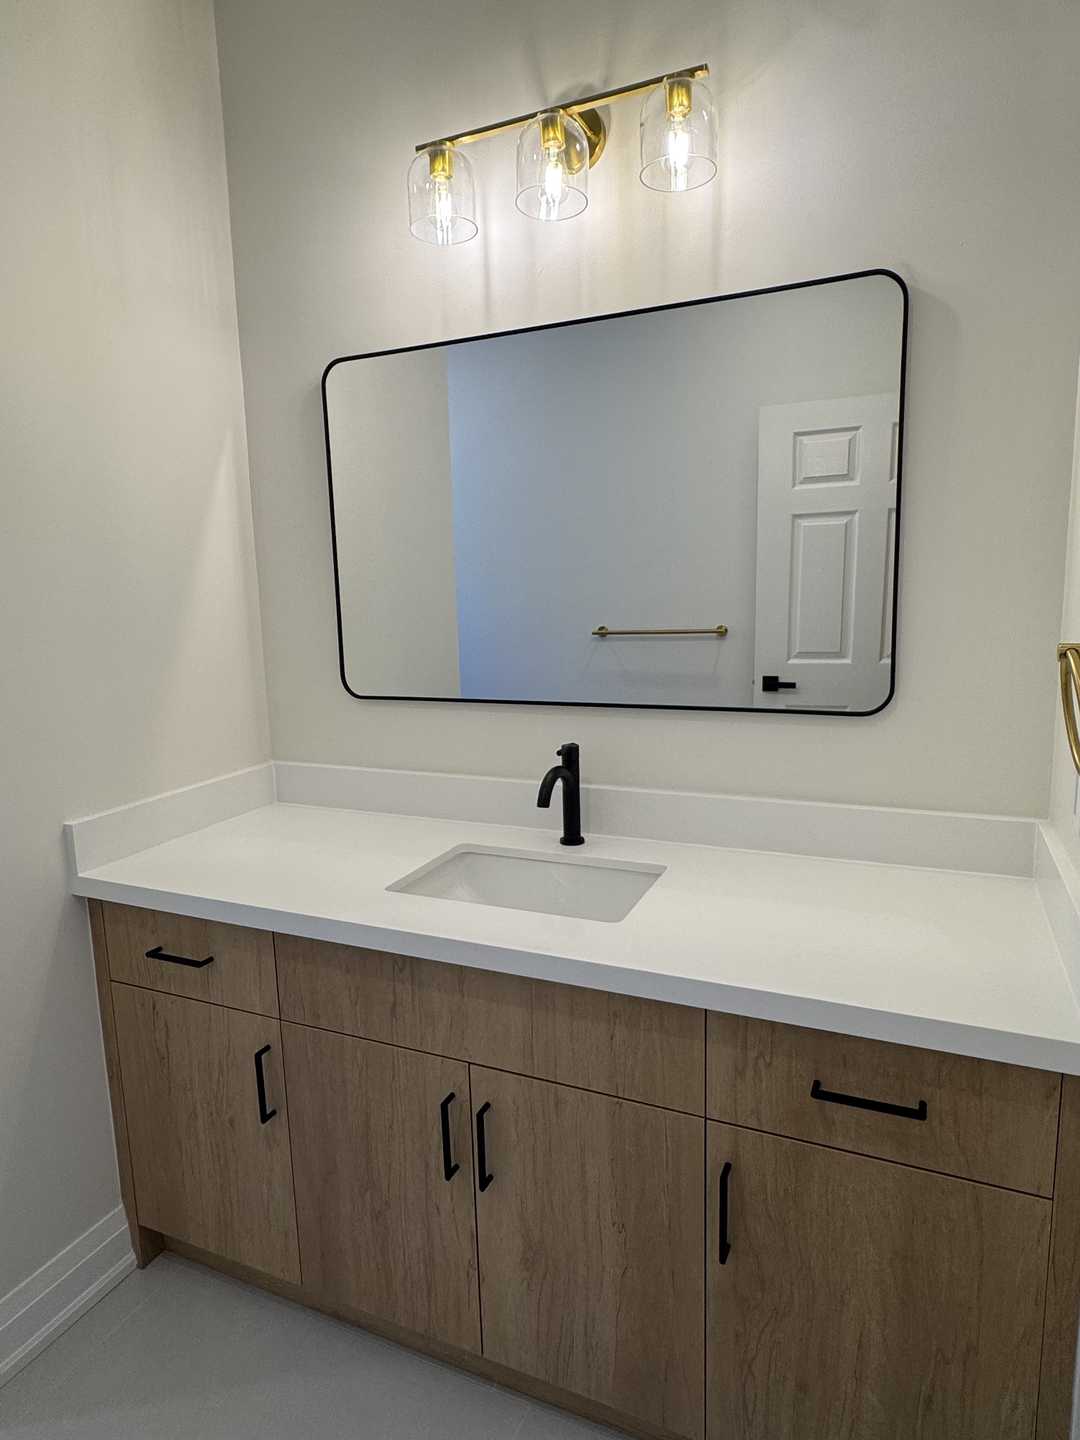
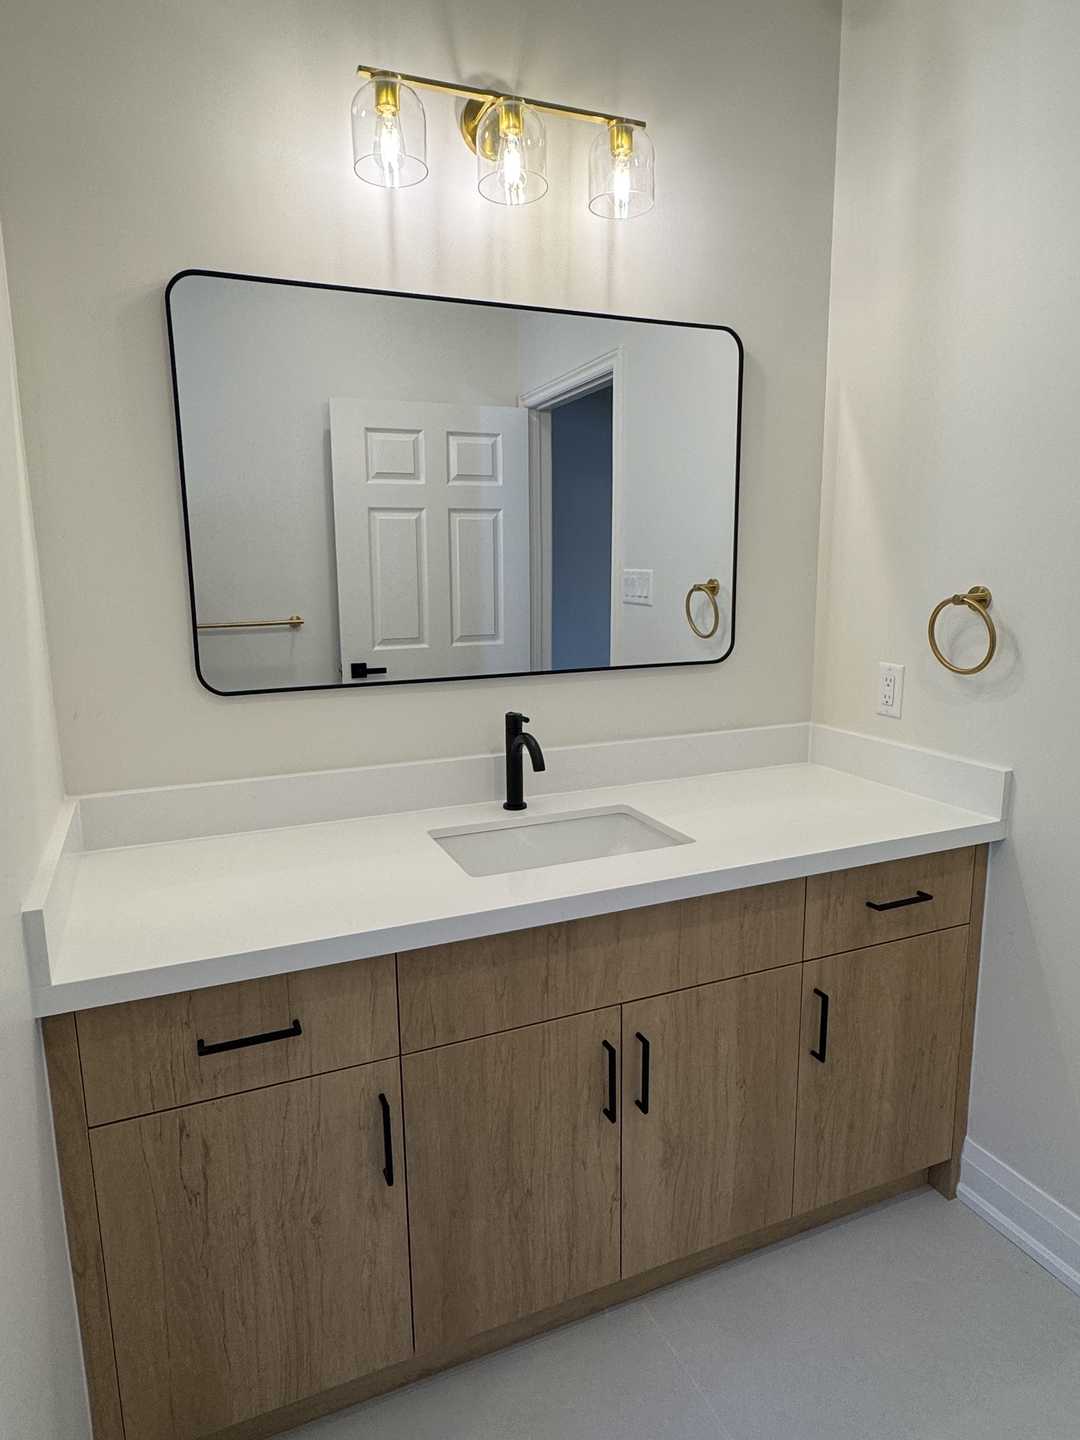
Finally, the vanity had to be custom. Off-the-shelf options just didn’t work with our layout or meet our storage needs. We envisioned a floating vanity to enhance the sense of space by showing more of the floor, finished in a warm wood tone to bring a natural element into the room and soften the cool grey and black palette.
Materials & Specifications: The Building Blocks of Quality
Every choice we made was deliberate, focusing on a balance of aesthetics, durability, and function.
- Wall & Floor Tile: We selected a 32”x32” rectified porcelain tile in a light grey with subtle veining. Porcelain is incredibly dense and durable, making it perfect for the high-moisture environment of a bathroom. The rectified edges allow for very thin grout lines (1/16”), creating a nearly seamless, monolithic surface that is both beautiful and easy to clean.
- Fixtures: We invested in a full suite of fixtures from Riobel’s Momenti collection in a matte black finish. This included a wall-mounted faucet, a pressure-balanced shower system with a rainfall showerhead and a handheld wand, and all the matching accessories like the towel bar and robe hooks. Riobel is known for its high-quality brass construction and durable finishes, which gave us peace of mind.
- Vanity: Our custom vanity was crafted from rift-cut white oak with a clear matte finish to showcase the natural grain. It was designed as a floating unit, securely mounted to the wall. The countertop is a 3cm slab of white quartz with subtle grey veining that ties into the floor tile. It’s non-porous, stain-resistant, and incredibly easy to maintain. We designed the interior with deep, soft-close drawers to organize everything perfectly.
- Mirror: The centrepiece is an Arch Sense LED mirror, 30” wide by 40” high. It features adjustable colour temperature (from warm white to cool daylight), a built-in anti-fog heating pad, and separate controls for the front task light and the ambient back-light.
- Shower System: Beneath the tile, the entire shower area was waterproofed using the Schluter-KERDI system, a non-negotiable for ensuring a leak-proof installation that meets Ontario’s stringent building codes. The shower floor incorporates a linear drain for a clean, modern look. The enclosure is made of 10mm frameless tempered glass with a protective coating to repel water spots.
- Lighting & Electrical: All electrical work was completed by a licensed electrician. This included installing a new, whisper-quiet ventilation fan vented directly outside, moving the vanity light wiring for the new mirror, and installing GFCI-protected outlets as required by code. We also added a pot light inside the shower enclosure for better visibility.
The Process & Timeline: Watching the Vision Come to Life
Seeing a project of this scale unfold is both exciting and a little nerve-wracking, but having a clear plan made all the difference. The entire renovation was completed within the projected 3-4 weeks.
Week 1: Demolition and Rough-Ins The first few days were the loudest and messiest, but the crew was fantastic at containing the dust. They tore out the old tub, vanity, toilet, and all the old tile down to the studs. This revealed the “bones” of the room and allowed the plumber and electrician to get to work. They relocated the shower drain for the new layout, installed the new Riobel shower valve in the wall, and ran the new wiring for the mirror and pot light. This foundational work is invisible in the end, but it’s the most critical for safety and function.
Week 2: Preparation and Tiling With the rough-ins complete and inspected, the room started taking shape. The team installed new moisture-resistant drywall and prepared the shower area for waterproofing. Watching them apply the Schluter membrane was fascinating; it’s an incredibly detailed process that ensures every seam and corner is perfectly sealed. Once the waterproofing was complete and passed its flood test, the tiling began. Laying such large tiles requires immense skill and precision to ensure they are perfectly level and the grout lines are flawless. By the end of this week, the room was transformed.
Week 3: Installation of the Stars This was the most rewarding week. The custom vanity arrived and was expertly mounted to the wall. The quartz countertop was installed, followed by the undermount sink and the sleek, wall-mounted Riobel faucet. The toilet was set, and the electrician returned to hang the magnificent arched mirror and install the new light switches and outlets. The room suddenly looked and felt like a real bathroom again, but a far more beautiful one.
Week 4: The Finishing Touches The final week was all about details. The walls received a fresh coat of paint in a soft, off-white hue specifically formulated for high-humidity areas. The baseboards and trim were installed, and the frameless glass shower door was fitted. After a thorough professional cleaning, the team did a final walkthrough with us to ensure every single detail was perfect. The transformation was complete.
The Final Look: Our Personal Sanctuary
Walking into the finished bathroom for the first time was breathtaking. The space feels twice as large as before. The continuous grey tile on the floor and walls creates a serene, unified canvas. The matte black fixtures stand out as bold, sculptural elements, providing a perfect counterpoint to the light tile.
But the true heart of the room is the vanity and mirror. The warmth of the white oak vanity brings a necessary organic touch to the space, preventing it from feeling cold or sterile. And the arched mirror… it’s a piece of art. During the day, its shape softens the room’s geometry. In the evening, with just the back-light on, it casts a halo of warm light that turns the entire bathroom into a tranquil escape. It’s everything we envisioned and more. This is no longer just a room for getting ready; it’s a place where we can decompress and recharge.
If you’re dreaming of a similar transformation for your own home, we can’t recommend the process enough. A well-planned renovation can truly change how you experience your space. Start planning your project with a free quote today.
Our Top Design Takeaways
- Embrace Large-Format Tile: If you want to make a small or medium-sized bathroom feel larger, 32”x32” tiles are a game-changer. Fewer grout lines mean less visual clutter and a more expansive feel.
- Mix Shapes and Textures: Our design works because of the interplay between different elements. The sharp lines of the tile and glass are softened by the curve of the mirror. The cool, smooth surfaces of quartz and porcelain are warmed by the natural grain of the wood vanity.
- Prioritize Layered Lighting: Don’t rely on a single overhead light. The combination of the ambient back-light on our mirror, the focused task light from the front, and the overhead pot light in the shower gives us perfect lighting for any mood or task.
- Invest in What You Touch: High-quality fixtures like the Riobel set not only look better but feel more substantial and operate more smoothly. It’s a daily reminder of the quality of the renovation.
Simple Maintenance for Lasting Beauty
- Matte Black Fixtures: The key is to avoid harsh, abrasive chemicals. We simply wipe them down with a soft, damp microfiber cloth. For any soap scum, a 50/50 solution of water and white vinegar works perfectly.
- Porcelain Tile: A pH-neutral cleaner is all that’s needed. We use a squeegee on the shower walls and glass after each use to prevent hard water spots from forming.
- Quartz Countertop: One of the easiest surfaces to care for. A little mild soap and water is sufficient for daily cleaning. It doesn’t require any sealing.
- Ventilation is Key: We always run our new, quiet bathroom fan for at least 20-30 minutes after a shower. This is the single best thing you can do to manage moisture, prevent mould and mildew, and protect your investment.
Frequently Asked Questions
Why did you choose a custom vanity instead of a stock option available in Bolton or the GTA? While there are many great retail options, a custom vanity allowed us to get the exact size, material, and storage configuration for our specific needs. It fits the wall perfectly from end to end, maximizing counter space. We could also select the exact white oak finish to bring the warmth we wanted into the design, something we couldn’t find in a pre-made unit.
Are matte black fixtures difficult to keep clean? Honestly, we’ve found them easier to maintain than polished chrome. They don’t show fingerprints or water spots as readily. As long as you avoid abrasive sponges or harsh cleaners and stick to soft cloths, they maintain their beautiful, deep finish with minimal effort.
What is the most important part of a bathroom renovation to get right for an Ontario home? Without a doubt, it’s the work you can’t see: the waterproofing and the electrical. Using a professional, certified system like Schluter-KERDI in the shower is crucial for preventing leaks, which can cause catastrophic damage. Likewise, all electrical work must be done by a licensed electrician to meet the Ontario Electrical Safety Code, especially concerning GFCI protection for outlets near water sources. Don’t cut corners on these foundational elements.
Does a high-end bathroom renovation like this add significant value to a home in the Caledon area? Absolutely. Real estate experts consistently rank bathroom and kitchen renovations as having the highest return on investment. A modern, stylish, and highly functional primary bathroom is a major selling point for potential buyers in communities like Bolton. It signals that a home has been well-cared for and updated to modern standards.
We are so thrilled with our new bathroom and the team that brought our vision to life. If you’re considering a renovation and want to explore what’s possible in your own home, we highly recommend taking the first step.
Ready to create your own sanctuary? Contact us for a complimentary consultation and quote.