
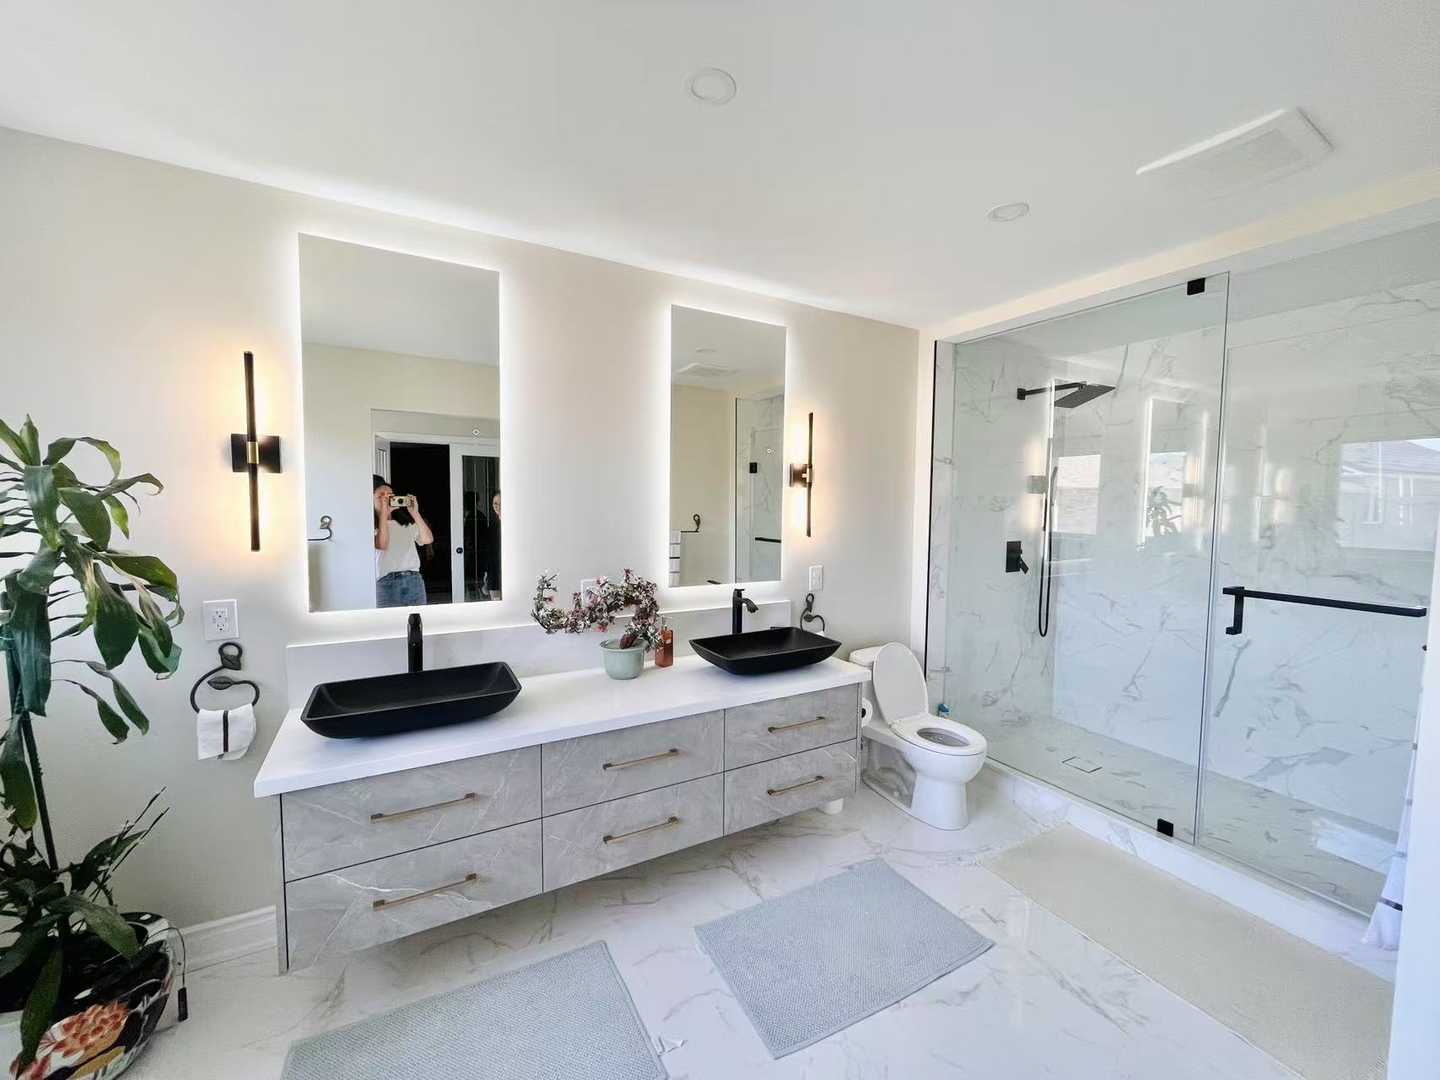
Welcome to another project diary from the field! This time, we’re taking you inside a stunning main bathroom transformation we recently completed in a beautiful Mississauga home. The goal was to take a functional but dated space and turn it into a modern, spa-like retreat. At the heart of this project was a specific vision for a custom floating vanity with U shape of drawers, a gorgeous frameless back-lit LED mirror, and warm side scones lighting to create the perfect ambiance.
Project Intro & Quick Facts
Every renovation starts with a story. For this family in Mississauga, their main bathroom felt cramped, dark, and difficult to keep organized. They dreamed of a space that was not only visually stunning but also incredibly practical for their daily routines. They wanted clean lines, an open feel, and smart storage solutions that would eliminate clutter for good. Our mission was to deliver a complete overhaul that blended sophisticated design with top-tier functionality, creating a sanctuary they could enjoy for years to come.
- Project: Main Bathroom Spa-Inspired Overhaul
- Location: Mississauga, ON
- Duration: 3 wweks
- Key Features: Custom floating vanity, frameless backlit LED mirror, porcelain slab walls, curbless walk-in shower, wall-hung toilet, matte black fixtures.
- Project Focus: Maximizing space and light through modern design and integrated technology.
Design Vision
The core design philosophy for this Mississauga bathroom was “warm minimalism.” The clients wanted to escape the visual noise of their old bathroom—the bulky vanity, the framed shower door, the busy floor tiles. They envisioned a calm, cohesive space where every element had a purpose and contributed to a feeling of tranquility.
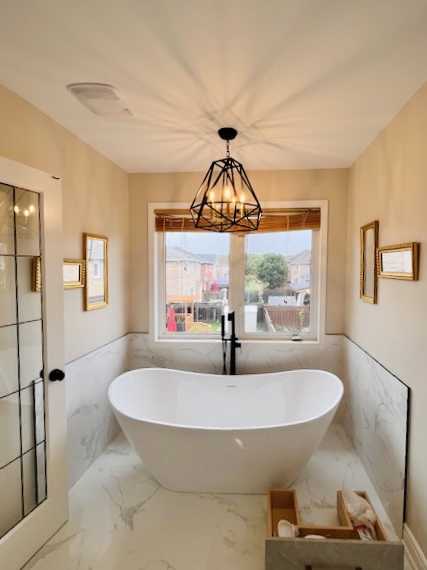
The starting point was the vanity wall. We decided this would be the room’s focal point. A floating vanity was non-negotiable; by lifting the cabinetry off the floor, we instantly create the illusion of more space and make the floor much easier to clean. To solve the classic dilemma of storage versus plumbing, we designed a custom unit with a clever U shape of drawers. This design allows the drawers to wrap around the central plumbing pipes, maximizing every square inch of usable storage without compromise.
Lighting was the second pillar of the design. Harsh overhead lighting is the enemy of a relaxing atmosphere. We proposed a layered lighting scheme to provide both function and mood. The centerpiece is the large frameless back-lit LED mirror, which casts a soft, even glow, perfect for ambient light and daily grooming. Flanking the mirror, a pair of elegant side scones lighting fixtures adds a touch of warmth and provides focused, flattering task light, eliminating shadows. This combination ensures the bathroom is perfectly lit for any occasion, from a bright morning routine to a relaxing evening soak.
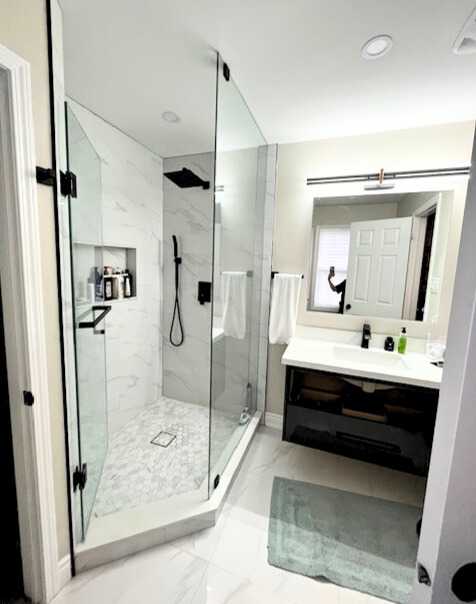
To complete the vision, we opted for a monochromatic palette of soft greys and warm wood tones, punctuated by the bold contrast of matte black fixtures. A curbless, walk-in shower with a single glass panel would further enhance the open, airy feel, creating a seamless transition from the main floor area into the shower space.
Materials & Specifications
Choosing the right materials is crucial for achieving both the desired aesthetic and long-term durability, especially in a high-moisture environment like a bathroom.
- Vanity: The star of the show is the custom-built floating vanity, crafted from solid maple with a warm walnut veneer. The drawers feature high-quality, soft-close hardware for a touch of quiet luxury. The U-shaped design of the top drawer is a testament to bespoke craftsmanship.
- Countertop & Sink: We topped the vanity with a 2-inch thick slab of Caesarstone quartz in “Cloudburst Concrete.” Its subtle grey texture provides visual interest without being overwhelming, and its non-porous surface is incredibly durable and resistant to stains and bacteria. An undermount rectangular ceramic sink maintains the clean, minimalist lines.
- Tile: To create a truly seamless and grand feel, we used large-format 24” x 48” porcelain tiles for both the floor and the shower walls. The tile, a Calacatta marble look-alike with delicate veining, minimizes grout lines, making the space feel larger and significantly easier to maintain.
- Lighting: The frameless LED mirror features an integrated dimmer and a colour temperature of 3000K, providing a warm, natural-looking light. The side sconces are from a local Toronto designer, featuring a simple cylindrical design with a matte black finish that complements the other fixtures. All lighting was installed by our licensed electrician to meet the stringent requirements of the Electrical Safety Authority (ESA) of Ontario.
- Shower System: The curbless shower was built using the Schluter-KERDI waterproofing system, a non-negotiable for us to ensure a completely sealed, leak-proof enclosure that exceeds Ontario Building Code standards. A sleek, stainless steel linear drain sits discreetly at the back. The shower is enclosed by a single panel of 10mm tempered glass with a protective coating to repel water spots.
- Fixtures: A full suite of matte black fixtures was selected, including the widespread faucet, the rainfall showerhead with a handheld wand, and the toilet flush actuator. This consistent finish ties the entire design together.
- Toilet: A wall-hung toilet was installed to complement the floating vanity. With the tank concealed within the wall, it saves precious floor space and elevates the modern aesthetic.
Process & Timeline
A three-week timeline for a full bathroom gut is ambitious but achievable with meticulous planning and a dedicated team. Here’s how we broke down the work on this Mississauga project.
Week 1: Demolition, Rough-ins, and Foundations
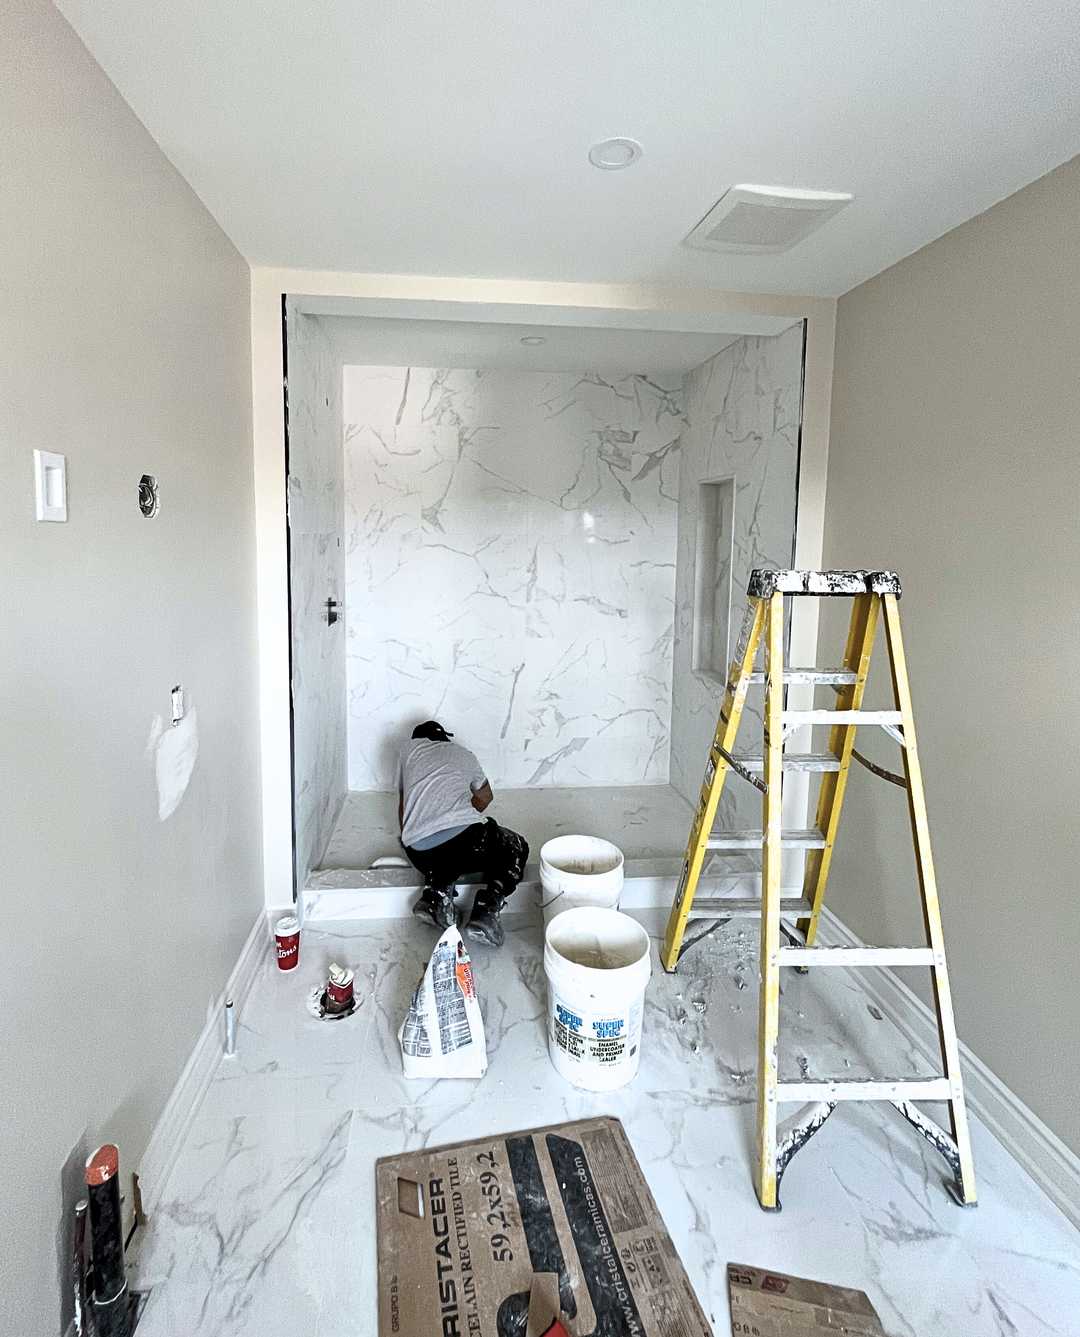
The first few days are always the most dramatic. We began by carefully sealing off the work area to contain dust and debris. The old tub, vanity, toilet, and tiles were completely removed, taking the room back to the studs. This “blank canvas” stage is critical for assessing the underlying structure.
With the room cleared, our plumbing and electrical teams got to work. This is the crucial “behind-the-walls” phase. The plumbing was re-routed to accommodate the new positions for the wall-hung toilet’s in-wall carrier and the floating vanity’s drain and supply lines. Simultaneously, our electrician ran new wiring for the pot lights, the fan, the backlit mirror, and the side sconces. All electrical work in a bathroom, considered a “wet zone,” must be done with extreme care, using GFCI-protected circuits as required by Ontario code.
Week 2: Waterproofing, Tiling, and Assembly
Week two is all about rebuilding and bringing the structure back. The first order of business was installing the new drywall and preparing the shower area. We installed the shower base and applied the Schluter-KERDI membrane across the shower floor and up the walls, creating a watertight “tank.” This is one of the most important steps in any bathroom renovation, as it provides a robust barrier against water and vapour penetration.
Once the waterproofing was complete and passed our internal inspection, the tiling began. Working with large-format porcelain requires precision and expertise. Our tile setter started with the floor, ensuring a perfectly level surface, before moving to the walls. The sheer size of the tiles means fewer grout lines, which contributes to the clean, monolithic look we were aiming for. By the end of the week, the room was fully tiled, grouted, and the walls outside the shower received their first coat of moisture-resistant paint.
Week 3: Installation and Final Touches
This is the most rewarding week, where all the planning and preparation culminates in the final look. The custom floating vanity was the first major piece to be installed, securely mounted to reinforced blocking within the wall. The quartz countertop and sink followed.
Next, our electrician returned to connect the frameless backlit mirror and the beautiful side sconces, bringing the room’s lighting scheme to life. The plumber then installed the matte black faucet, the wall-hung toilet, and the complete shower trim kit. The single panel of frameless glass for the shower was carefully set in place, completing the open-concept wet area.
The final days were dedicated to the details: installing the towel bars, toilet paper holder, and robe hooks. The painters completed their final touch-ups, and our team performed a deep clean of the entire space. We concluded with a comprehensive walkthrough with the homeowners, demonstrating all the new features and ensuring every detail met their expectations.
The Final Look
Stepping into the completed bathroom is like entering a different world. The space feels doubled in size, thanks to the floating vanity, wall-hung toilet, and seamless glass shower. The large-format tiles create an elegant, continuous surface that flows from the floor up the walls, lending a sense of grandeur.
The lighting is, without a doubt, a showstopper. During the day, the room is bright and airy. In the evening, the soft glow from the back-lit mirror and the warm light from the side sconces create an incredibly inviting and serene atmosphere. The warm wood of the vanity provides a beautiful, organic contrast to the cool grey of the tiles and the sharp, modern lines of the matte black fixtures. It’s a space that perfectly balances form and function—a true personal sanctuary right in their Mississauga home.
Design Takeaways
This project offers several key insights for anyone planning a bathroom renovation in the Toronto area:
- Embrace Floating Elements: In any bathroom, but especially in smaller urban spaces, getting fixtures off the floor is a powerful design tool. It not only creates a more open, spacious feel but also simplifies cleaning.
- Invest in a Layered Lighting Plan: A single overhead light is rarely sufficient or flattering. Combining ambient light (like a backlit mirror), focused task light (sconces), and general overhead light (pot lights) gives you ultimate control over the mood and functionality of your space.
- Customization Solves Problems: The U-shaped vanity drawer is a perfect example of how custom millwork can solve practical problems beautifully. Don’t assume you have to work around standard-sized limitations; custom solutions can unlock your space’s full potential. If you’re considering a similar solution, we can help you design it during a free quote consultation.
Maintenance Tips
To keep this modern bathroom looking pristine, we left the homeowners with a few simple care instructions:
- Porcelain & Quartz: Clean surfaces with a pH-neutral, non-abrasive cleaner. A simple solution of warm water and a drop of dish soap is often all you need.
- Matte Black Fixtures: To prevent water spots and preserve the finish, wipe fixtures dry with a soft microfiber cloth after use. Avoid harsh chemical cleaners or abrasive pads.
- Shower Glass: Use a squeegee on the glass panel after each shower. This small habit takes less than 30 seconds and dramatically reduces soap scum and mineral deposit buildup.
Frequently Asked Questions
How long does a bathroom renovation typically take in Mississauga?
While this project was completed in a tightly scheduled 3 weeks, a more typical timeline for a full gut renovation of a main bathroom in Mississauga or the GTA is between 4 to 6 weeks. This allows for potential delays in material delivery, necessary city inspections, and the curing times required for things like waterproofing and grout.
Are permits always required for a bathroom remodel in Ontario?
If your renovation involves changing the plumbing layout (like moving a toilet or drain) or altering electrical wiring (like adding new lights or outlets), then yes, permits are absolutely required. A building permit for the plumbing and an electrical permit from the ESA are necessary to ensure all work is performed to code, is safe, and is properly inspected. We manage this entire process for our clients.
What is the advantage of a curbless shower?
A curbless or “zero-threshold” shower offers two major benefits. Aesthetically, it creates a seamless, high-end look that makes the bathroom feel more spacious. Functionally, it’s a fantastic accessibility feature, making it easier and safer for people of all ages and mobility levels to enter and exit the shower.
Is a floating vanity secure enough for a family bathroom?
Absolutely. When installed correctly, a floating vanity is incredibly secure. We mount it to reinforced blocking that is installed between the wall studs, ensuring it can handle significant weight and daily use. It’s a safe and durable choice for any modern bathroom.
This Mississauga bathroom project was a joy to bring to life, transforming a tired space into a functional work of art. It’s a perfect example of how thoughtful design, quality materials, and expert craftsmanship can completely redefine a room.
If you’re feeling inspired to create your own bathroom sanctuary, we’d love to hear about it. Get in touch for a free quote and let’s start planning your dream renovation today.