
From Cramped to Connected: A Toronto Kitchen Renovation with an Extended Island Countertop
A kitchen is so much more than a place to cook; it’s the command center of the home, the backdrop for morning coffees, homework sessions, and late-night chats. For one Toronto family, their dated kitchen was falling short. We embarked on a transformative kitchen renovation with an extended island countertop that didn’t just update the look, but completely redefined how they lived in their space. This project, completed in the early summer of 2023, is a perfect example of how thoughtful design can unlock a home’s true potential.
This is the story of how we turned a compartmentalized and inefficient kitchen into a bright, open, and incredibly functional family hub.
Quick Facts
- Project: Full Kitchen Renovation
- Location: Toronto, ON
- Key Features: Custom extended island with seating, two-tone cabinetry, quartz countertops and backsplash, updated lighting plan.
- Duration: 3-4 weeks
The Design Vision: Creating a Social Hub
The “before” was a story familiar to many homeowners in older Toronto properties. The kitchen was enclosed, with a small, awkward peninsula that created a traffic jam and offered little functional workspace or seating. The homeowners dreamed of a space where they could cook while engaging with family and guests, a layout that felt inclusive rather than isolated.
Our initial design consultation focused on one key objective: flow. The solution was clear—we needed to open up the space and make a central island the star of the show.
The vision was to:
- Remove the Peninsula: By demolishing the obstructive peninsula and a non-load-bearing wall segment, we could instantly create a more open-concept feel connecting the kitchen to the adjacent dining area.
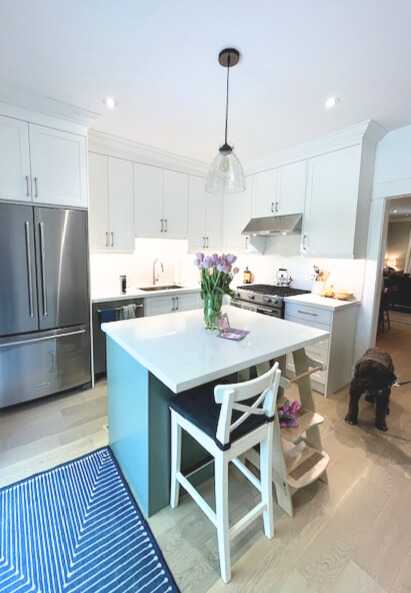
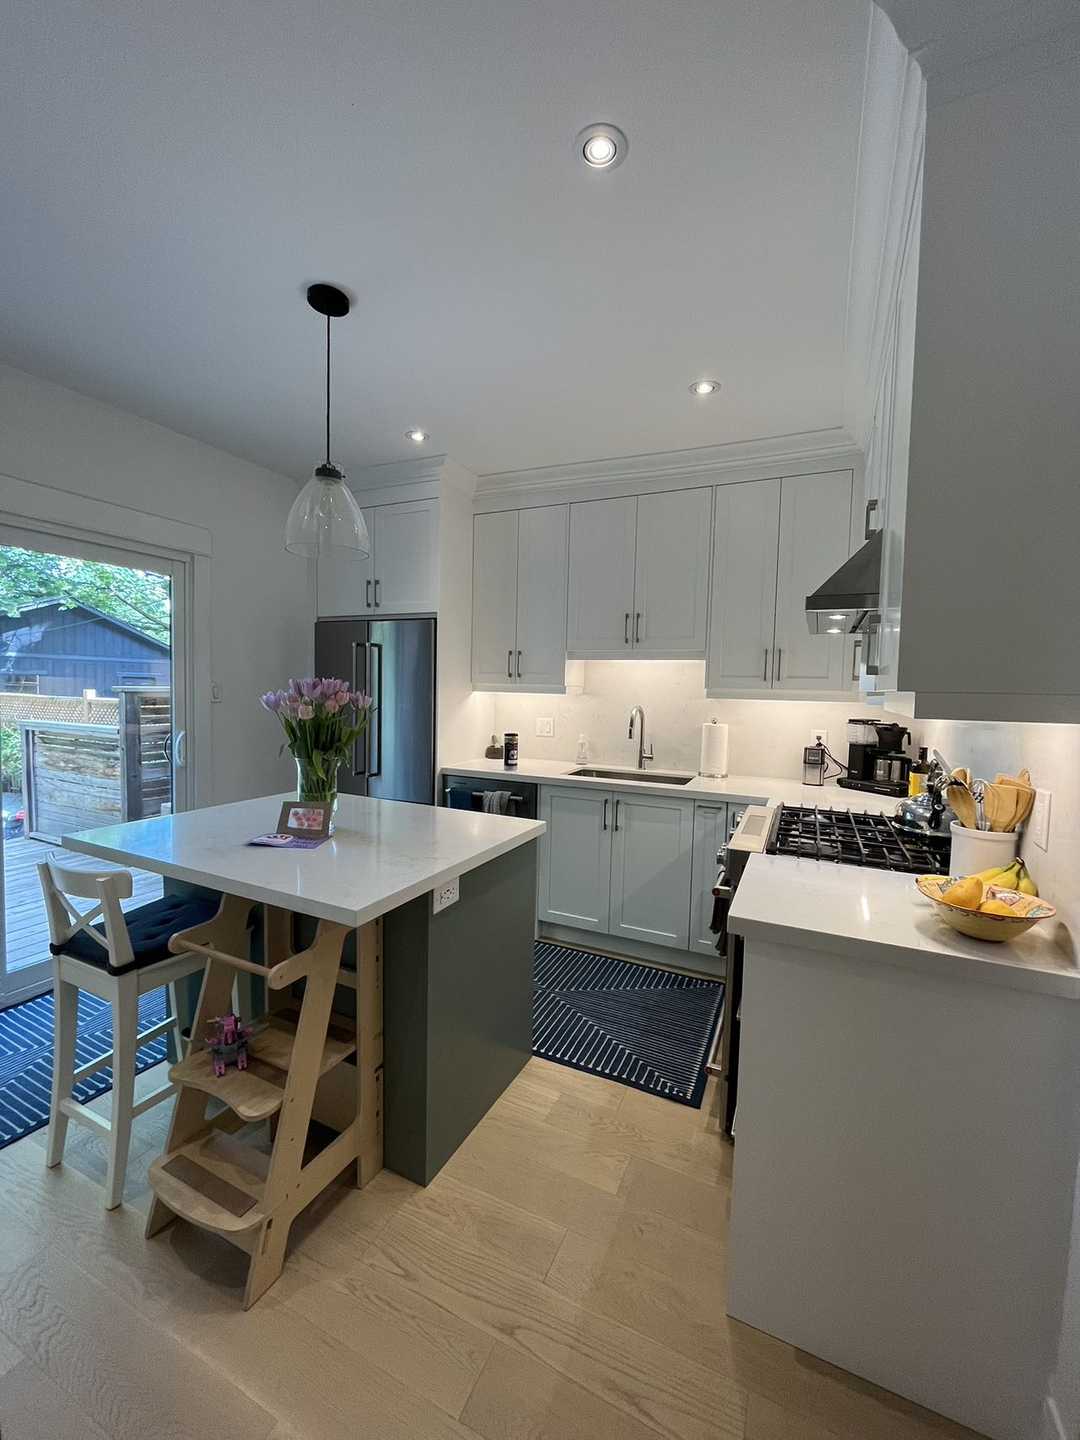
- Design a Grand Island: The centerpiece would be a large, multifunctional island. The design called for one side dedicated to prep work, complete with a sink and ample storage, while the other side would feature an extended countertop overhang. This extension was crucial; it created a comfortable and casual dining bar for four, eliminating the need for a separate, seldom-used breakfast nook.
- Implement a Two-Tone Colour Scheme: To create visual interest and depth, we planned for deep navy blue base cabinets for the island and perimeter, contrasted with clean, white upper cabinets. This approach grounds the space while keeping the upper portion feeling light and airy.
- Prioritize Smart Lighting: A layered lighting plan was essential. We specified recessed pot lights for overall ambient lighting, elegant pendant lights to define the island, and under-cabinet LED strips for bright, functional task lighting on the countertops.
Materials & Specifications
Choosing the right materials is about balancing beauty, durability, and budget. For this Toronto home, we selected a palette that exuded modern elegance while being tough enough for daily family life.
- Cabinetry: We used custom-built Shaker-style cabinets. The perimeter and island base cabinets were finished in a resilient lacquer paint (Benjamin Moore’s “Hale Navy”), while the uppers were a matching crisp white (“Chantilly Lace”). All drawers and doors were fitted with soft-close hardware for a touch of quiet luxury.
- Countertops & Backsplash: To unify the space and create a dramatic, seamless look, we opted for Calacatta Laza quartz. This engineered stone features a milky white background with soft brown and grey veining, mimicking the look of high-end marble without the maintenance. We used a 3cm slab for the countertops for a substantial feel and ran the same material up the wall for a full-height backsplash behind the range—a statement that is both stunning and incredibly easy to clean.
- Flooring: The existing hardwood was carefully laced in and refinished to create a seamless transition from the kitchen into the rest of the main floor, enhancing the open-concept flow.
- Plumbing Fixtures: A matte black, single-handle pull-down faucet was paired with a deep, single-basin undermount stainless steel sink. This combination is practical for washing large pots and pans and adds a sharp, modern contrast to the light countertops.
- Hardware: Sleek and understated brushed gold pulls and knobs were chosen for the cabinetry. This touch of warmth prevents the cool blue-and-white palette from feeling sterile and ties in with the new pendant lighting.
The Process & Timeline: A 4-Week Transformation
A well-executed renovation runs on a precise schedule. Our team is committed to minimizing disruption and delivering on time. This project followed our proven 3-4 week timeline for a full kitchen overhaul.
Week 1: Demolition and Rough-Ins The first few days were dedicated to careful demolition. The old cabinets, countertops, and the peninsula were removed. Our licensed electrician and plumber then got to work on the “rough-ins.” This is a critical stage where we moved and installed new wiring and plumbing to service the island. All electrical work, including running dedicated circuits for new appliances and adding GFCI-protected outlets to the island, was performed to meet the stringent standards of the Ontario Building Code and prepared for inspection by the Electrical Safety Authority (ESA).
Week 2: Foundation and Structure With the rough-ins complete and passed inspection, we moved on to drywall installation and repair. Our team meticulously taped, mudded, and sanded the new walls to create a flawless canvas. Towards the end of the week, the beautiful custom cabinets began to arrive and our installers started fitting them into place, bringing the new layout to life.
Week 3: Surfaces and Finishes This is the week where the visual transformation truly accelerates. The professional countertop fabricators came in to create a precise digital template for the quartz. While the countertops were being cut and polished off-site, our team installed the new flooring and applied the first coats of paint. Once the stunning Calacatta Laza countertops—including the large, single-piece island top—were installed, the kitchen’s new character became undeniable. The full-height backsplash went up next, followed by the installation of the sink and faucet.
Week 4: The Finishing Touches The final week was all about details. The new appliances were delivered and expertly installed. Our electrician returned to install the pot lights, pendant fixtures, and under-cabinet lighting, connecting everything and ensuring all switches and outlets were perfect. The cabinet hardware was mounted, the final coat of paint was applied, and our team performed a deep, professional clean. After a final walkthrough with the ecstatic homeowners, the kitchen was officially ready for its new life.
The Final Look: An Entertainer’s Dream
Stepping into the finished kitchen is like entering a completely different home. Where there was once a barrier, there is now an invitation. The extended island countertop is the undisputed heart of the room, drawing you in. It’s a prep station, a serving buffet, a breakfast bar, and a homework desk all in one. The navy blue island base provides a bold, sophisticated anchor, while the light from the large window dances across the bright white uppers and the veined quartz surfaces, making the entire space feel larger and more vibrant.
The flow is effortless. You can move easily from the fridge to the sink to the stove—a perfect work triangle. More importantly, the cook is no longer separated from the conversation. The family now spends more time together in this space than ever before, proving that a great renovation is about more than just aesthetics; it’s about improving your quality of life.
Design Takeaways
This project offers valuable lessons for any homeowner considering a kitchen renovation:
- Invest in Layout: Before you pick a single colour or finish, perfect the floor plan. Removing a peninsula or a non-essential wall can be the single most impactful change you make.
- An Island Can Do It All: Don’t think of an island as just extra counter space. With smart planning, an extended island can replace a kitchen table, add immense storage, and become the social center of your home.
- Create a Focal Point: Using a bold colour for the island or installing a full-height stone backsplash creates a powerful focal point that elevates the entire design from standard to stunning.
Maintenance Tips for Your New Kitchen
To keep this Toronto kitchen looking its best for years to come, we provided the homeowners with a few simple care instructions:
- Quartz Care: Clean quartz countertops daily with a soft cloth, water, and a drop of mild dish soap. Avoid abrasive scrubbers or harsh chemicals like bleach or oven cleaner, which can dull the polished surface.
- Painted Cabinets: Wipe down spills immediately with a damp, soft cloth. For tougher grime, use a gentle cleaner. Avoid letting moisture sit on the cabinet surfaces, especially near the sink.
- Matte Black Faucet: Clean with a non-abrasive sponge and mild soapy water. Avoid polishes or waxes, as they can damage the matte finish.
Frequently Asked Questions
1. Do I need a permit for a kitchen renovation like this in Toronto? For a project that involves moving plumbing and electrical, like adding a sink and outlets to a new island, permits are absolutely required. This ensures all work is done to code and is inspected for safety. As part of our service, we manage the entire permit application and inspection process for our clients.
2. How much more does an extended island countertop cost compared to a standard one? The cost difference depends on the material and the amount of extra square footage. However, the real value is in the function it adds. By creating seating for four, this island eliminated the need for a separate kitchen table, saving space and furniture costs. We can provide a detailed breakdown of options and costs in a free, no-obligation quote.
3. Is a full-height quartz backsplash difficult to maintain? Quite the opposite! It’s one of the easiest backsplashes to maintain. With no grout lines to scrub or seal, a simple wipe-down is all it takes to clean up cooking splatters. It’s a practical and luxurious choice for any busy kitchen.
This Toronto kitchen story is a testament to the power of thoughtful design. By focusing on layout and flow, we created a space that is not only beautiful but has fundamentally improved how this family lives, connects, and entertains in their home.
If you’re feeling inspired to transform your own kitchen, we’d love to hear about your vision. Contact us today to get your free quote and start the conversation!