A Mississauga Kitchen Reimagined: The Beauty of Bold Choices
Welcome to our project diary for a truly special renovation in Mississauga. When we first met our clients in the spring of 2023, they had a vision for a kitchen that was more than just a place to cook. They wanted a warm, inviting hub that blended classic style with modern luxury. This project centered on creating a sophisticated space using dark brown shaker kitchen cabinets with gold handle fixtures, a stunning integrated extended sintered stone countertop, and unique architectural details like a custom arch shape niche. Let’s walk through how this beautiful transformation came to life.
Project Quick Facts
- Project Type: Kitchen & Main Floor Bathroom Renovation
- Location: Mississauga, Ontario
- Key Features: Custom shaker cabinetry, sintered stone island with integrated countertop, arched display niche, custom-sprayed wall unit, full 3-piece bathroom update.
- Duration: 4 weeks
The Design Vision: Warmth Meets Modern Elegance
The goal was to create a kitchen that felt both timeless and daring. Our clients loved the enduring appeal of shaker-style cabinets but wanted to move away from the common whites and greys. The decision to go with a deep, rich dark brown set the tone for the entire project. This choice immediately established a sense of warmth and sophistication.
To complement the deep wood tones, we planned for accents that would pop. Brushed gold handle fixtures were selected to provide a luxurious contrast, catching the light and adding a touch of glamour.
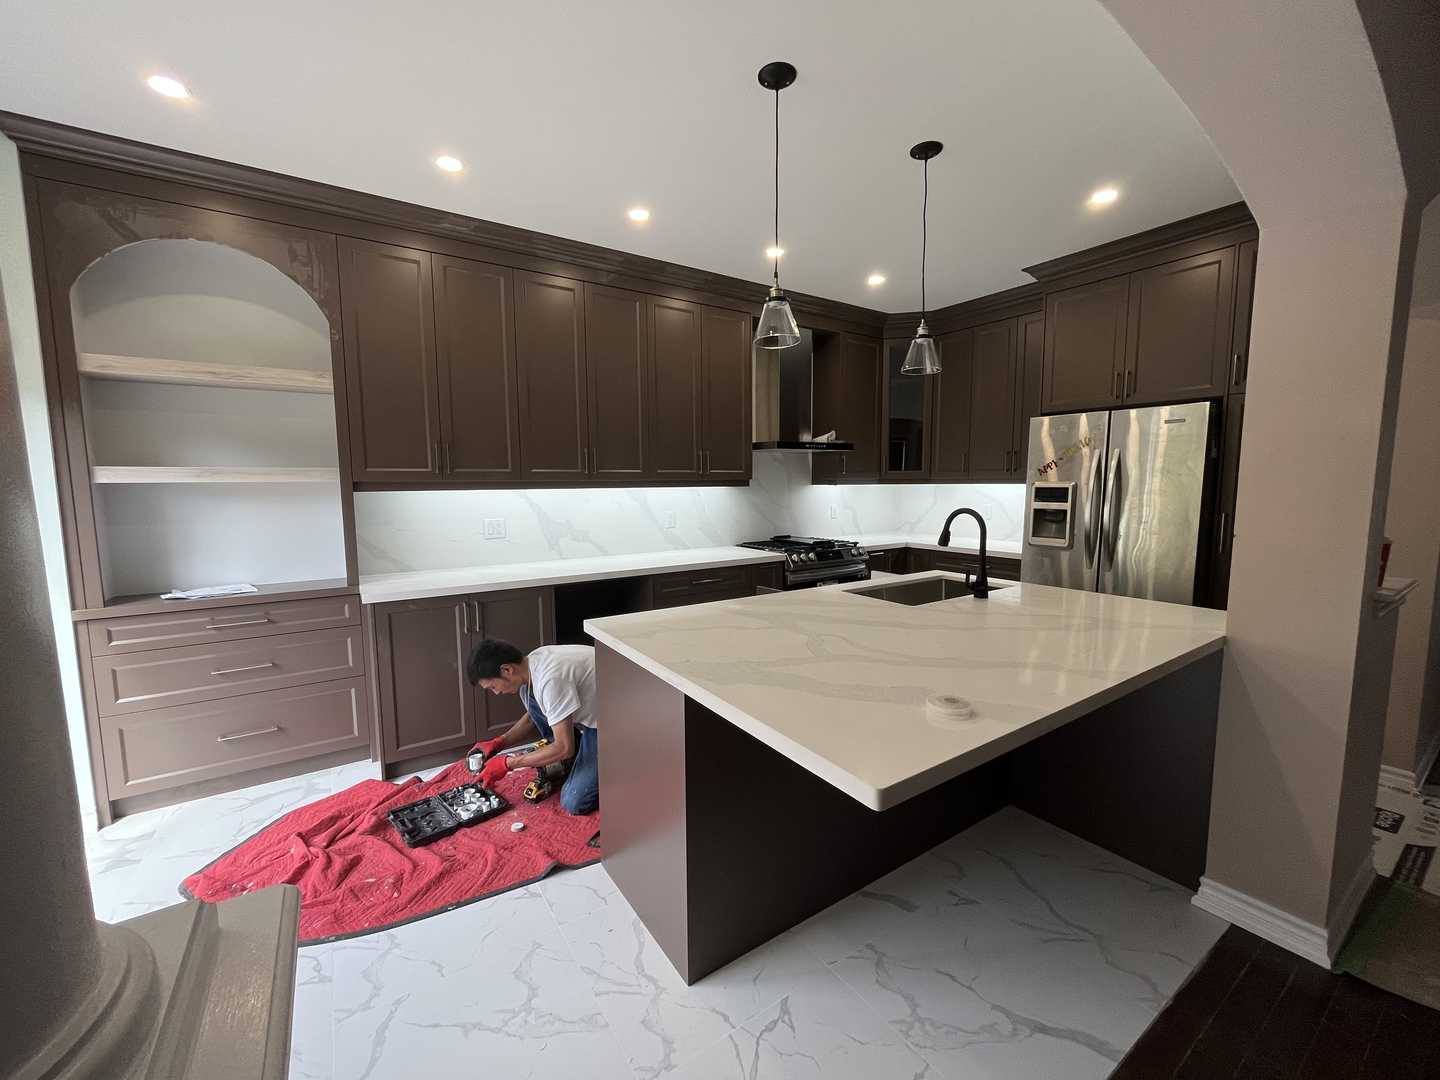
The centerpiece of the design was the island. The clients envisioned a large, functional surface that could serve as a prep area, a casual dining spot, and a social gathering point. We designed an island with an integrated, extended sintered stone countertop that flows seamlessly, creating a monolithic, sculptural element in the room. This not only looks incredible but also offers unparalleled durability.
Beyond the main kitchen area, the design extended to adjacent spaces to create a cohesive feel. A nearby wall unit was designated for a custom chocolate colour spray painting finish, tying into the kitchen’s warm palette. We also incorporated a soft, arch shape niche with a shelf into a key wall, providing a unique spot for display and breaking up the linear nature of the cabinetry. This architectural detail adds character and a bespoke touch.
Finally, the project included the renovation of a nearby 3-piece bathroom. To provide a surprising and delightful contrast to the warm, earthy tones of the kitchen, we opted for a fresh light green palette for the bathroom, creating a spa-like retreat that feels both vibrant and serene.
Materials & Specifications: A Focus on Quality
A great design is only as good as the materials used to bring it to life. For this Mississauga kitchen, we sourced high-quality, durable components built to last.
- Cabinetry: Custom-made shaker-style cabinets in a solid dark brown finish. The shaker profile offers a classic look, while the deep colour adds modern depth. All doors and drawers were fitted with soft-close hardware for quiet, smooth operation.
- Hardware: Brushed gold cabinet pulls and knobs. The warm metallic finish contrasts beautifully with the dark cabinets and picks up the veining in the countertop.
- Countertops & Backsplash: High-grade sintered stone was chosen for its exceptional properties. It’s non-porous, highly resistant to scratches, heat, and stains, making it perfect for a busy family kitchen. We used the same slab for the countertops, the waterfall edge on the island, and the full-height backsplash for a seamless, high-end look.
- Wall Unit: The existing wall unit was professionally prepped and spray-painted with a durable, satin-finish lacquer in a deep chocolate brown. This technique provides a flawless, factory-like finish that is far superior to traditional brush or roller painting.
- Bathroom Finishes: The 3-piece bathroom features large-format porcelain tiles in a soft, light green. A floating vanity was installed to enhance the sense of space, complemented by modern matte black fixtures for a clean, contemporary look.
- Lighting: We installed a comprehensive lighting plan, including LED pot lights for general illumination, under-cabinet lighting for task areas, and two statement pendant lights over the island to serve as functional art. All lighting is on dimmers to allow the homeowners to control the mood.
The Process & Timeline: A Phased Approach to Perfection
Custom renovations of this scale are a fluid process, with each phase building upon the last. Rather than a rigid timeline, we focus on hitting key milestones to ensure quality and precision at every step.
Phase 1: Demolition and Preparation Our journey began with the careful demolition of the old kitchen and bathroom. The crew systematically removed old cabinets, countertops, flooring, and fixtures. This is a critical stage where we often uncover unforeseen issues. In this home, we found some outdated wiring and minor plumbing that needed to be brought up to current Ontario Building Code (OBC) standards. Our licensed electricians and plumbers were brought in to reroute pipes and run new electrical lines for the island, new appliances, and updated lighting layout. All new electrical work was planned to meet the rigorous standards of the Electrical Safety Authority (ESA), including dedicated circuits for major appliances and GFCI protection for outlets near the sink.
Phase 2: Rough-ins and Structural Work With a clean slate, our trades began the rough-in process. This involved installing the new plumbing and electrical infrastructure, as well as framing the new arched niche. Precision here is paramount, as every outlet, switch, and water line must be perfectly placed to align with the final cabinet and appliance layout. Drywall was then installed, taped, and mudded to a smooth, level-5 finish, creating the perfect canvas for the new design.
Phase 3: Installation of Finishes This is when the vision truly starts to take shape. The new hardwood flooring was laid and protected, followed by the installation of the beautiful dark brown shaker cabinets. Our installation team spent several days ensuring every cabinet was perfectly level and securely fastened.
The most anticipated milestone was the countertop templating and installation. Once the cabinets were in place, a digital template was created for the sintered stone. The slab was then custom-cut and installed, including the dramatic waterfall edge on the island. The full-height backsplash went in next, creating that stunning, seamless flow.
Phase 4: Finishing Touches With the major components in place, our focus shifted to the details. The chocolate-coloured wall unit was spray-painted on-site in a controlled environment to achieve its flawless finish. The gold hardware was meticulously installed on every cabinet door and drawer. Painters applied the final coats of paint to the walls and ceiling.
Simultaneously, the fresh light green bathroom was coming together with tile setting, vanity installation, and the final hookup of plumbing fixtures.
The Final Look: A Symphony of Colour and Texture
Stepping into the completed kitchen is a transformative experience. The dark brown shaker cabinets ground the space with a sense of strength and stability, while the gold hardware adds a layer of sophisticated warmth. The sintered stone countertop is the undisputed star, its subtle veining adding movement and its seamless surface reflecting light around the room.
The arched niche, now styled with a few curated pieces, offers a soft, organic counterpoint to the clean lines of the cabinetry. The chocolate-coloured wall unit in the adjacent living space creates a beautiful echo of the kitchen’s palette, unifying the entire main floor.
And the bathroom? It’s a breath of fresh air. The light green tile creates a tranquil, spa-like atmosphere that feels like a perfect escape, proving that bold, contrasting colours can coexist beautifully within a single home.
Design Takeaways
- Don’t Be Afraid of Dark Colours: While white kitchens are timeless, a deep, rich colour like dark brown can create a uniquely warm, luxurious, and inviting atmosphere.
- Mix Your Metals and Materials: The combination of dark wood, brushed gold, and veined stone creates a rich textural and visual experience.
- Invest in a Statement Feature: The integrated sintered stone island acts as the heart of the home. A single, high-impact element can elevate the entire design.
- Embrace Architectural Details: A simple feature like an arched niche can add immense custom character and personality to a space, making it feel truly one-of-a-kind.
Maintenance Tips for Your New Kitchen
- Sintered Stone: While incredibly durable, wipe up spills promptly with a pH-neutral cleaner and a soft cloth. Avoid abrasive scouring pads. Use trivets for hot pots and pans out of an abundance of caution.
- Custom Cabinetry: Clean your dark brown shaker cabinets with a soft, damp cloth and a mild soap solution. Dry immediately to prevent water spots. Avoid harsh chemical cleaners that can damage the finish.
- Gold Hardware: Regularly wipe with a dry microfiber cloth to remove fingerprints and maintain its shine.
Frequently Asked Questions
1. How long does a kitchen renovation like this typically take in Mississauga? While every custom project is unique, a full kitchen gut and renovation involving layout changes, new electrical, and plumbing typically ranges from 8 to 14 weeks. The timeline can be affected by the lead times for custom materials like cabinetry and countertops. We provide a detailed project schedule before any work begins.
2. Are permits required for this type of kitchen renovation in Toronto or the GTA? Yes, often they are. If you are moving walls, changing the plumbing layout significantly, or making major electrical alterations, a building permit is typically required. We handle the entire permit application process for our clients in Mississauga and across the GTA to ensure all work is fully compliant with the Ontario Building Code.
3. Why choose sintered stone over quartz or granite? Sintered stone is a fantastic premium choice for its superior performance. It’s manufactured under intense heat and pressure, making it denser and less porous than even quartz. This gives it exceptional resistance to heat, UV rays (it won’t fade), scratches, and stains, making it one of the most durable and low-maintenance countertop materials available today.
4. Can you install an arched niche in any wall? In most cases, yes. We can typically frame a decorative niche like this into any non-load-bearing interior wall. During our initial consultation, we assess the structure to determine the best placement and ensure it doesn’t interfere with any existing in-wall plumbing or electrical wiring.
This project was a joy to bring to life, blending bold choices with timeless design principles to create a space that is both stunning and deeply personal for the homeowners.
If you’re dreaming of transforming your own kitchen, we’d love to help you explore the possibilities. Get Your Free Quote and let’s start the conversation about your perfect space.