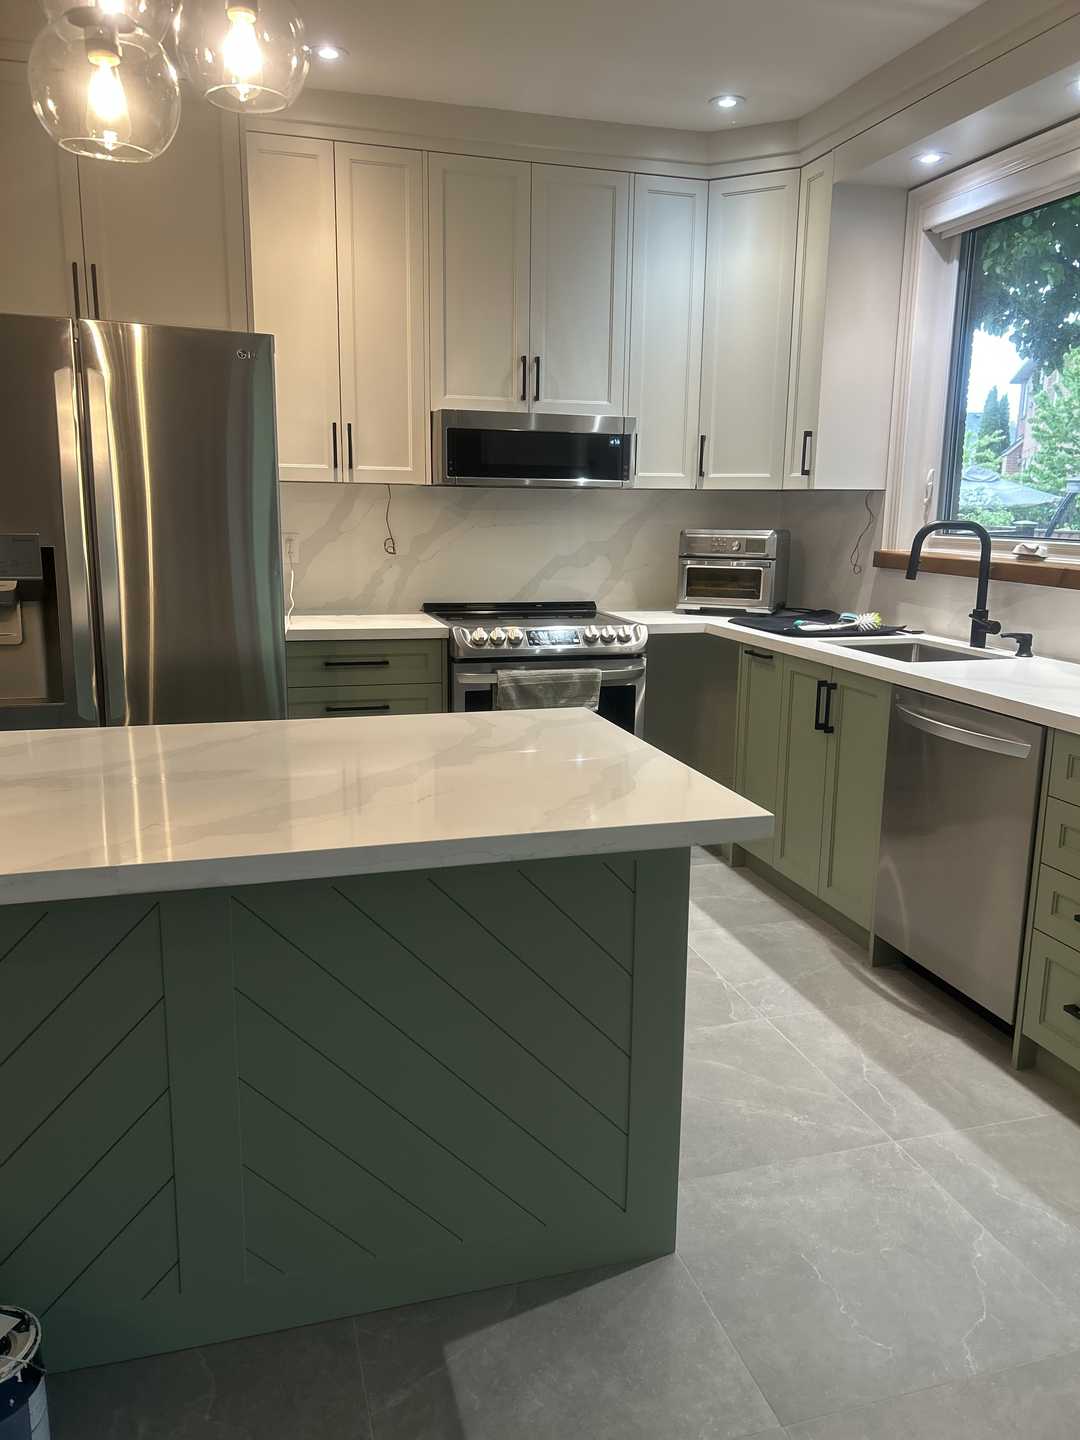

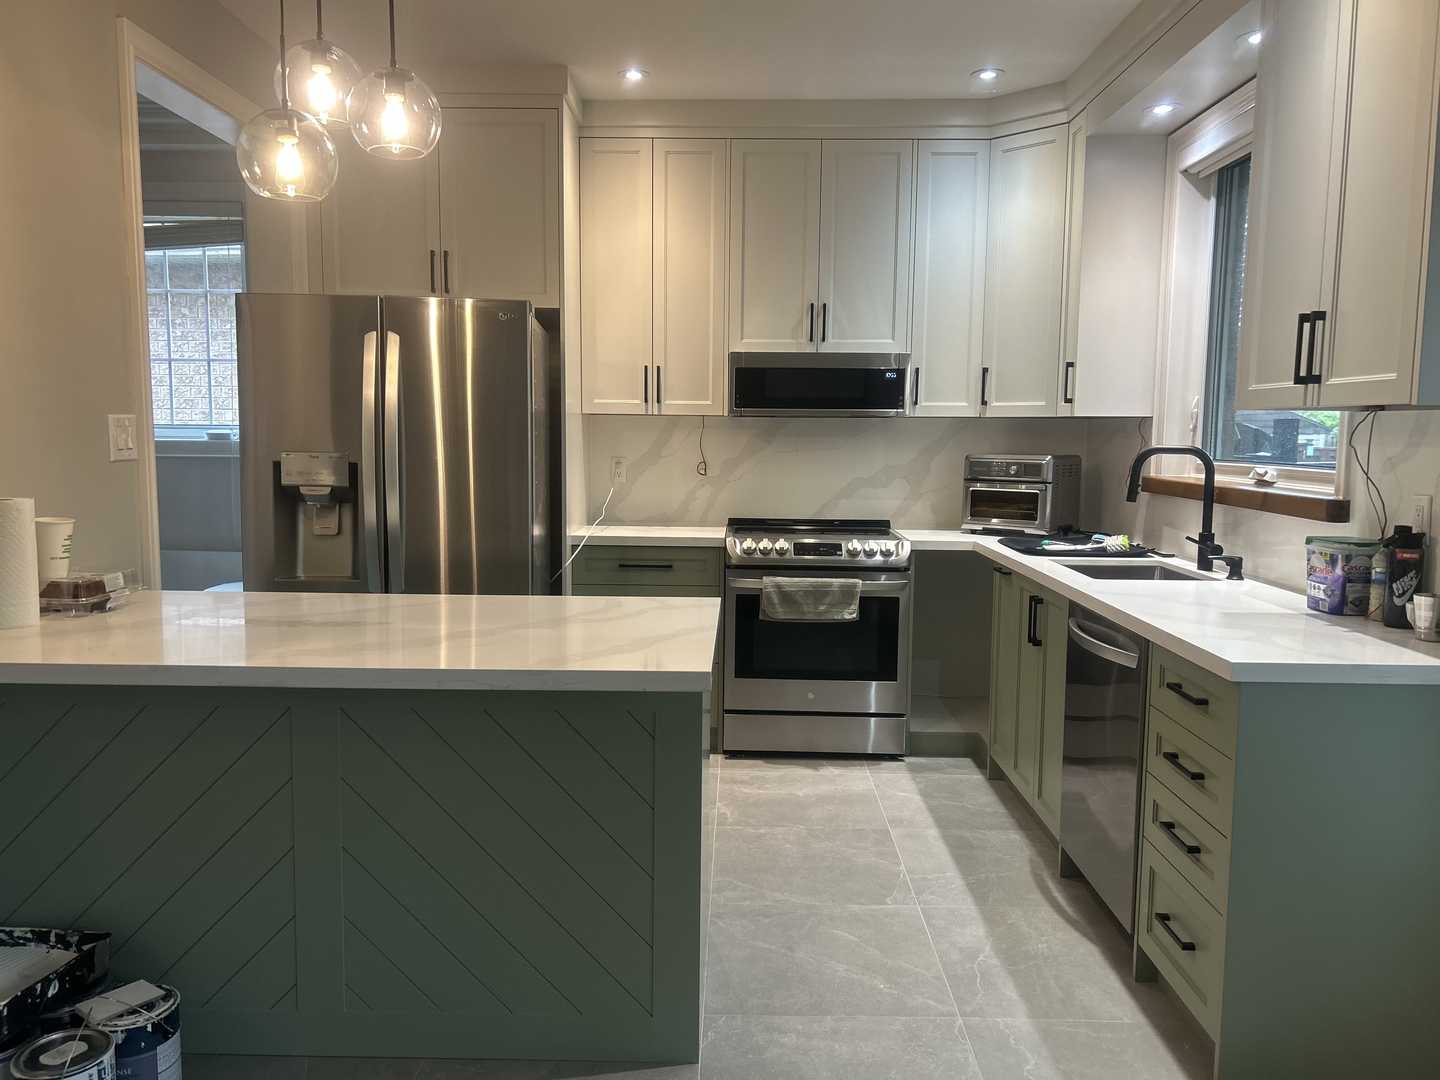
Welcome to the site diary for Project 6226, a kitchen and main floor renovation that brought a fresh, contemporary European feel to a wonderful family home in Mississauga. We often see clients who love their neighbourhood but feel their home’s interior hasn’t kept pace with their style. That was exactly the case here. The goal was to create a bright, functional, and unified space, starting from the moment you walk in the door. The vision centered on stunning Ciot Eureka Grey 24”x24” tile through out the main floor foyer and kitchen, paired with a sophisticated two-tone cabinet scheme featuring a rich green MDF lower cabinet with OC-17 white shaker upper cabinets.
This project is a perfect example of how thoughtful material choices can completely redefine a home’s character. Follow along as we detail the transformation from a dated layout to a modern, inviting heart of the home.
Project Quick Facts
- Project: Kitchen 6226
- Location: Mississauga, ON
- Category: Kitchen Renovation, Main Floor Flooring
- Key Features: Two-tone custom cabinetry, large format porcelain tile, quartz countertops, LED pot lighting, unified foyer-to-kitchen flooring.
- Duration: 4 weeks
The Design Vision
The homeowners wanted to move away from the tired, builder-grade finishes of the early 2000s. Their vision was clear: create a space that felt both modern and timeless, with a touch of colour to give it personality. The primary challenge was making the main floor feel larger and more cohesive. The existing kitchen was sectioned off by flooring transitions and a less-than-optimal layout, which made it feel cramped despite its decent square footage.
Our design strategy focused on three core principles:
-
Unity: The single most impactful decision was to run the same flooring from the front door, through the foyer, and into the kitchen. This immediately creates a sense of scale and flow. The choice of the Ciot Eureka Grey 24”x24” porcelain tile was perfect. Its large format minimizes grout lines, contributing to a clean, expansive look, while its subtle concrete-like texture adds a layer of contemporary sophistication.
-
Light & Contrast: The kitchen’s colour palette was designed to feel airy and grounded at the same time. We specified classic Shaker-style upper cabinets painted in Benjamin Moore’s OC-17 White Dove. This soft, warm white is a perennial favourite for a reason; it reflects light beautifully and never feels cold or stark. To anchor the space and inject personality, we chose a deep, calming forest green for the lower cabinets. Fabricated from high-density MDF, these cabinets provide a flawless, durable painted finish that serves as the kitchen’s focal point.
-
Functionality: A beautiful kitchen is only successful if it works for the people who use it. We reconfigured the layout to create a more efficient work triangle, improve storage with deep drawers and custom pull-outs, and enhance the lighting. A simple, elegant quartz countertop and backsplash were chosen to complement the cabinetry without competing with it, ensuring the space felt calm and uncluttered.
Materials & Specifications
Every material in this Mississauga kitchen was selected for its blend of beauty, durability, and performance.
- Flooring: Ciot Eureka Grey 24”x24” Porcelain Tile. This Italian-made tile is known for its exceptional hardness and resistance to stains, scratches, and moisture, making it an ideal choice for high-traffic areas like a foyer and kitchen.
- Lower Cabinetry: Custom slab-style doors made from premium MDF, finished with a professionally sprayed, furniture-grade lacquer in a custom-matched deep green (similar to Benjamin Moore’s Forest Floor). MDF was chosen over wood for its superior stability, which prevents the paint from cracking at the joints over time due to humidity changes.
- Upper Cabinetry: Classic Shaker-profile doors, also made from MDF for a perfect paint finish, in Benjamin Moore OC-17 White Dove.
- Hardware: A mix of minimalist matte black pulls for the lowers and subtle knobs for the uppers to create a modern, high-contrast look.
- Countertops: 3cm Caesarstone Quartz in “Fresh Concrete”. Its light grey, matte finish perfectly complements the floor tile and provides a durable, non-porous work surface that is incredibly easy to maintain.
- Backsplash: A simple 3”x12” ceramic tile in a glossy white, laid in a classic stacked pattern. This choice adds texture and reflects light without making the design too busy.
- Lighting: We removed the dated central fixture and installed ten 4” LED slim pot lights on a dimmer switch for excellent ambient lighting. For task lighting, we installed hardwired LED strips under the upper cabinets. All electrical work was completed by our licensed ESA contractor to meet all Ontario Electrical Safety Code requirements.
- Plumbing: A new 30” undermount single-bowl stainless steel sink was paired with a sleek, high-arc Moen faucet in a matte black finish. All plumbing connections were updated and verified to be leak-free and code-compliant.
The Process & Timeline
While every project has its own unique rhythm, a kitchen renovation follows a well-orchestrated sequence of events. The key to success is meticulous planning and coordination between our trades.
Phase 1: Demolition and Preparation The first step was the careful tear-out of the old kitchen. We disconnected plumbing and electrical, removed the old cabinets, countertops, and flooring. We sealed off the work area from the rest of the house with plastic sheeting to control dust. The subfloor was then assessed and prepped, ensuring it was perfectly level and structurally sound—a critical step for installing large format tiles.
Phase 2: Rough-Ins This is the “behind-the-walls” stage where the foundation for the new kitchen is laid. Our electrician ran new wiring for the pot lights, under-cabinet lighting, and relocated a few outlets for better functionality, all according to the new plan. The plumber adjusted the water supply and drain lines for the new sink’s precise location. Every rough-in was inspected to ensure it met or exceeded the Ontario Building Code.
Phase 3: Flooring Installation With the subfloor prepped, our tiling specialists began laying the 24”x24” Ciot Eureka Grey tiles. Using a high-quality polymer-modified thin-set mortar and a tile levelling system, they worked meticulously from the foyer inward, ensuring perfect grid lines and zero lippage between tiles. This process creates that seamless, monolithic look that makes the space feel so expansive.
Phase 4: Cabinetry and Countertop Templating This is when the vision truly starts to come to life. The green base cabinets were installed first, followed by the white uppers. Our team uses lasers to ensure every cabinet is perfectly level and plumb. Once the base cabinets were secured, the countertop fabricator came to the Mississauga site to create a precise digital template for the quartz.
Phase 5: Finishing and Final Hook-ups After a week or so for fabrication, the stunning quartz countertops were installed. This was immediately followed by the backsplash tile. In the final stretch, our plumber and electrician returned to connect the sink, faucet, dishwasher, and install all the light fixtures, switches, and outlets. The last touches included installing the cabinet hardware, painting the walls, and completing all the trim work.
The Final Look
Stepping into the finished space is a breath of fresh air. The continuous Ciot Eureka Grey tile creates an unbroken visual path, guiding you into a kitchen that feels dramatically larger and more sophisticated. The deep green base cabinets provide a rich, organic anchor, while the White Dove uppers seem to float above, enhancing the room’s height.
The matte finish of the quartz countertops adds a quiet, contemporary elegance, and the new lighting scheme transforms the atmosphere completely. The space is no longer just a place to cook; it’s a bright, welcoming hub for family life, perfectly suited to this modern Mississauga home. The clean lines, balanced colours, and improved layout have resulted in a kitchen that is as functional as it is beautiful.
Design Takeaways
This project offers some valuable lessons for any homeowner in the Toronto area planning a kitchen renovation:
- Flooring is Foundational: Don’t underestimate the power of continuous flooring. Removing transitions between rooms is one of the most effective ways to make your main floor feel bigger and more cohesive.
- Embrace Two-Tone Cabinets: A two-tone scheme is a fantastic way to add visual interest. Using a darker colour on the bottom and a lighter one on top is a classic technique that keeps the space from feeling top-heavy.
- Plan Your Lighting Meticulously: Good lighting is not an afterthought. A layered approach with ambient (pot lights), task (under-cabinet), and decorative lighting is essential for creating a kitchen that is both functional and inviting at all hours.
- Material Matters: Choosing high-quality materials like premium MDF for painted cabinets and durable porcelain for floors ensures your investment will look great for years to come.
Maintenance Tips
To keep this beautiful new kitchen looking its best, we provided the homeowners with a few simple care instructions:
- Porcelain Floors: Clean regularly with a vacuum or dust mop and wash with a pH-neutral tile cleaner. Avoid harsh chemicals like bleach or ammonia, which can damage the grout over time.
- Lacquered MDF Cabinets: For daily cleaning, simply wipe with a soft, damp cloth and dry immediately. For stubborn spots, use a mild solution of dish soap and water. Never use abrasive pads or cleaners.
- Quartz Countertops: Wipe up spills promptly with a soft cloth and water. While highly resistant to staining, it’s best not to let things like red wine, coffee, or turmeric sit for long periods. Always use a cutting board and place hot pots and pans on trivets.
Frequently Asked Questions
Do I need a permit for a kitchen renovation like this in Mississauga?
In most cases, yes. For a project like this where we moved electrical outlets and plumbing lines, permits from the City of Mississauga are required. This ensures all work is done to code and inspected for safety. As your renovation partner, we manage the entire permit application and inspection process for you.
How did you ensure the large 24x24 tiles were installed perfectly flat without any uneven edges?
Achieving a perfectly flat finish with large format tiles requires expertise. We start by ensuring the subfloor is completely level, using a self-levelling compound if necessary. During installation, we use a tile levelling system, which involves clips and wedges that lock the tiles together at the same height while the mortar cures. This system prevents “lippage” and guarantees a smooth, professional result.
What are the benefits of using MDF for the green lower cabinets instead of solid wood?
For painted cabinets, high-quality MDF (Medium-Density Fiberboard) is often the superior choice. Wood naturally expands and contracts with changes in humidity, which can cause paint to crack at the joints of the cabinet door frame over time. MDF is a stable, uniform material that doesn’t have a grain, providing a perfectly smooth surface for paint and eliminating the risk of cracking. It’s a hallmark of a durable, high-quality painted cabinet.
I’m in the Toronto area and love this design. How do I start planning my own kitchen renovation?
The best first step is to gather inspiration and think about how you use your current kitchen—what works and what doesn’t. Then, reach out to a professional. We begin with a complimentary consultation to discuss your vision, needs, and budget. From there, we can develop a design and a detailed plan to bring your dream kitchen to life.
This Mississauga kitchen transformation showcases how a clear vision, quality materials, and expert craftsmanship can come together to create a space that is both stunning and perfectly tailored to a family’s lifestyle.
If you’re dreaming of a similar transformation for your home, we’d love to help you bring it to life. Contact us today for a free quote and let’s start the conversation.