


A Woodbridge Bathroom Gets a Spa-Worthy Makeover
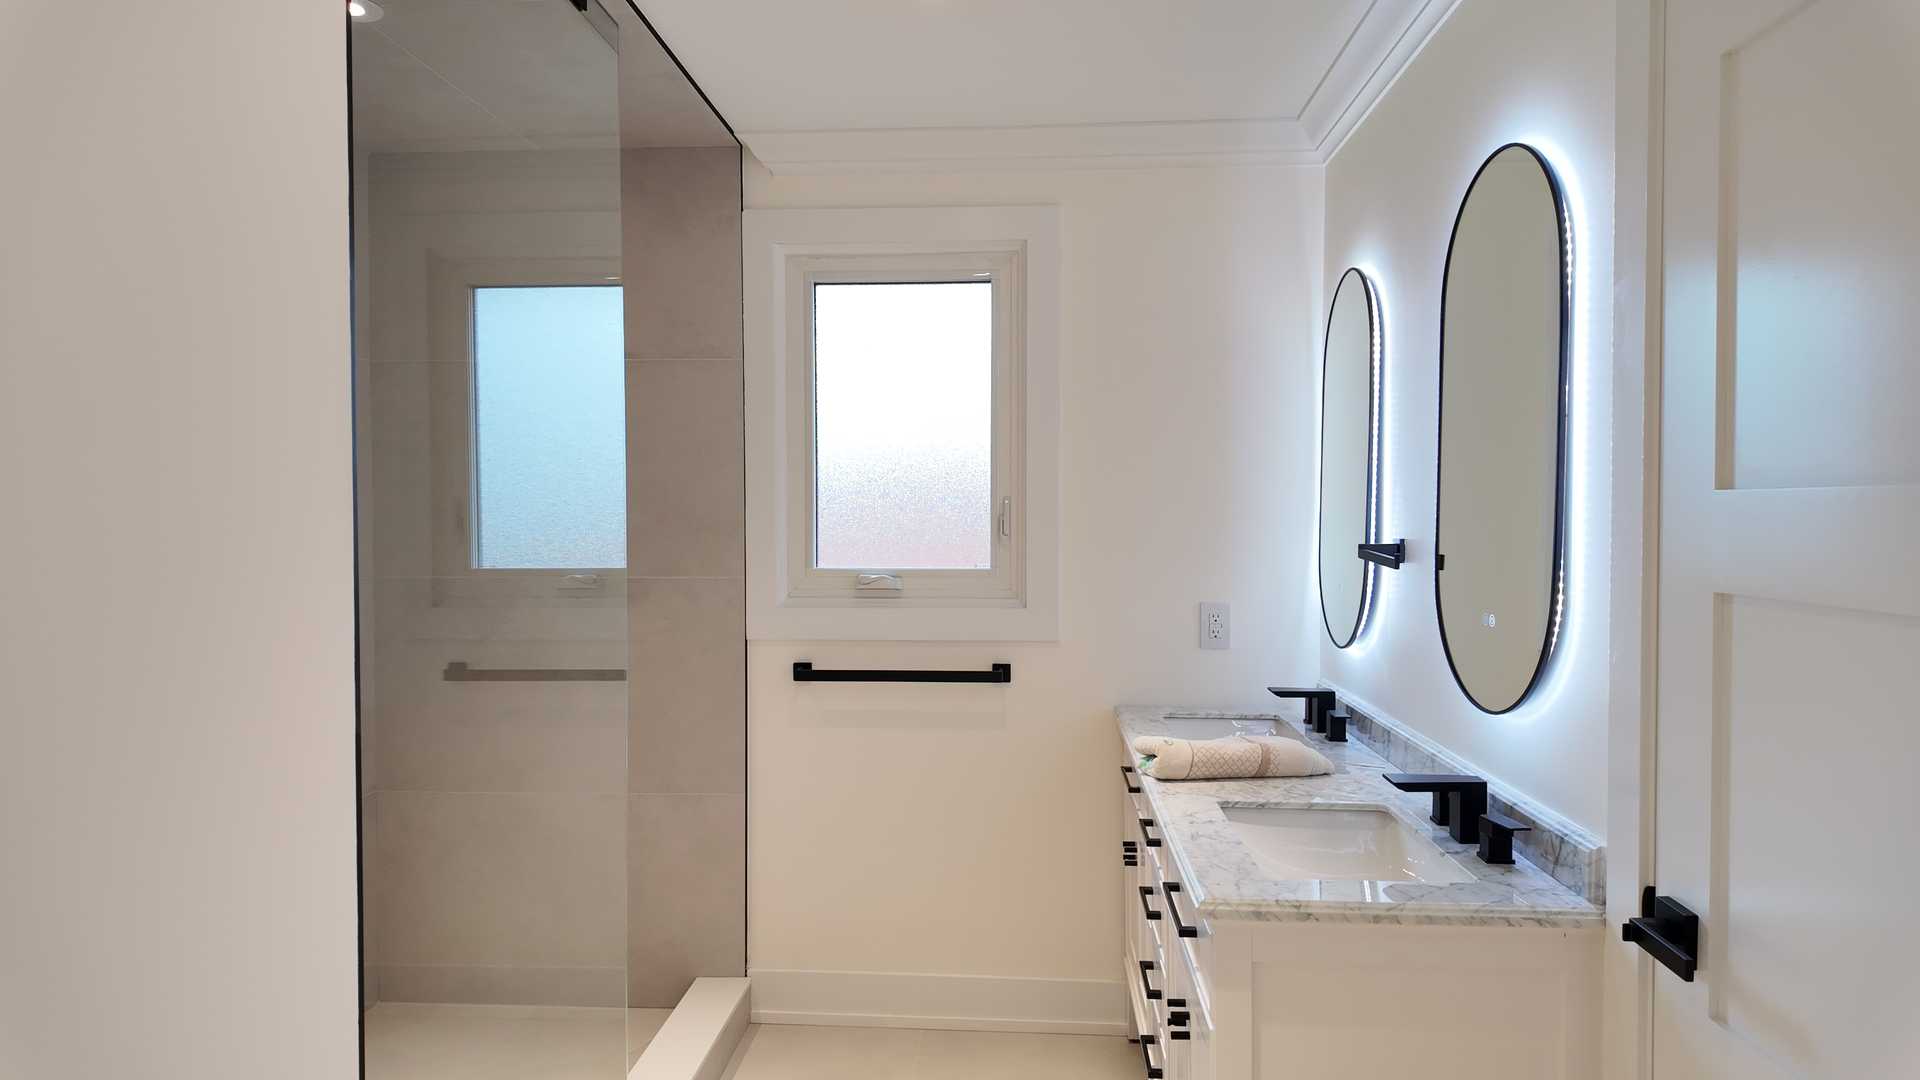
A primary bathroom should be more than just a functional space; it should be a personal retreat. For one Woodbridge, ON homeowner, their dated and inefficient bathroom was falling short. We embarked on a renovation journey to transform it into a modern, serene oasis. This project showcases how thoughtful design choices, like a striking floating vanity with a white MDF tower, expansive 24”x48” beige gray tile, and a brilliant 60”x36” LED mirror with front and back-lit lighting, can completely redefine a room’s character and functionality.
This case study walks you through the transformation, from the initial vision to the stunning final reveal, offering insights and inspiration for your own Ontario home renovation.
Quick Facts
- Project Type: Primary Bathroom Renovation
- Location: Woodbridge, ON
- Duration: 3 weeks
- Key Features: Custom floating vanity, large-format porcelain tile, curbless walk-in shower, dual-function LED mirror, vertical storage tower.
Design Vision
The homeowner’s goal was clear: to create a contemporary, spa-like environment that felt spacious, bright, and easy to maintain. The existing layout felt cramped, storage was inadequate, and the lighting was harsh and unflattering.
Our design strategy focused on three core principles:
- Create an Illusion of Space: In many Greater Toronto Area homes, maximizing the feeling of space is paramount. We proposed a wall-mounted, floating vanity to expose more floor area, instantly making the room feel larger and more open.
- Establish a Calm, Cohesive Palette: We selected large-format porcelain tiles in a sophisticated beige-gray hue. This neutral, earthy tone creates a warm and calming backdrop, while the large size of the tiles results in fewer grout lines, contributing to a seamless and uncluttered aesthetic.
- Layer Lighting for Ambiance and Function: Great lighting is non-negotiable in a modern bathroom. We designed a layered lighting scheme anchored by a statement-making LED mirror. This piece provides perfect, shadow-free task lighting from the front for daily routines, while the backlighting casts a soft, ambient glow against the wall, perfect for unwinding in the evening.
The addition of a slim, white MDF storage tower next to the vanity was a crucial functional element, providing ample vertical storage without sacrificing floor space.
Materials & Specifications
Choosing the right materials is essential for both beauty and long-term durability, especially in a high-moisture environment like a bathroom. Every selection for this Woodbridge project was made with quality and performance in mind.
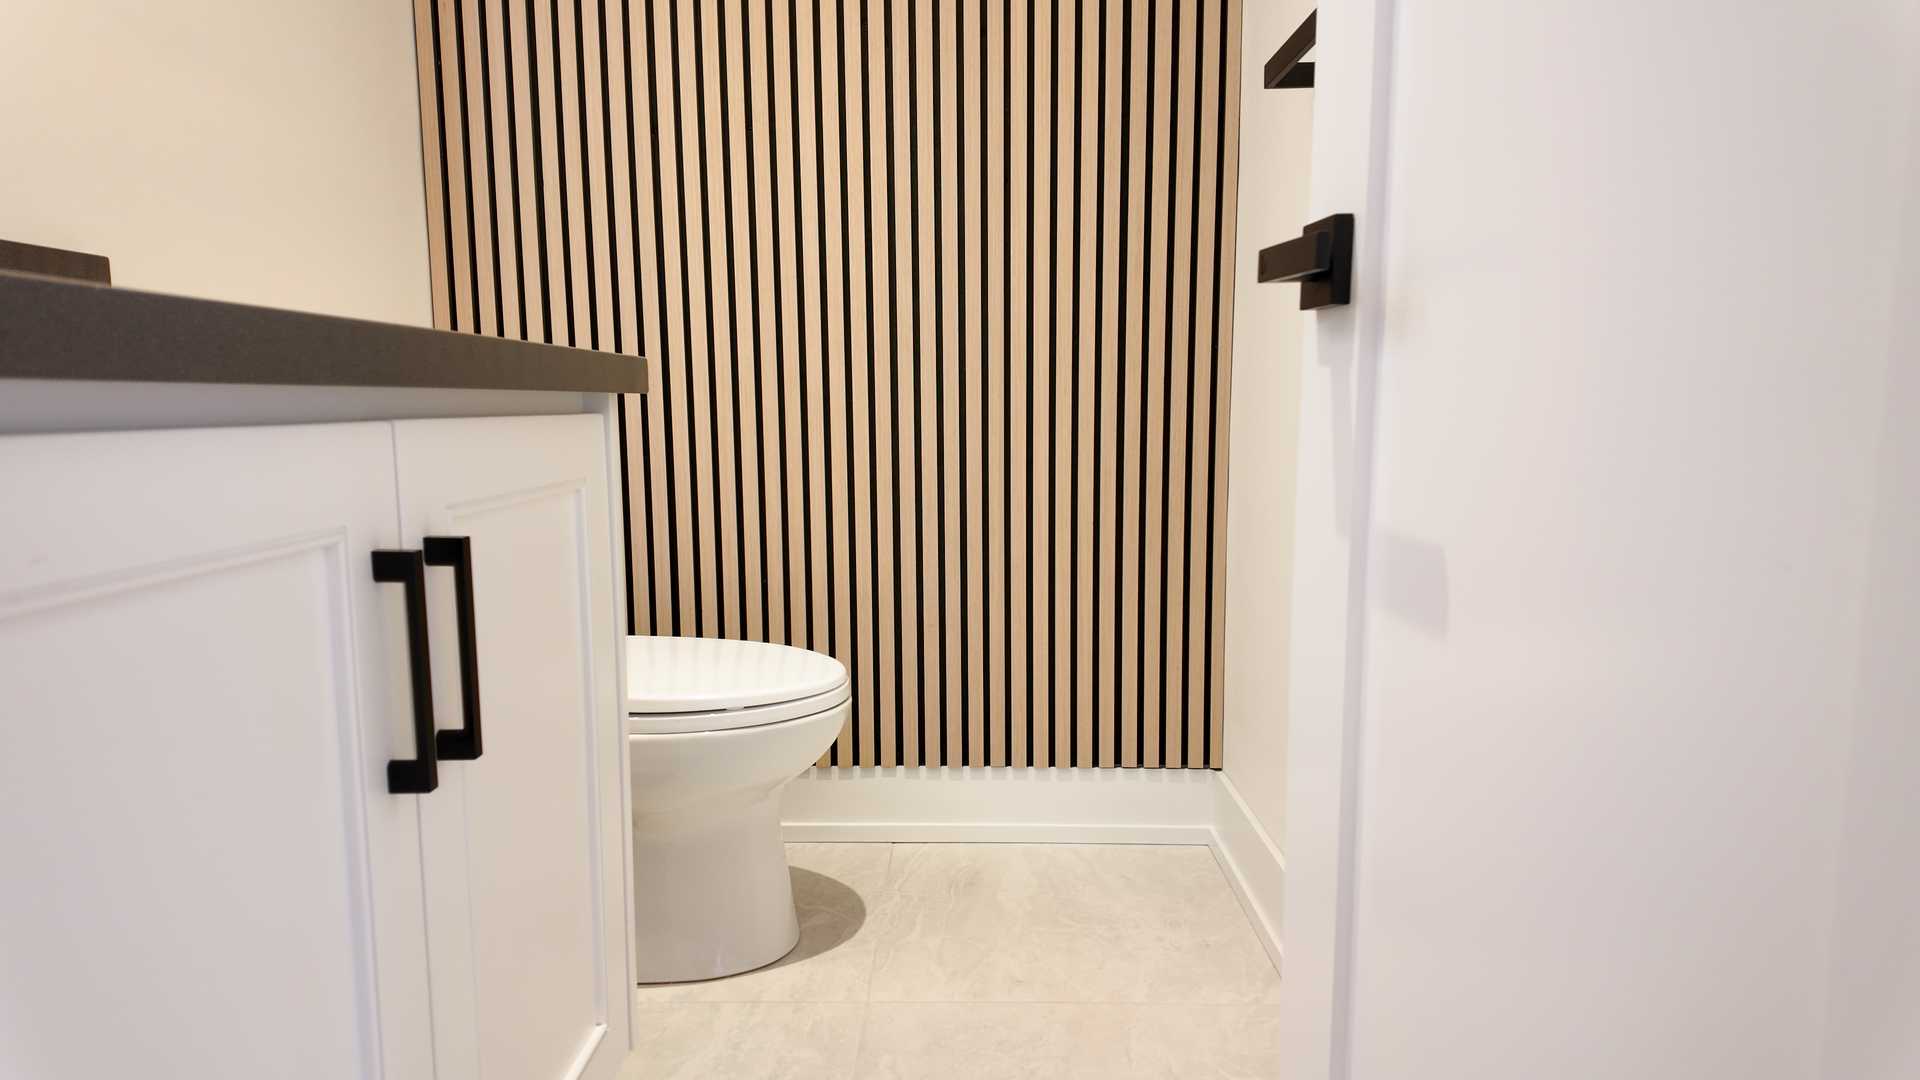
- Vanity & Storage: A custom 60-inch floating vanity was paired with a floor-to-ceiling white MDF storage tower. The vanity featured deep, soft-close drawers for concealed storage. We opted for high-quality, moisture-resistant MDF, professionally sealed and finished to withstand humidity, a smart choice for any bathroom in Ontario’s variable climate. The vanity was topped with a durable, low-maintenance white quartz countertop with an integrated sink.
- Tilework: We used premium 24”x48” rectified porcelain tiles in a matte beige-gray finish for both the floor and shower walls. The large format minimizes grout lines, making cleaning easier and creating a grand, continuous surface. The floor outside the shower was equipped with an electric in-floor heating system for added comfort on chilly mornings.
- Mirror & Lighting: The centerpiece is a 60”x36” LED mirror featuring both front-lit and back-lit capabilities. The lights are dimmable and offer adjustable colour temperatures (from warm to cool white), allowing the homeowners to customize the lighting to their mood and needs. This was supplemented by four new ceiling pot lights for general room illumination.
- Shower System: A curbless, walk-in shower design enhances accessibility and the room’s open feel. The shower floor slopes gently to a modern linear drain. For waterproofing—the most critical step—we used a complete Schluter-KERDI system, a top-tier membrane application that creates a fully sealed, watertight enclosure, exceeding Ontario Building Code standards.
- Fixtures: We selected fixtures in a modern matte black finish to create a bold, contemporary contrast against the neutral tiles and white vanity. This included a wall-mounted faucet, a rain shower head with a handheld wand, and all other hardware.
- Glass: A 10mm thick, frameless tempered glass panel was installed for the shower, maintaining the open-concept feel while providing an effective water barrier.
Process & Timeline
A well-planned timeline is the backbone of a smooth renovation. We completed this entire transformation in a focused 3-week period, minimizing disruption for the homeowners.
Week 1: Demolition and Rough-ins
The first week is about preparation. We began with the careful demolition and removal of the old tub, vanity, toilet, and all existing tile. Once the room was stripped to the studs, our licensed tradespeople got to work. The plumbing was reconfigured for the new walk-in shower drain and the wall-mounted vanity and faucet. Our electrician ran new wiring for the heated floors, pot lights, and the hardwired LED mirror, ensuring everything was up to the latest Electrical Safety Authority (ESA) standards in Ontario. Finally, we added solid wood blocking inside the wall where the floating vanity would be mounted to guarantee a secure, robust installation.
Week 2: Waterproofing, Tiling, and Prep
This week was dedicated to building the room back up. We installed new moisture-resistant drywall, followed by taping and plastering to create perfectly smooth surfaces. The most crucial step was the meticulous application of the Schluter waterproofing system throughout the entire shower area. Once the waterproofing was complete and cured, our expert tile setters began laying the large-format 24”x48” porcelain tiles. Working with tiles of this size requires precision and skill to ensure perfect alignment and minimal grout lines for that high-end, seamless look.
Week 3: Installation and Finishing Touches
The final week is when the vision truly comes to life. The room was painted in a soft, complementary off-white. We then installed the floating vanity and the tall MDF storage tower, followed by the quartz countertop. Our plumber returned to install the new toilet, connect the faucet, and fit the beautiful matte black shower fixtures. The electrician completed the final hookups for the LED mirror and lighting. The last major piece was the installation of the custom frameless shower glass. The project concluded with a thorough professional cleaning, a final quality inspection, and an excited walkthrough with the homeowners.
The Final Look
Stepping into the completed bathroom is like entering a private spa. The continuous flow of the large-fomat beige-gray tile from the floor up the shower walls creates a serene and expansive feel. The floating vanity is the undisputed star, appearing to hover effortlessly above the heated floor, making the room feel wider and airier.
The 60”x36” LED mirror is both a functional powerhouse and a stunning design element. During the day, its front light provides crystal-clear, shadowless illumination. In the evening, the back-light casts a gentle, relaxing glow, creating the perfect ambiance for a long soak or a quiet end to the day. The crisp white of the MDF tower provides a clean vertical line, drawing the eye upward and offering incredible storage capacity that keeps the quartz countertop completely free of clutter. The bold matte black fixtures add a touch of drama and sophistication, perfectly punctuating the calm, neutral palette.
Design Takeaways
This Woodbridge bathroom renovation offers several key takeaways for any homeowner planning a similar project:
- Float Your Vanity to Free Up Space: If your bathroom feels cramped, a wall-mounted vanity is one of the most effective ways to create a sense of openness.
- Invest in Professional Waterproofing: The longevity of your bathroom depends on what’s behind the tiles. Using a premium system installed by certified professionals is the best insurance against future leaks and water damage.
- Think in Layers with Lighting: Don’t rely on a single light source. Combining ambient, task, and accent lighting (as we did with the mirror and pot lights) gives you ultimate control over the mood and functionality of your space.
- Go Big with Tile for a Luxe Look: Large-format tiles are a hallmark of modern luxury. They create a visually cleaner, more expansive surface and are easier to maintain than smaller tiles with extensive grout lines.
Maintenance Tips
To keep this beautiful new bathroom looking its best, we provided the homeowners with a few simple care instructions:
- Tile & Grout: Clean porcelain tile with a pH-neutral cleaner. While the grout is stain-resistant, sealing it annually can provide extra protection.
- Glass: Use a squeegee on the shower glass after each use to prevent hard water spots and soap scum buildup.
- MDF & Quartz: Wipe down the vanity and tower with a soft, damp cloth. The quartz countertop is non-porous and highly durable, easily cleaned with mild soap and water. Avoid abrasive cleaners on all surfaces.
- Fixtures: Clean matte black fixtures with water or a mild, non-abrasive cleaner to protect the finish.
Frequently Asked Questions
1. How much does a bathroom renovation like this typically cost in the Woodbridge or Vaughan area? The cost of a primary bathroom renovation can vary significantly based on the size of the room, the quality of materials selected, and the complexity of the plumbing and electrical work. A project with custom elements, large-format tile, and high-end fixtures like this one generally represents a significant investment, but delivers incredible value and enjoyment. We always provide a detailed, transparent quote based on your specific design.
2. Was a building permit required for this project in Woodbridge? Yes, a permit is often required in York Region for renovations that involve altering plumbing or electrical systems. We handle the entire permit application process for our clients to ensure all work is fully compliant with the Ontario Building Code and local municipal bylaws, giving you complete peace of mind.
3. How do you ensure a heavy floating vanity is securely attached to the wall? This is a critical installation step. During the framing stage, before any drywall is installed, we add solid wood blocking between the wall studs exactly where the vanity’s mounting brackets will be located. This provides a much stronger anchor point than drywall alone, ensuring the vanity can safely support its own weight, the countertop, and the contents of its drawers for years to come.
4. What are the main benefits of a mirror with both front and back-lighting? It’s the best of both worlds. The front light is your functional task lighting, designed to illuminate your face directly and evenly without casting shadows, which is perfect for shaving, applying makeup, or any detailed grooming. The back-light, or ambient light, washes the wall behind the mirror with a soft glow, creating a relaxing atmosphere and making the mirror appear to float, adding depth and a high-end designer touch to the room.
This Woodbridge bathroom is now a perfect blend of modern style, smart function, and serene comfort. It stands as a testament to how a well-executed renovation can fundamentally change how you experience your home.
Ready to transform your own bathroom into a personal oasis? Contact us today for a free quote and let’s start designing the beautiful, functional space you deserve.