Welcome to our site diary, where we take you behind the scenes of our latest projects. This time, we’re stepping into a classic Toronto home to tackle a complete 3-piece bathroom renovation. The goal was to create a modern, high-contrast space featuring a stunning glass subway tile accent shower wall with black fixtures, transforming a dated room into a sophisticated retreat. This project showcases how strategic design and material choices can dramatically elevate a compact 3-piece bathroom.
Project at a Glance: Bathroom 330
Here are the quick facts on this elegant Toronto bathroom transformation.
- Location: Toronto, ON
- Project Type: 3-Piece Bathroom Renovation
- Key Features: Floor-to-ceiling glass subway tile accent wall, matte black plumbing fixtures and hardware, floating oak vanity, large-format porcelain tile.
- Duration: 2 weeks
- Timeline: December 2023
The Design Vision: Modern Contrast and Timeless Texture
Our clients came to us with a clear vision: they wanted a bathroom that felt both contemporary and timeless. The existing space was functional but lacked personality, with dated finishes and poor lighting that made it feel cramped. They loved the idea of bold contrast but wanted the overall feeling to remain serene and spa-like—a common desire for busy Toronto homeowners seeking a personal escape.
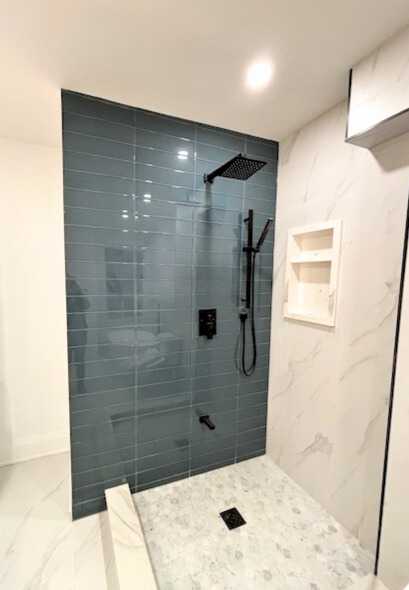
The design conversation quickly centred on creating a powerful focal point. Instead of spreading visual interest thinly across the room, we decided to concentrate it in the shower. This led to the concept of a floor-to-ceiling accent wall. The choice of a deep emerald green glass subway tile was pivotal. Glass, unlike ceramic, has a unique luminous quality; it reflects light, adding depth and a sense of luxury.
To balance this dramatic feature, the rest of the palette was kept neutral and bright. We opted for large-format white tiles for the other shower walls and a light, concrete-look porcelain for the floor. The final, unifying element was the matte black fixtures. From the shower system to the faucet and cabinet pulls, this consistent finish provides a sharp, graphic counterpoint to the softer tiles and wood tones, grounding the design in modern sophistication.
Materials & Specifications: The Building Blocks of Beauty
A beautiful design is only as good as the materials used to build it. For this project, we selected components known for their durability, style, and performance.
- Shower Walls: The star of the show is the 3” x 9” emerald green glass subway tile on the accent wall. On the surrounding walls, we used 12” x 24” matte white porcelain tiles, installed with minimal grout lines for a clean, monolithic look.
- Waterproofing: Behind the beautiful tile is a critical, unseen hero: a full Schluter-KERDI membrane waterproofing system. This goes beyond the Ontario Building Code minimums, creating a completely sealed, watertight envelope to protect the home from moisture and mould for decades.
- Shower Fixtures: We installed a Moen Genta single-handle shower system in a matte black finish. Its integrated pressure-balancing valve ensures consistent water temperature and pressure, providing a safe and comfortable shower experience.
- Shower Base & Glass: A low-profile white acrylic base provides a crisp, clean foundation that’s easy to maintain. It’s enclosed by a custom frameless 10mm glass door with matte black hinges and a sleek ladder-pull handle, maximizing light and sightlines.
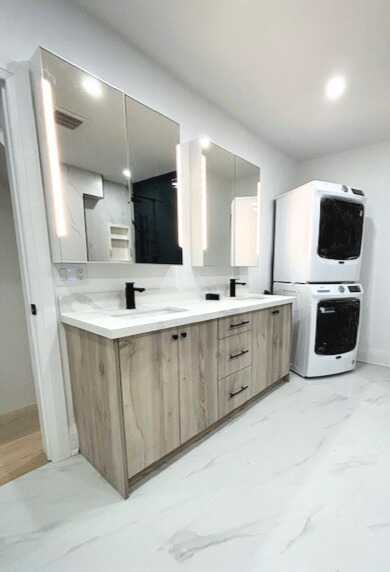
- Vanity & Countertop: A 36” floating vanity in a light oak finish was chosen to create a sense of spaciousness by revealing more floor area. It’s topped with a durable white quartz countertop featuring an undermount rectangular sink.
- Faucet: A single-hole deck-mounted faucet from Delta’s Trinsic collection in matte black complements the shower fixtures perfectly.
- Flooring: The floor is clad in 24” x 24” porcelain tile with a subtle light grey concrete finish. Its large format means fewer grout lines, contributing to the bathroom’s open and uncluttered feel.
- Toilet: A sleek, one-piece dual-flush toilet from Toto offers superior performance and water efficiency, with a skirted trapway that makes cleaning a breeze.
- Lighting & Electrical: Above the vanity, a modern three-light fixture with clean lines and a matte black finish provides ample, even lighting. All electrical work, including the installation of a new GFCI-protected outlet beside the sink, was completed to the strict standards of the Ontario Electrical Safety Code.
- Ventilation: We replaced the old, noisy fan with a new Panasonic WhisperCeiling fan, vented directly to the exterior. It’s incredibly quiet yet powerful, efficiently managing humidity to prevent mould and mildew growth.
The Process & Timeline: A Two-Week Transformation
A successful renovation is all about meticulous planning and execution. We were committed to completing this entire transformation within the promised two-week timeline, minimizing disruption for the homeowners.
Week 1: Demolition and Foundations
- Day 1-2: Prep and Demolition. Our first priority is always protection. We laid down floor protection from the front door to the bathroom and sealed the workspace with plastic sheeting to contain dust. With the area secured, our crew carefully dismantled the old bathroom, removing the vanity, toilet, tub, and all the old tile down to the studs.
- Day 3-4: Mechanical Rough-ins. With the room stripped bare, our licensed plumber and electrician got to work. The plumber adjusted the plumbing lines for the new floating vanity and centred the shower valve on the accent wall. The electrician ran new wiring for the relocated vanity light, the new GFCI outlet, and the upgraded exhaust fan.
- Day 5-7: Subfloor, Backer Board, and Waterproofing. After a thorough inspection and reinforcement of the subfloor, we installed new cement backer board on the shower walls and floor. This provides a stable, moisture-resistant substrate for the tile. The rest of the week was dedicated to the most critical step: waterproofing. Every seam, corner, and screw penetration was meticulously sealed with the Schluter-KERDI system, creating a failsafe barrier against water.
Week 2: Finishes and Final Assembly
- Day 8-10: Tiling. The art of the project began. Our master tiler started with the large-format floor tiles, ensuring perfect levels and spacing. Then, he moved to the shower, first installing the white porcelain side walls. Finally, he painstakingly set each piece of the green glass subway tile, using a premium white thin-set mortar to ensure the tile’s true colour shone through. After a 24-hour curing period, all tile was grouted with a high-performance, stain-resistant epoxy grout.
- Day 11: Painting and Vanity Installation. With the tiling complete, the space truly began to feel like a room again. The walls and ceiling received two coats of Benjamin Moore’s Aura Bath & Spa paint in “Chantilly Lace,” a mildew-resistant formula perfect for humid environments. Later that day, the floating vanity was securely mounted to the wall.
- Day 12: Fixture Installation. This is the day the bathroom gets its “jewelry.” The plumber returned to install the new toilet, connect the vanity sink and faucet, and install the matte black shower trim. The electrician installed the new vanity light, fan, and switches.
- Day 13: The Finishing Touches. The custom frameless glass shower door was installed, instantly making the space feel bigger and brighter. We then mounted the mirror, towel bars, and toilet paper holder, ensuring every element was perfectly level and secure.
- Day 14: Final Inspection and Handover. The final day was all about details. We performed a deep clean of the entire space, tested every component, and conducted a final walkthrough with the homeowners. Seeing their delight as they stepped into their brand-new bathroom was the perfect end to a busy and productive two weeks.
The Final Look: A Toronto Bathroom Reimagined
The completed bathroom is a study in balanced design. The emerald green glass subway tile accent shower wall is undeniably the hero, drawing the eye and infusing the room with colour and life. Light from the window and vanity fixture dances across its surface, creating a dynamic effect that changes throughout the day.
The sharp lines of the black fixtures provide a sophisticated, architectural framework, while the warm oak of the floating vanity prevents the space from feeling cold. The large-format floor and wall tiles create a calm, uncluttered backdrop that allows the key features to shine. The result is a room that feels significantly larger, brighter, and more luxurious than before—a perfect, personalized sanctuary in the heart of Toronto.
Design Takeaways: Lessons from Bathroom 330
- Embrace the Accent: You don’t need to use expensive or bold tile everywhere. Concentrating a special material on one accent wall creates maximum impact while being cost-effective.
- Consistency is Key: Using the same finish (in this case, matte black) for all your fixtures, from the showerhead to the cabinet pulls, creates a cohesive and intentionally designed look.
- Waterproofing is Not Optional: The most important part of your bathroom renovation is the part you can’t see. Investing in a premium waterproofing system is the best insurance you can buy for your home.
- Plan Your Lighting: Good lighting is transformative. A combination of a well-placed vanity light and a high-quality exhaust fan (which often includes a light) can make a small bathroom feel open and airy.
Maintenance Tips for Your New Bathroom
- Glass Tile: To keep the glass tile sparkling, use a squeegee after each shower to prevent water spots. For cleaning, use a pH-neutral cleaner designed for glass; avoid abrasive powders or scrubbers.
- Matte Black Fixtures: The key to maintaining a matte finish is gentle cleaning. Wipe fixtures with a soft, damp cloth and mild soap. Avoid harsh chemical cleaners or abrasive sponges, which can damage the finish.
- Grout: Our epoxy grout is highly stain-resistant, but it’s still good practice to clean it regularly. For the floor, an occasional steam clean can keep it looking brand new.
Frequently Asked Questions
How long does a typical 3-piece bathroom renovation take in Toronto?
While this project was completed in a streamlined 2 weeks, a typical bathroom renovation in Toronto can take anywhere from 2 to 4 weeks. The timeline depends on the project’s complexity, the scope of plumbing and electrical changes, lead times for custom materials like vanities or glass, and the city’s inspection schedule.
What kind of waterproofing is required for a shower wall in Ontario?
The Ontario Building Code has specific requirements for water resistance in showers. We exceed these standards by using a topical sheet membrane system like Schluter-KERDI. Unlike just relying on cement board, this system creates a continuous, seamless waterproof and vapour-tight layer directly behind the tile, offering the highest level of protection against leaks and mould.
Are matte black fixtures just a trend?
Matte black has proven to be more than a fleeting trend; it has established itself as a modern classic. Its versatility allows it to pair beautifully with a wide range of colours and materials, from rustic wood to polished marble. It offers a bold yet sophisticated alternative to traditional chrome and is a durable, stylish choice for any Toronto home renovation.
Inspired by this modern Toronto bathroom transformation? If you’re ready to stop dreaming and start planning, our team is here to help you create a space that’s uniquely yours. Reach out to us today to get your free, no-obligation quote and let’s build something beautiful together.