
Transforming a primary bathroom into a personal sanctuary is one of the most rewarding home renovation projects. For a recent client in Oakville, the goal was to create a bright, highly functional space that felt both modern and timeless. This project, completed in the summer of 2024, centered on designing and building a stunning custom makeup vanity with an LED mirror, turning a daily routine into a luxurious experience. This Oakville bathroom renovation showcases how thoughtful design and expert craftsmanship can elevate everyday life.
Project Quick Facts
- Project Type: Primary Bathroom Renovation
- Location: Oakville, Ontario (Greater Toronto Area)
- Key Features: Custom floating vanity with makeup station, integrated LED mirror, large-format porcelain tile, curbless shower with linear drain, matte black fixtures.
- Duration: 3 weeks
Design Vision: A Conversation with Our Lead Designer
We sat down with our lead designer, Alina, to discuss the inspiration and goals behind this beautiful Oakville bathroom transformation.
Q: What was the homeowner’s primary request for this project?
Alina: The client’s existing bathroom was functional but dated. It lacked adequate lighting and smart storage, especially for their morning routine. The core request was for a “get-ready oasis”—a space that was bright, organized, and felt like a high-end hotel spa. The concept of a dedicated, beautifully lit makeup vanity was the starting point that guided the entire design. They wanted to eliminate clutter and create a calm, streamlined environment to start and end their day.
Q: The custom vanity is the centerpiece. Can you tell us about the design process for that specific element?
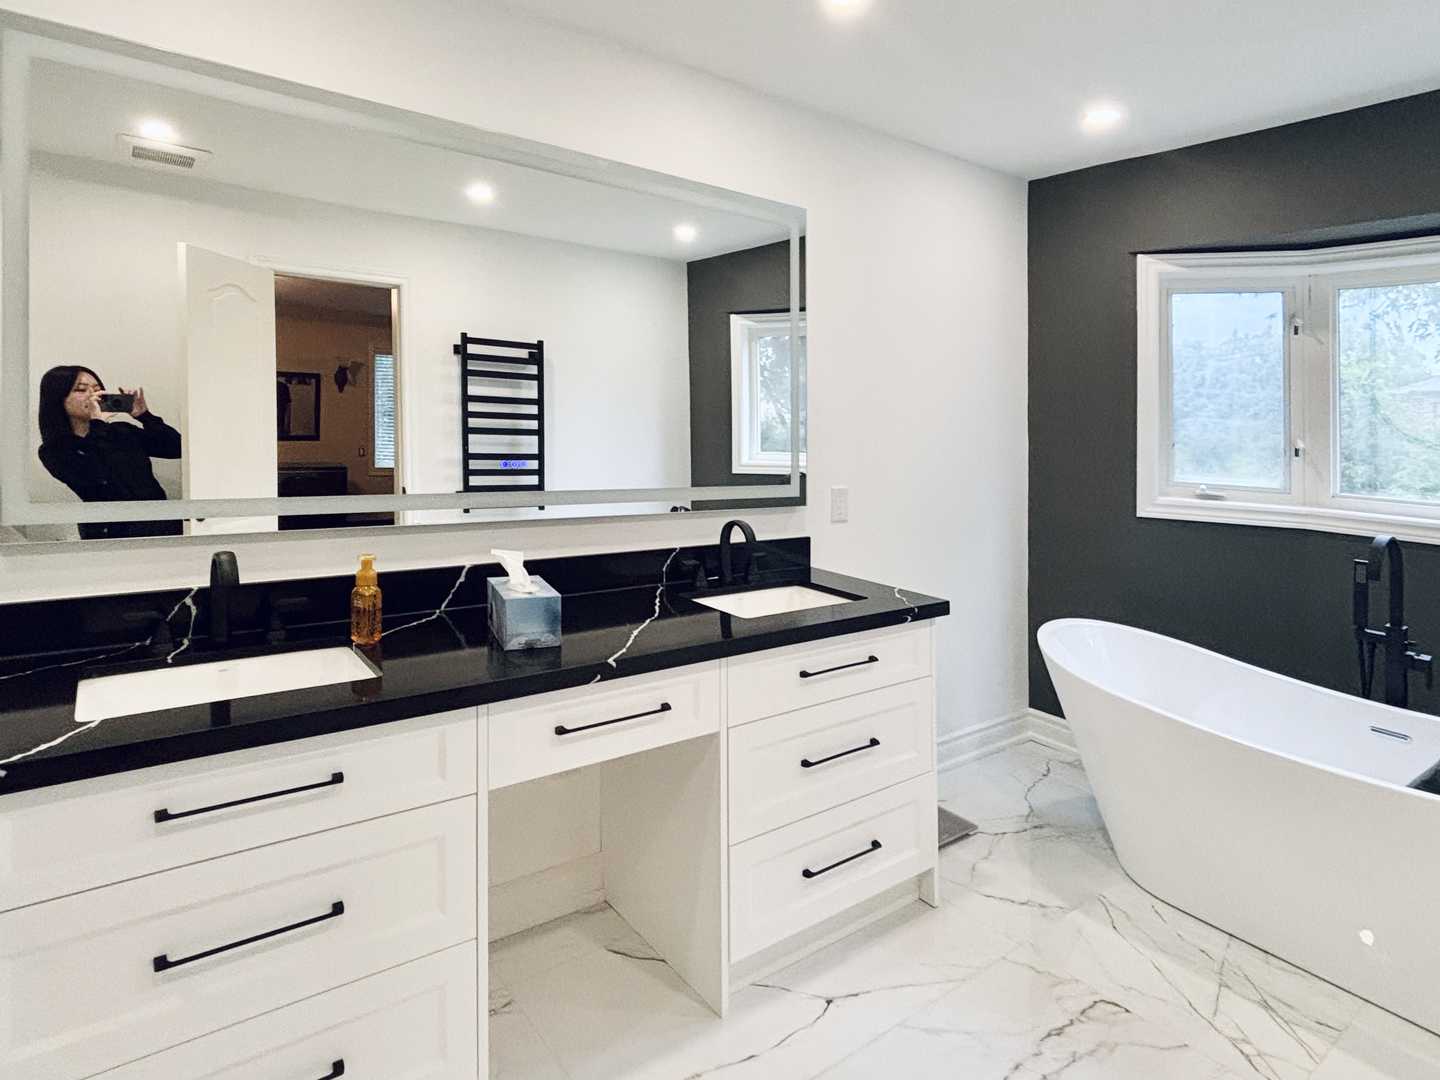
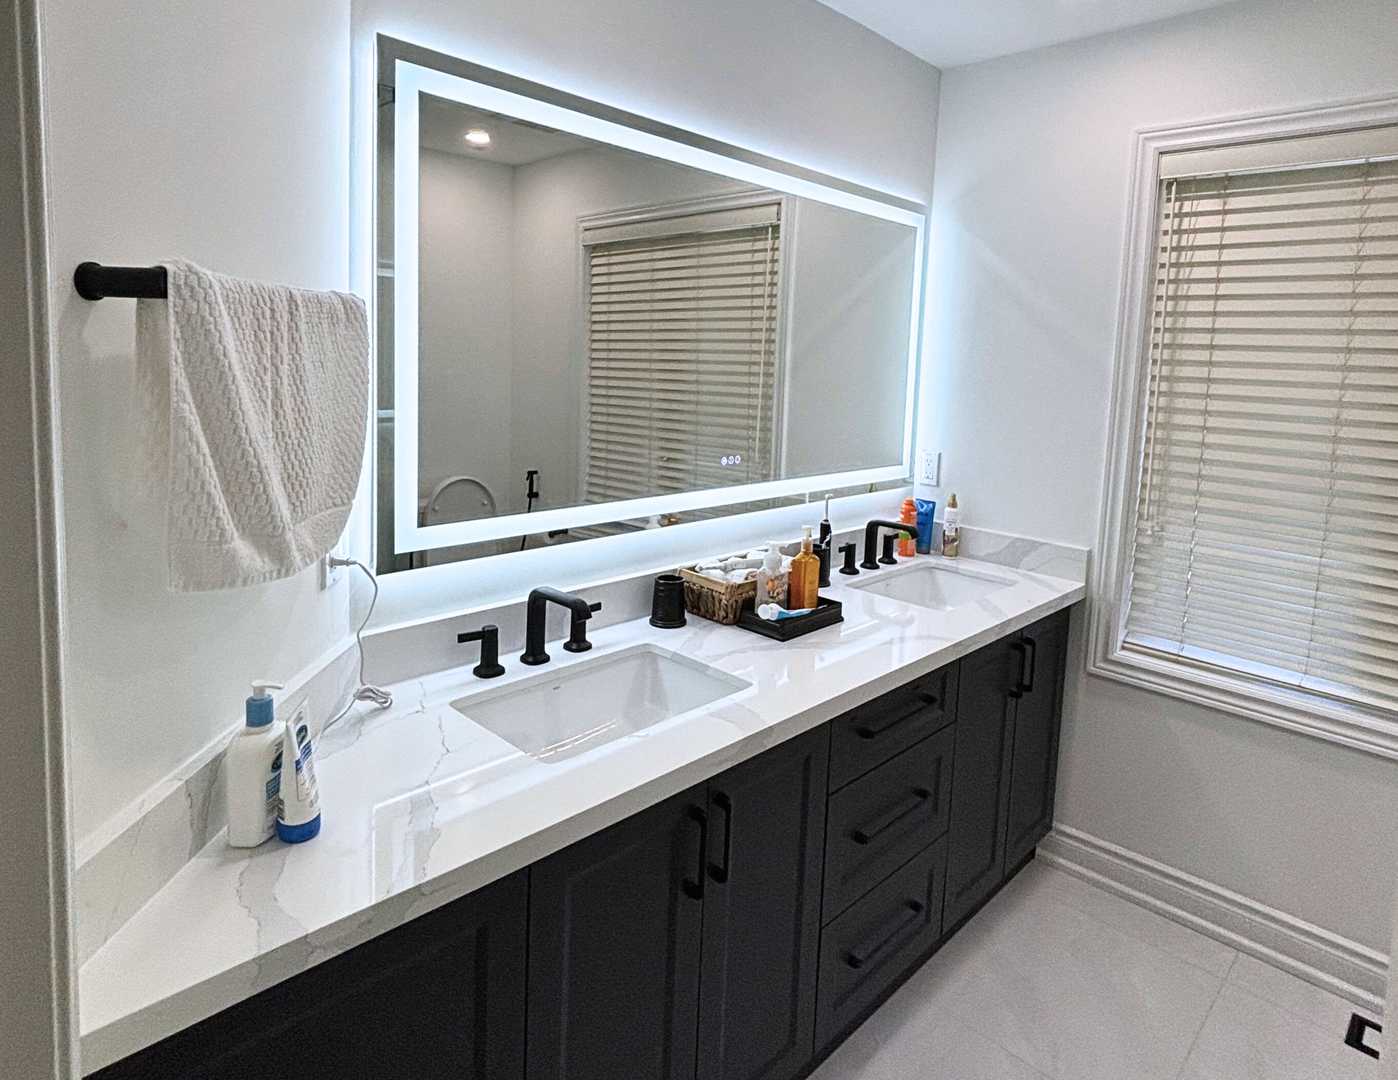
Alina: Absolutely. We didn’t want to just place a standard vanity in the space. The client needed a seated makeup area, but we didn’t want to sacrifice counter space or storage. The solution was an L-shaped floating vanity. The main section houses the sink and provides deep drawers for towels and larger items. The return, set at a lower height, creates the dedicated makeup station. We chose a light rift-cut white oak to add warmth and texture, contrasting beautifully with the sleek porcelain. The floating design makes the room feel larger and is much easier to clean.
Q: How did you approach the lighting, which was a key pain point for the client?
Alina: Lighting was everything here. In addition to four new LED pot lights on a dimmer for general ambient light, we focused on task lighting at the vanity. The oversized, integrated LED mirror was a game-changer. It provides perfectly even, shadow-free light, which is essential for makeup application. We selected a mirror with adjustable colour temperature, allowing the client to switch between warm, neutral, and cool white light to see how their makeup will look in different environments. This single feature solved the primary functional issue and added a major “wow” factor.
Materials & Specifications
Achieving a seamless, high-end look requires a meticulous selection of materials that are as durable as they are beautiful.
- Vanity: Custom-fabricated floating vanity in rift-cut white oak with a clear matte finish. Drawers are equipped with soft-close hardware.
- Countertop: 2cm Quartz in “Calacatta Gold” with a subtle, warm veining that complements the oak and gold-toned fixtures (though the main fixtures are black, this was a specific client choice for the countertop).
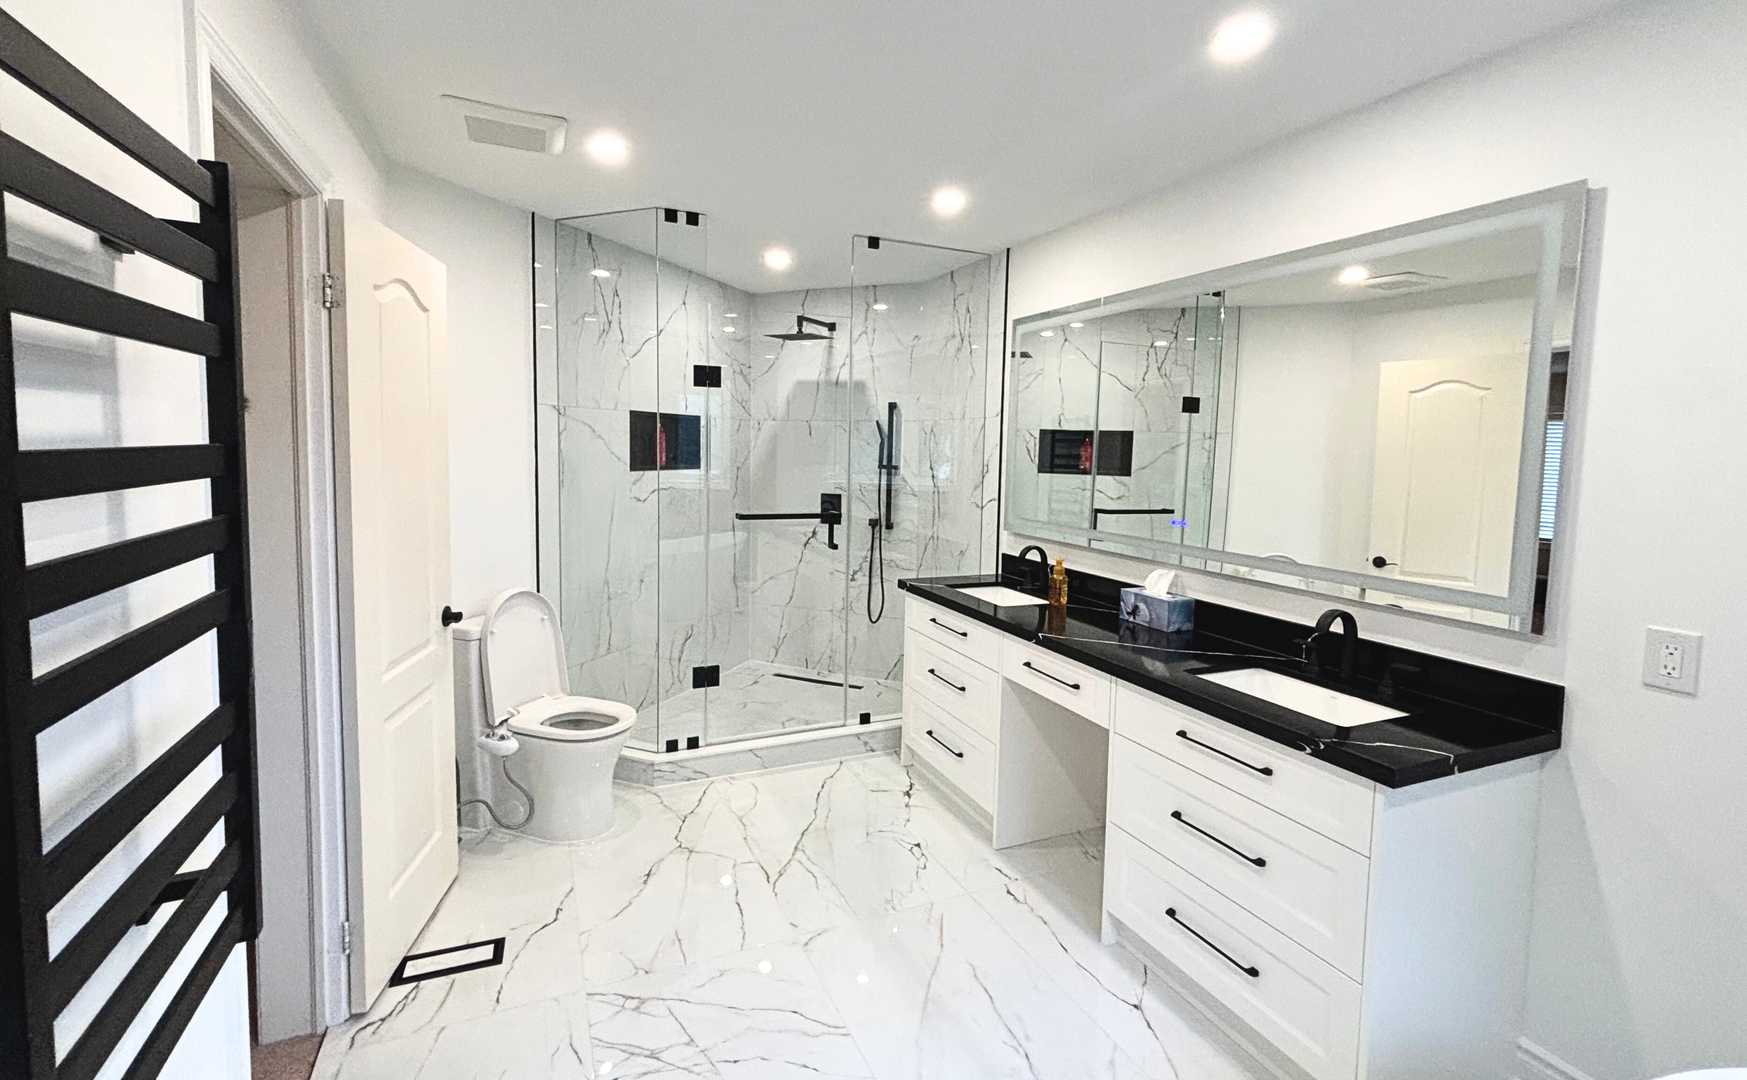
- Floor & Wall Tile: 24” x 48” large-format porcelain tile in a matte “Statuario” finish. Using the same tile on the floors and shower walls creates a monolithic, expansive feel.
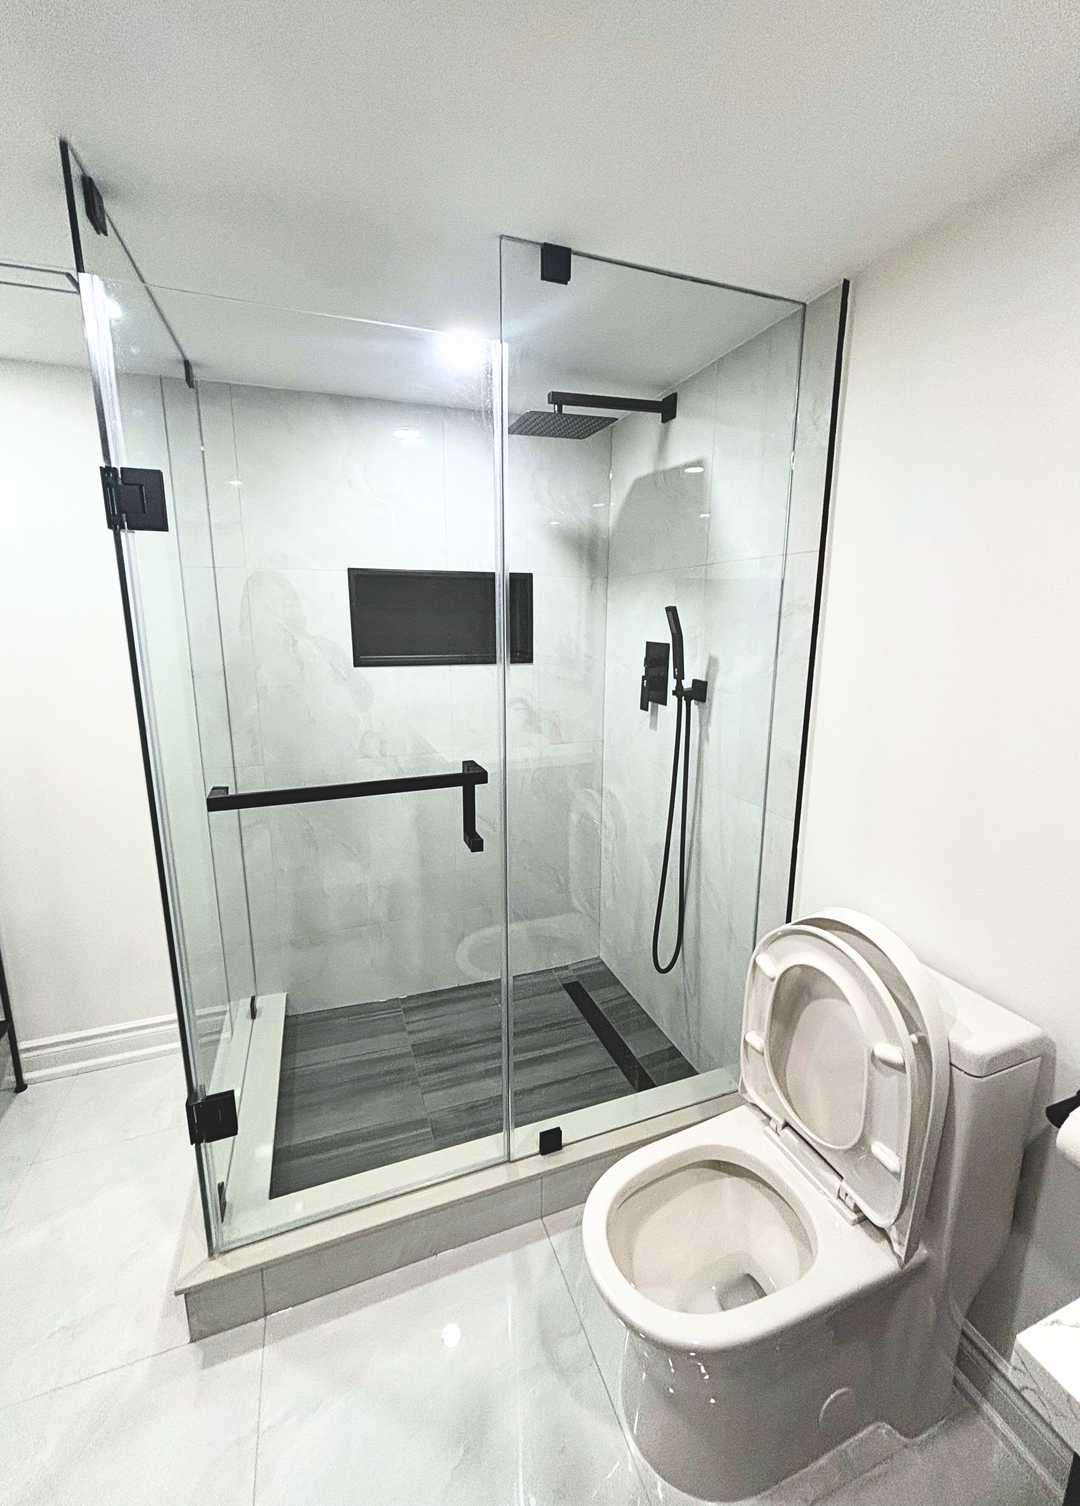
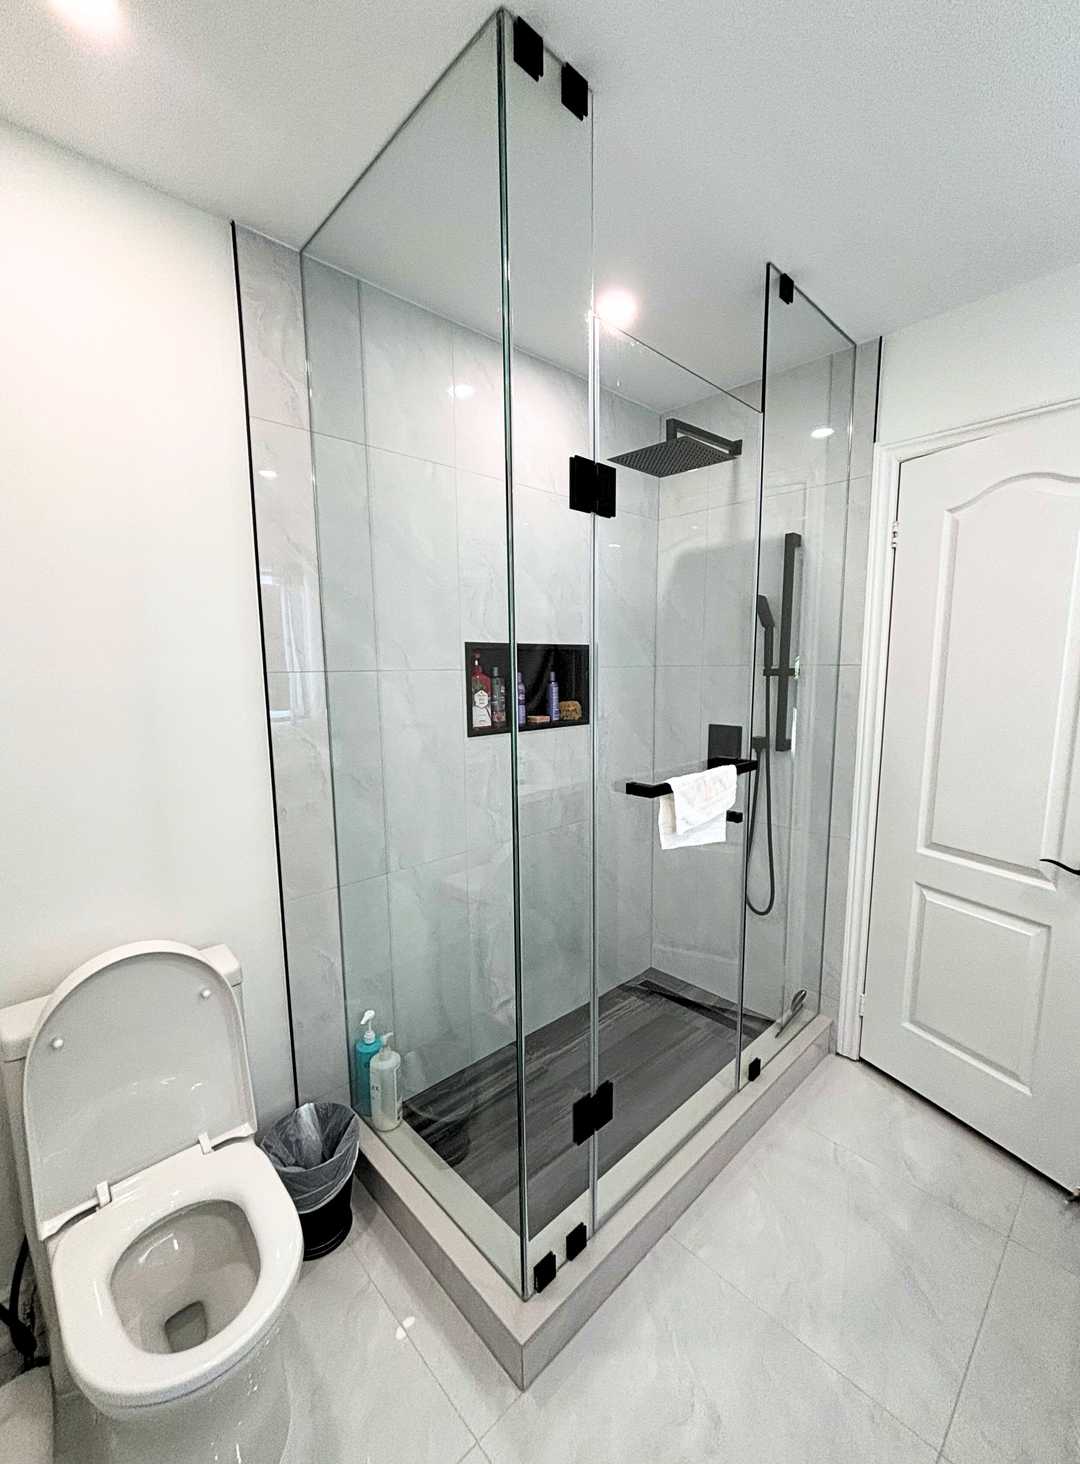
- Plumbing Fixtures: All faucets, showerheads, and accessories are from the Brizo “Litze” collection in a Matte Black finish. The curbless shower features a concealed linear drain for a minimalist aesthetic.
- Lighting: Integrated front-lit LED mirror with adjustable colour temperature and anti-fog technology. Complemented by 4” slim-profile LED pot lights.
- Waterproofing: The entire shower enclosure and the main bathroom floor were waterproofed using the Schluter-KERDI system. This industry-leading membrane and sealant system provides superior protection against water and vapour intrusion, exceeding the Ontario Building Code requirements and ensuring the longevity of the renovation.
- Ventilation: A new whisper-quiet Panasonic exhaust fan was installed and properly vented to the exterior to manage humidity effectively.
Process & Timeline
A successful renovation is built on a foundation of clear communication and meticulous scheduling. This Oakville bathroom was transformed from studs to stunning in just 3 weeks, a testament to our team’s efficient project management.
Week 1: Demolition and Foundation
The first week was dedicated to the groundwork. After protecting the adjacent areas of the home, our crew performed a full demolition, taking the space back to the studs. This allowed us to inspect the plumbing and framing. Our licensed plumber and electrician then completed all rough-ins for the new layout, including moving the drain for the sink, setting up the plumbing for the wall-mounted faucet, and running new wiring for the LED mirror and pot lights. All electrical work was planned to meet ESA (Electrical Safety Authority) standards for inspection in Ontario. The week concluded with the installation of new moisture-resistant drywall and the first crucial steps of the Schluter-KERDI waterproofing system in the shower.
Week 2: Bringing the Vision to Life
With the behind-the-scenes work complete, the visual transformation began. Our tiling specialists spent the first half of the week meticulously laying the large-format porcelain tiles. Achieving perfect, slim grout lines with tiles of this size requires immense precision. Once the tile and grout were set, the custom vanity was carefully installed and levelled. The space was then primed and painted in Benjamin Moore’s “Chantilly Lace,” a crisp white that enhances the natural light.
Week 3: Fixtures and Final Touches
The final week was all about the details that make a space shine. The quartz countertop was installed, followed by the plumbing fixtures—the vessel sink, wall-mounted faucet, and the shower trim kit. Our licensed electrician returned to install the LED mirror, pot lights, and switches, ensuring everything was connected safely and passed final inspection. The toilet was installed, along with all the accessories like the towel bar and robe hooks. The project concluded with a thorough professional cleaning, a final quality control walkthrough with the homeowner, and the official handover of their new spa-like retreat.
The Final Look
Stepping into the completed bathroom is a breath of fresh air. The large-format tiles create an unbroken, serene canvas, making the room feel significantly larger and brighter. The floating white oak vanity introduces natural warmth and texture, grounding the space without feeling heavy.
The custom makeup station is both a functional workhorse and a beautiful design feature. The large, illuminated mirror serves as a piece of art, reflecting the clean lines of the room and providing flawless task lighting. The matte black fixtures offer a bold, modern contrast against the light tile and warm wood, tying the entire design together with a touch of sophisticated drama. The curbless, glass-enclosed shower feels open and accessible, embodying the principles of universal design while looking incredibly sleek.
Design Takeaways
This project offers valuable insights for any homeowner in the Toronto area planning a bathroom renovation.
- Invest in Lighting: Don’t underestimate the power of a well-layered lighting plan. A combination of ambient (pot lights), task (vanity light), and even accent lighting can completely transform the feel and function of a bathroom. An integrated LED mirror is a fantastic two-in-one solution.
- Custom Solves Problems: Off-the-shelf solutions don’t always fit your space or your needs. A custom vanity allowed us to perfectly address the client’s desire for a makeup station without compromising storage or style. If you have a unique need, custom millwork is often the answer.
- Go Big with Tile: Large-format tiles are excellent for small to medium-sized bathrooms. Fewer grout lines create a more seamless, expansive look and also mean less cleaning.
- Prioritize Professional Trades: Especially in a bathroom, where water and electricity are in close proximity, using licensed and insured plumbers and electricians is non-negotiable. It ensures your renovation is safe, up to Ontario code, and built to last.
Thinking about how these ideas could apply to your own home? We can help you design a space that’s perfectly tailored to your needs. Start the conversation with a free quote.
Maintenance Tips
To keep this Oakville bathroom looking pristine for years to come:
- Tile & Grout: Clean porcelain with a pH-neutral cleaner. While epoxy grout is highly stain-resistant, regular cleaning prevents buildup.
- Quartz Countertop: Wipe up spills promptly. Use non-abrasive cleaners; simple soap and water is usually sufficient.
- Matte Black Fixtures: Clean with a soft cloth and mild soap. Avoid harsh chemicals or abrasive sponges, which can damage the finish.
- Wood Vanity: Dust with a soft, dry cloth. For cleaning, use a slightly damp cloth followed immediately by a dry one. Avoid letting water sit on the wood surface.
Frequently Asked Questions
What is the typical cost for a full bathroom renovation in Oakville?
The cost can vary significantly based on the size of the room, the quality of materials, and the complexity of the layout changes. A mid-range to high-end primary bathroom renovation like this one in Oakville or the greater Toronto area typically falls between $25,000 and $50,000+. The best way to get an accurate number for your specific project is to get a detailed estimate.
How important is waterproofing, and what does it involve?
It’s critically important—arguably the most crucial step in a bathroom renovation. Proper waterproofing prevents leaks, mould, and structural damage to your home. In Ontario, the Building Code sets minimum standards, but we prefer to exceed them using systems like Schluter-KERDI, which involves applying a waterproof membrane to walls and floors in wet areas before tile is installed. This creates a fully sealed, watertight enclosure.
Do I need permits for a bathroom renovation in Toronto or the GTA?
It depends on the scope. If you are simply replacing fixtures in their existing locations (a “rip and replace”), you typically don’t need a permit. However, if you are changing the layout, moving plumbing drains, or altering framing, a building permit is usually required. Any new or altered electrical wiring always requires the work to be done by a licensed electrician who will file a notification with the ESA. We handle the entire permit process for our clients to ensure everything is done correctly.
Ready to create the bathroom you’ve been dreaming of? Our team of expert designers and craftspeople is here to guide you every step of the way. Contact us today for a complimentary, no-obligation quote and let’s bring your vision to life.