From Cramped to Connected: A Full Kitchen Reno in Brampton
For many families in the Greater Toronto Area, the kitchen is more than just a place to cook; it’s the heart of the home. When a space designed decades ago no longer serves the needs of a modern family, it can create daily friction. This was precisely the case for a recent full kitchen reno we completed in a lovely Brampton home. The original layout was closed-off and inefficient, making cooking a chore and entertaining a challenge. Our mission was to transform it into a bright, functional, and welcoming hub for family life.
This project, completed in late 2022, is a perfect example of how thoughtful design and expert craftsmanship can completely redefine a home’s central space. By rethinking the layout and selecting durable, beautiful materials, we turned a frustrating kitchen into a dream kitchen.
Project Quick Facts
- Category: Kitchen
- Scope: Full Kitchen Renovation, Layout Reconfiguration
- Location: Brampton, Ontario
- Key Features: Custom Cabinetry, Quartz Countertops, Large Central Island, Modern Lighting Plan
- Duration: 4 weeks
The Design Vision: Breaking Down Barriers
The “before” state of this Brampton kitchen was a story we see often in homes built in the 80s and 90s. It featured a classic U-shape with a bulky peninsula that jutted into the breakfast nook, creating a significant bottleneck. This layout not only made the kitchen feel small and dark but also disconnected it from the adjacent family room. The homeowners dreamed of an open-concept space where they could cook, entertain, and connect with their family simultaneously.
Our design vision centered on three key principles:
- Flow and Openness: The primary goal was to remove the restrictive peninsula. This single change would open the sightlines directly into the family room, creating a seamless transition between the two spaces and allowing natural light to flood the kitchen.
- Functionality and Ergonomics: We planned to replace the peninsula with a large, multi-functional island. This island would serve as the new heart of the kitchen, providing ample prep space, casual seating for four, and integrated storage. We also redesigned the “work triangle”—the relationship between the sink, stove, and refrigerator—to be more intuitive and efficient for daily use.
- Modern, Timeless Aesthetics: The homeowners wanted a look that was clean and contemporary but would not feel dated in a few years. We proposed a two-tone cabinetry scheme with classic shaker-style doors, durable quartz countertops with subtle veining, and a sophisticated backsplash to add texture and personality.
By focusing on this vision, we created a detailed plan that addressed every one of the original kitchen’s shortcomings, promising a transformation that was as practical as it was beautiful.
Materials & Specifications
Choosing the right materials is crucial for the longevity and enjoyment of any full kitchen reno. For this project, we balanced aesthetics, durability, and value to create a high-performance space perfect for a busy family.
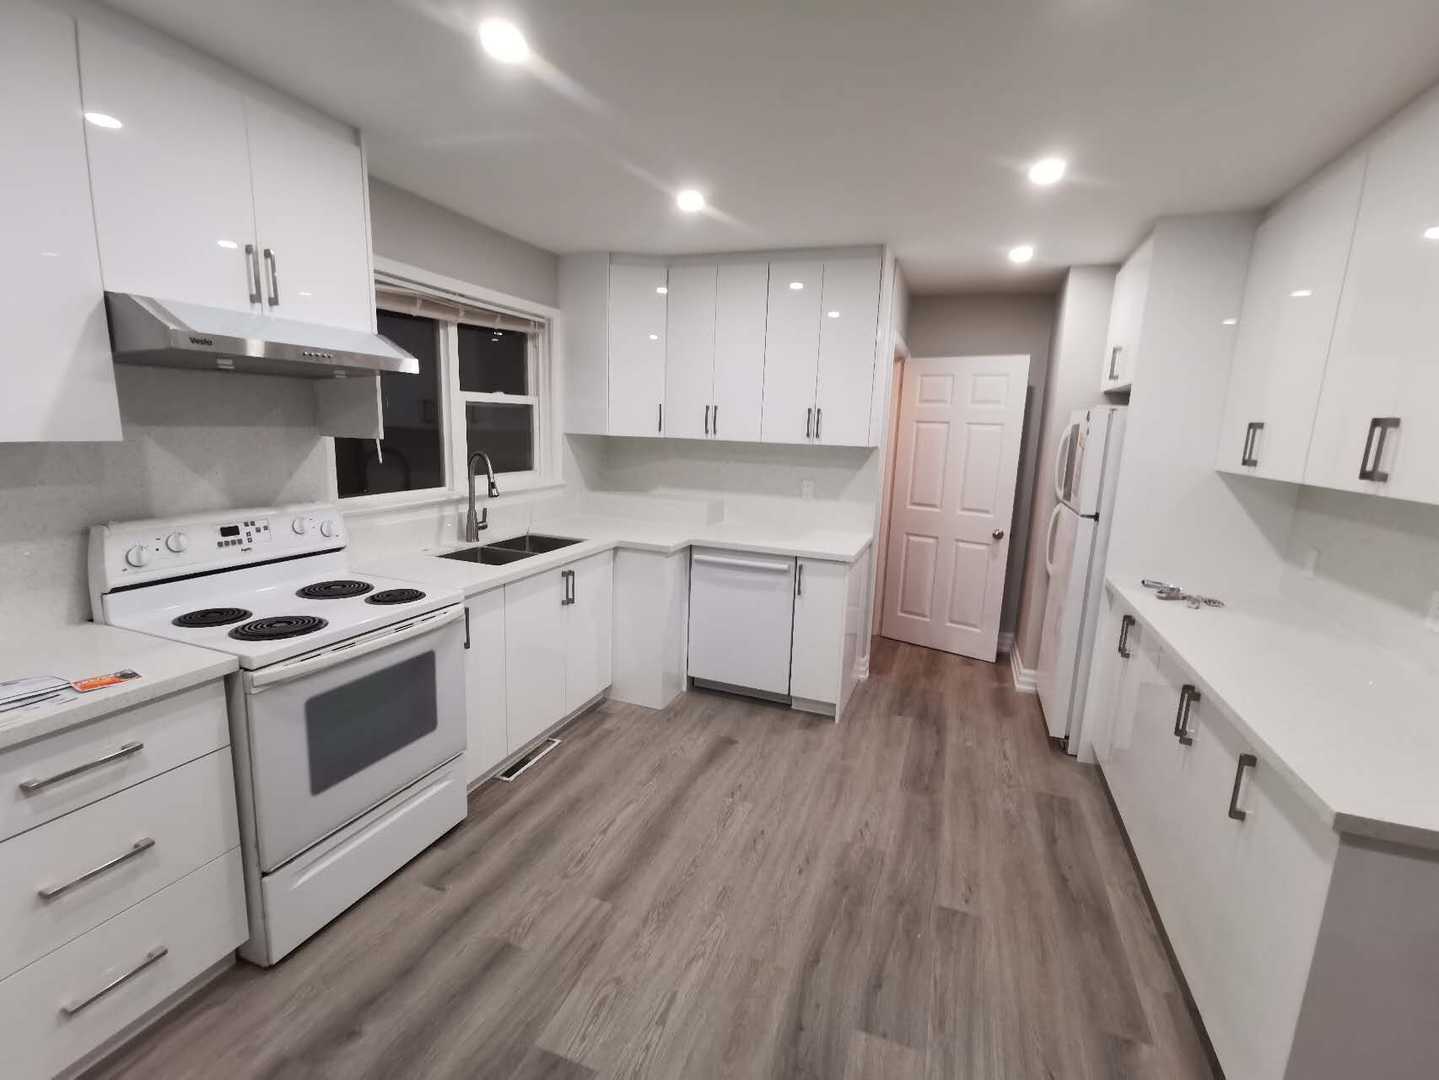
- Cabinetry: We opted for Canadian-made, custom-sized cabinets with solid maple shaker doors. The perimeter cabinets were finished in a timeless Chantilly Lace white, which enhances the sense of space and light. For the island, we chose a deep Hale Navy to create a striking focal point and anchor the room. All cabinet boxes were constructed from furniture-grade plywood for superior strength and moisture resistance compared to standard particleboard.
- Countertops & Backsplash: Calacatta Gold quartz was the clear winner for the countertops. This engineered stone provides the luxurious look of marble with its warm, flowing veins, but offers exceptional durability, being non-porous and resistant to stains and scratches. For the backsplash, we installed a glazed porcelain tile in a classic 3x6 subway format, laid in a herringbone pattern behind the range to create a subtle but elegant feature.
- Flooring: To unify the kitchen with the adjoining family room, we installed Luxury Vinyl Plank (LVP) flooring throughout. We chose a wide-plank style in a warm, natural oak finish. LVP is an ideal choice for kitchens as it’s 100% waterproof, comfortable underfoot, and incredibly resilient against scratches and dents.
- Plumbing & Fixtures: A large, single-bowl undermount sink in stainless steel was paired with a high-arc, pull-down faucet in a matte black finish. This finish was carried through to the cabinet hardware—sleek, modern pulls and knobs—creating a cohesive and contemporary look.
- Lighting: A multi-layered lighting plan was essential. We installed ten 4-inch LED pot lights on a dimmer switch for general ambient lighting. Two large, elegant glass pendant lights were hung above the island to provide task lighting and visual appeal. Finally, under-cabinet LED strip lighting was added to illuminate the countertops, eliminating shadows and enhancing functionality.
The Process & Timeline
While every project’s timeline is unique, our process follows a structured sequence of phases to ensure quality, efficiency, and clear communication from start to finish.
Phase 1: Demolition and Preparation The first step was the careful demolition of the old kitchen. Our crew systematically removed the old cabinets, countertops, flooring, and the problematic peninsula. We ensured all debris was properly disposed of and the space was left as a clean slate for the transformation to begin.
Phase 2: Mechanical Rough-Ins This is a critical stage where the groundwork for the new layout is laid. Our licensed and insured electricians rerouted wiring to accommodate the new island, which required its own dedicated circuits for outlets, complying with the Ontario Electrical Safety Code. They also wired for the new pot lights, pendants, and under-cabinet lighting. Simultaneously, our licensed plumbers adjusted the water supply and drain lines for the sink and dishwasher, which were relocated in the new design.
Phase 3: Drywall, Mudding, and Priming Once all the in-wall electrical and plumbing work passed inspection, the walls were closed up with new drywall. Our skilled tapers applied multiple coats of compound and sanded everything to a perfect, level-5 finish, ensuring a flawless canvas for the new paint.
Phase 4: Painting and Flooring Installation A fresh coat of paint in a soft, neutral grey was applied to the walls. With the painting complete, the new LVP flooring was installed, flowing seamlessly from the kitchen into the family room, visually uniting the two spaces.
Phase 5: Cabinet and Countertop Installation This is the phase where the vision truly starts to come to life. Our team meticulously installed the perimeter and island cabinets, ensuring they were perfectly level and secure. Following the cabinet installation, a specialized team came in to create a precise digital template of the countertops. The Calacatta Gold quartz was then fabricated off-site and installed about a week later, fitting perfectly over the new cabinetry.
Phase 6: Finishing Touches With the main components in place, we focused on the details. The backsplash tile was installed, the sink and faucet were connected, and the new stainless steel appliances were put into place. Our electricians returned to install all the light fixtures, switches, and outlets, providing the final ESA (Electrical Safety Authority) certificate upon completion. Finally, the cabinet hardware was installed, marking the completion of the construction phase.
The Final Look
Stepping into the finished kitchen is like entering a completely different home. Where there was once a dark, cramped corridor, there is now a bright, expansive, and inviting space. The removal of the peninsula was transformative, creating an effortless flow that encourages family interaction.
The large navy island is the undeniable star of the show. It’s a hub of activity, serving as a breakfast bar for quick morning meals, a homework station in the afternoon, and a buffet for weekend gatherings. The brilliant white perimeter cabinets and light quartz countertops reflect the light from the new pot lights and large window, making the entire room feel airy and spacious.
The subtle details are what elevate the design. The warm veining in the quartz, the sophisticated matte black hardware, and the texture of the herringbone backsplash all work in harmony to create a space that feels both luxurious and welcoming. The new layout is not just more beautiful; it’s smarter. Every drawer, cabinet, and appliance is placed for maximum efficiency, making cooking and cleaning up a genuine pleasure.
Design Takeaways
This Brampton kitchen renovation offers several key takeaways for any homeowner considering a similar project:
- Prioritize Layout: Before you pick a single colour or material, focus on the floor plan. A functional layout that suits your lifestyle is the single most important investment you can make in your kitchen.
- An Island Can Do It All: If you have the space, a well-designed island can solve multiple problems at once. It can replace lost storage from a peninsula, add seating, and create a natural social hub.
- Lighting is Not an Afterthought: A layered lighting plan with ambient, task, and accent lighting is essential. Dimmers are a must-have for controlling the mood of the room from bright and functional to soft and relaxed.
- Invest in Professional Trades: For electrical and plumbing, always use licensed and insured professionals. This is not only for safety and code compliance (like ESA certification in Ontario) but also for the quality and longevity of the work.
Maintenance Tips for Your New Kitchen
To keep this beautiful kitchen looking its best for years to come, we provided the homeowners with a few simple care instructions:
- Quartz Countertops: Clean daily with a soft cloth, water, and a mild soap. Avoid abrasive cleaners or scouring pads. While highly stain-resistant, wipe up spills like wine or coffee promptly.
- Painted Cabinets: Dust regularly with a soft, dry cloth. For cleaning, use a damp cloth with a mild, non-abrasive detergent, and dry immediately. Avoid harsh chemicals that can damage the finish.
- LVP Flooring: Sweep or vacuum regularly to remove grit. Mop as needed with a pH-neutral floor cleaner. Never use a steam mop, as the high heat can damage the vinyl.
Frequently Asked Questions
1. Do I need a permit for a full kitchen reno in Brampton? It depends on the scope. If you are simply replacing cabinets and countertops in the same location, you typically don’t need a permit. However, for a project like this that involves moving walls (even non-load-bearing ones), altering plumbing, or making significant electrical changes, a building permit from the City of Brampton is usually required. We handle the entire permit application process for our clients.
2. How long does a kitchen renovation disrupt our home life? While the total project timeline varies, the most disruptive phase is typically the first few weeks during demolition and rough-ins. We work with homeowners to set up a temporary kitchen station in another area of the house (like the basement or dining room) with a microwave, coffee maker, and small fridge to minimize the inconvenience.
3. Why did you choose quartz over a natural stone like granite for this project? For this busy family, quartz was the superior choice. While granite is beautiful and durable, it’s a porous natural stone that requires regular sealing to prevent staining. Engineered quartz is non-porous, meaning it never needs to be sealed and is exceptionally resistant to stains from everyday kitchen use, making it a lower-maintenance and highly practical option.
Thinking about transforming your own kitchen? A well-planned renovation can completely change how you experience your home. If you’re ready to explore the possibilities for your space, we’d love to help. Contact us today for a free, no-obligation quote.