


A Spa-Like Retreat: Transforming a Woodbridge Bathroom with Custom Details
Our primary bathroom in Woodbridge had good bones, but it felt stuck in another decade. The layout was inefficient, the finishes were tired, and it lacked the sense of calm and luxury we craved at the start and end of a long day. We envisioned a complete transformation—a modern, spa-like sanctuary. Our dream list included sleek black fixtures, a spacious walk-in shower, and thoughtful details like a customisable shower niche and a comfortable built-in bench. We wanted a space that wasn’t just functional, but truly restorative.
Quick Facts
- Location: Woodbridge, ON
- Project Type: Primary Bathroom Renovation
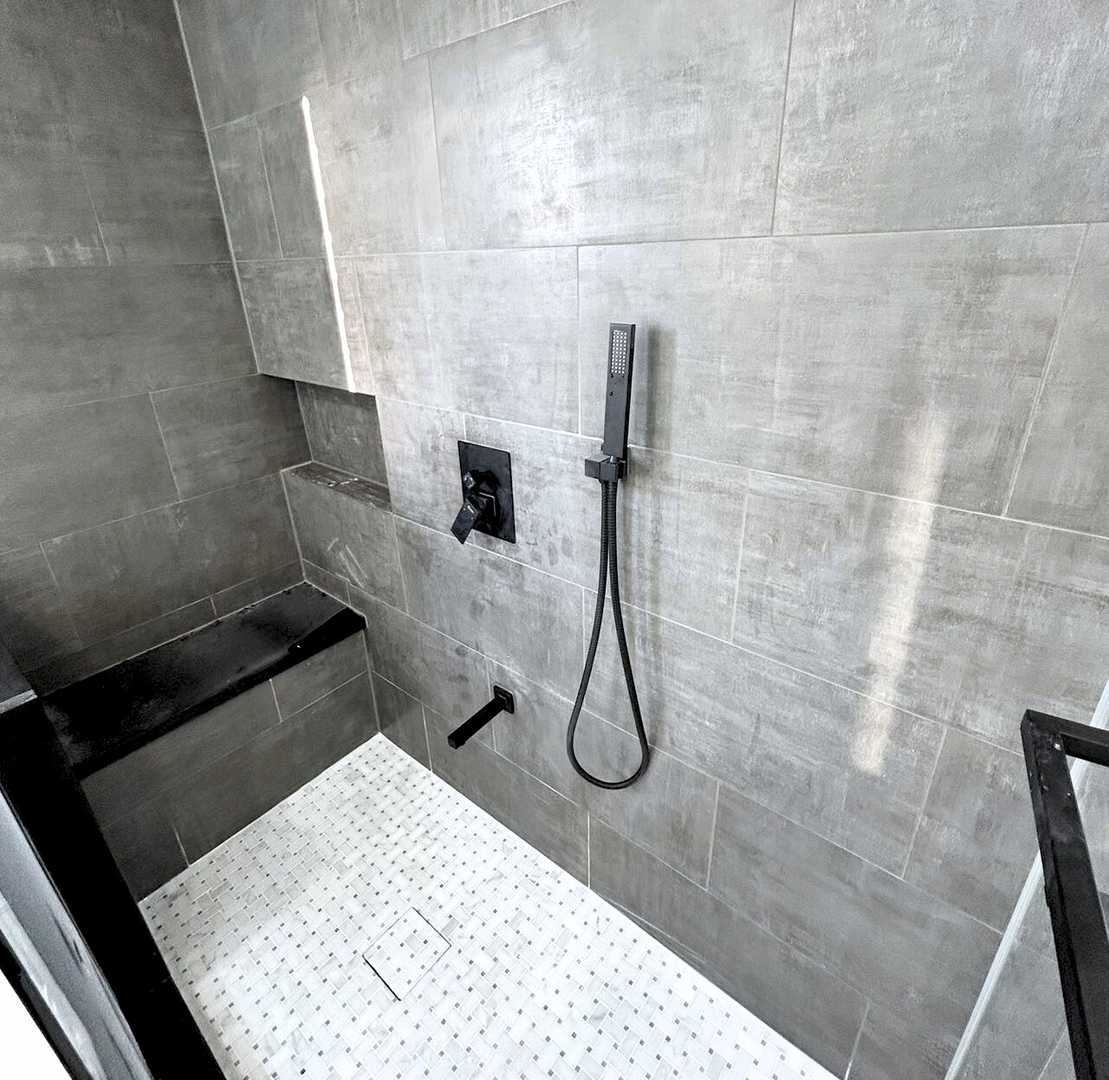
- Key Features: Walk-in shower with custom niche and built-in bench, large-format porcelain tile, floating vanity, matte black fixtures.
- Duration: 2 weeks
The Design Vision: Modern Serenity Meets Everyday Luxury
The core goal was to create a bright, open, and serene environment. The old bathroom, with its bulky tub-shower combo and dated vanity, felt cramped and dark. Our design vision was built on a foundation of clean lines, contrasting textures, and hyper-functional elements that felt seamlessly integrated.
We wanted to move away from the cluttered look of wire shower caddies and bottles on the floor. This led to the two non-negotiable features on our list: a large, custom-built shower niche and an integrated bench. The niche needed to be wide enough to hold all our family’s products without looking crowded, while the bench would add a true spa-like element of comfort and accessibility.
The colour palette was intentionally simple and sophisticated. We chose large-format, marble-look porcelain tiles for the walls and floor to minimize grout lines and create a sense of expansive calm. To provide a bold, contemporary contrast, we decided on matte black for all the fixtures—from the rain shower head and faucet to the cabinet pulls and towel bars. This deliberate juxtaposition of light and dark became the defining characteristic of the new design.
Finally, we wanted the vanity to feel light and airy, so we opted for a floating design. This not only creates the illusion of more floor space but also makes cleaning underneath a breeze. Paired with a durable quartz countertop and modern vessel sink, the vanity would be a functional and beautiful centerpiece.
Materials & Specifications
Choosing the right materials was crucial for achieving the desired look while ensuring longevity and compliance with Ontario’s building standards.
- Tiling: We selected 24” x 48” large-format porcelain tiles with a subtle Calacatta marble veining and a matte finish. Using the same tile for the shower walls and the main floor created a cohesive, monolithic look that makes the room feel larger. For the shower floor, we used a matching 2” x 2” mosaic tile to ensure a safe, non-slip surface.
- Waterproofing: Behind the beautiful tile is a critical, unseen hero: a comprehensive waterproofing system. We used a modern membrane system on all shower walls and the floor, extending beyond the shower area as required. This multi-layer approach is essential for preventing leaks and mould growth, providing peace of mind and meeting Ontario Building Code requirements.
- Fixtures: All fixtures are finished in a durable, fingerprint-resistant matte black. This included a wall-mounted rain shower head with a separate handheld wand, a single-handle vanity faucet, and all matching accessories like the toilet paper holder and towel hooks.
- Vanity & Countertop: A custom-built, wall-mounted floating vanity with flat-panel doors provides ample storage. It’s topped with a pure white quartz countertop, known for its durability and non-porous, easy-to-clean surface.
- Shower Enclosure: To maintain the open feel, we installed a frameless 10mm tempered glass enclosure with minimal black hardware. The door features a smooth, heavy-duty hinge system.
- Lighting & Electrical: The lighting plan was layered for both function and ambiance. We installed four dimmable LED pot lights for general illumination and two vertical sconces flanking the mirror for shadow-free task lighting at the vanity. Critically, all electrical outlets near the sink were upgraded to GFCI (Ground Fault Circuit Interrupter) receptacles, a mandatory safety feature under the Ontario Electrical Safety Code. We also installed a new, high-CFM exhaust fan with a humidity sensor to manage moisture effectively.
The Process & Timeline: A Meticulous Two-Week Transformation
Seeing a full bathroom demolition and rebuild happen in just two weeks was incredible. It was a testament to meticulous planning and coordination.
Week 1: Demolition, Rough-ins, and Preparation
The first few days were a flurry of controlled chaos. The team started by carefully demolishing the entire bathroom down to the studs and subfloor. This revealed the plumbing and electrical, allowing the licensed trades to step in.
With the space opened up, the plumber re-routed the water lines for the new shower head and handheld wand configuration. Simultaneously, the electrician ran new wiring for the pot lights, sconces, and the relocated GFCI outlet.
The most critical phase of the first week was the prep work. The carpenters framed the new structures for the recessed shower niche and the full-width built-in bench. Once framing was complete, the entire shower area was prepped for waterproofing. The team applied the membrane system, meticulously sealing every corner, seam, and screw head to create a completely watertight vessel. This stage is something you never see in the finished product, but it’s arguably the most important for the longevity of a bathroom in our Ontario climate.
Week 2: Finishes, Fixtures, and Final Touches
The second week was when the design vision truly began to materialize. The tile setters arrived and began their artistry, starting with the shower walls. Laying the large-format tiles required precision and expertise to ensure perfect alignment and minimal grout lines. The custom niche and bench were tiled with the same care, becoming seamless parts of the overall design.
Once the tiling and grouting were complete, the room was ready for the final installations. The floating vanity was securely mounted to the wall, followed by the quartz countertop and vessel sink. The plumber returned to install the matte black faucet, connect the drain, and set the new high-efficiency toilet.
Next came the shower fixtures and the beautiful frameless glass enclosure. The final electrical trim-out involved installing the new light fixtures, switches, and outlet covers. The last steps included a final coat of paint on the ceiling and walls, careful application of silicone sealant around the vanity and shower glass, and a thorough professional cleaning. On the final day, we did a walkthrough with the project manager, and the space was officially ours to enjoy.
The Final Look: A Dream Realized
Walking into the finished bathroom for the first time was breathtaking. It was even better than we had imagined. The space feels twice as large, filled with light, and exudes a sense of profound calm. The large-format tiles create a seamless, elegant backdrop, while the matte black fixtures provide a striking, modern contrast that feels both bold and sophisticated.
The custom shower is the undeniable star. The expansive niche holds everything we need, eliminating clutter entirely. The built-in bench is more than just a design feature; it’s a functional luxury we use every single day. It has completely changed our shower experience, turning a daily routine into a moment of relaxation. The frameless glass is almost invisible, preserving the open sightlines and making the entire room feel like one cohesive space. It’s a perfect blend of high-end design and practical, everyday usability.
Design Takeaways
This renovation taught us a few valuable lessons that we hope can help other homeowners in Ontario.
- Embrace High Contrast: Don’t be afraid to mix light and dark elements. The success of our design lies in the tension between the bright, marble-look tiles and the bold, matte black fixtures. This creates visual interest and a sophisticated, contemporary feel.
- Function-First Customization: Think about how you actually use your space. For us, the custom niche and bench weren’t afterthoughts; they were central to solving our storage and comfort problems. Investing in built-in solutions that cater to your specific needs is always worth it.
- Plan Your Lighting: A single overhead light is rarely enough. Our layered approach with ambient pot lights and targeted task lighting makes the bathroom more functional for everything from getting ready in the morning to a relaxing evening soak. Dimmers are a small addition that make a huge difference in setting the mood.
Maintenance Tips for Your New Bathroom
To keep our new retreat looking pristine, the team left us with some simple but effective maintenance advice:
- Matte Black Fixtures: Clean with a soft microfiber cloth and a gentle, pH-neutral cleaner or just warm water. Avoid abrasive sponges, harsh chemicals, or wax-based cleaners, which can damage the finish.
- Tile & Grout: Use a squeegee on the shower walls and glass after each use to prevent water spots and soap scum buildup. For weekly cleaning, a pH-neutral tile cleaner is best.
- Glass Enclosure: The daily squeegee is your best friend. For a deeper clean, use a spray bottle with a solution of white vinegar and water, then wipe clean with a microfiber cloth.
Frequently Asked Questions
How long does a bathroom renovation typically take in the Woodbridge area?
While every project is different, a standard 5x8 bathroom renovation like this one can often be completed in 2-3 weeks with proper planning and an experienced team. Our project was completed in a highly efficient 2 weeks because the design was finalized, and all materials were ordered and on-site before demolition began, minimizing delays.
What’s involved in creating a custom shower niche and bench?
Creating these features properly involves more than just tiling. It starts with precise framing to create the structure. Most importantly, it requires meticulous application of a waterproofing system, like a liquid membrane or sheet membrane, across all surfaces inside the niche and over the bench. This is a critical step to meet Ontario Building Code standards and prevent future water damage.
Are matte black fixtures a durable choice for a busy family bathroom?
Absolutely. Modern PVD (Physical Vapour Deposition) and powder-coated finishes on high-quality matte black fixtures are extremely durable and resistant to scratches and tarnishing. The key is proper care—avoiding abrasive cleaners and using soft cloths will keep them looking new for years.
Do I need a permit for a bathroom renovation in Vaughan?
It depends on the scope of work. If you are simply replacing fixtures in their existing locations (like-for-like), you often don’t need a permit. However, because our project involved moving plumbing supply lines and drains and altering electrical circuits, permits were required. A professional renovation company will handle the entire permit application process with the City of Vaughan to ensure everything is built to code and passes inspection.
This transformation has completely changed how we feel about our home. It’s more than just a new bathroom; it’s a dedicated space for wellness and peace. If our Woodbridge story has inspired you to reimagine your own space, we encourage you to take the next step.
Ready to start planning your dream bathroom? Contact us today for a free, no-obligation quote.